| Operations | << | >> |
|---|
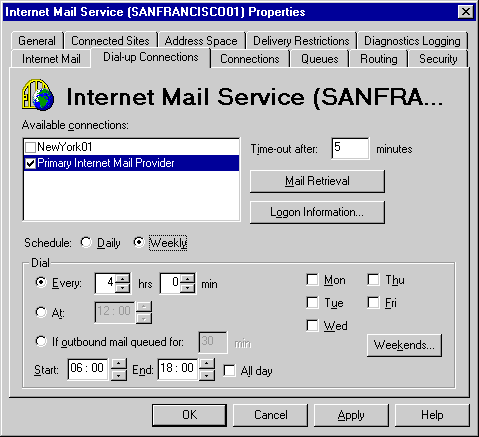
Use the Dial-up Connections property page to set connection and schedule information for using the Internet Mail Service and Remote Access Service (RAS) to connect to another site or to an Internet provider. Dial-up connections can be used when you do not want to have a permanent Internet Mail Service connection but would like to connect to an Internet service provider or a remote site at specified intervals.

Use the Dial-up Connections property page to view and modify connections specified in the RAS phone book. You can specify commands used to retrieve mail, provide logon information, and schedule when connections will occur. The connection must be activated to modify its settings. To activate a connection, select the check box to the left of the connection name.
You can add RAS entries using the RAS phone book. For information about how to add RAS entries, see your Windows NT Server documentation.
Note If you have multiple dial-up connections defined on the server and have selected the check boxes next to them in the Dial-up Connections property page, the Internet Mail Service dials each connection, even though only the connections selected in the Connections property page are used to transfer mail.
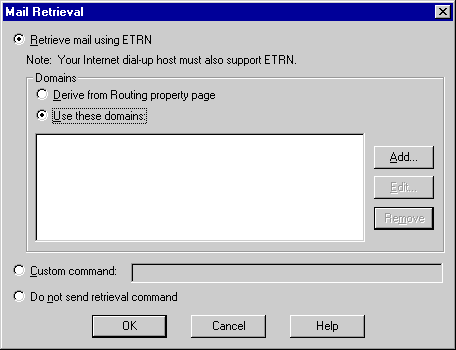
Your Internet service provider may require a command that identifies you to the provider and gives notification that you are ready to receive messages. You can use ETRN, if your host supports it, or you can specify a command, such as ping, to run on the local computer when the connection is established. ETRN is an SMTP extension that causes the remote host to send mail to a specified domain.
Use the Dial-up Connections property page to specify which command will be used to retrieve mail.

| Option | Description |
|---|---|
| Retrieve mail using ETRN | Specify whether you will use the domains specified on the Routing property page or create a new list of domains. |
| Derive from Routing property page | An @ sign is appended to the ETRN command for all domains listed on the Routing property page. This enables mail to be collected for all subdomains. This is the default. |
| Use these domains | Choose Add, Edit, and Remove to create, modify, and delete domain names. Precede domain names with an @ symbol to collect mail for all subdomains. |
| Custom Command | Choose to enter a custom command or executable file, such as ping. This is run on the local computer when the connection is made. |
| Do not send retrieval command | Disables ETRN and does not send any command. |
For more information on ETRN, see Microsoft Exchange Server Concepts and Planning.
Use the Dial-up Connections property page to specify the amount of time, in minutes, to keep the RAS connection open and wait for incoming mail after the initial transfer is complete. If incoming mail is received before the time-out period expires, the mail is transferred and the time-out period begins again.
Outbound mail is sent only when a RAS connection is first established. When you set the time-out period, it should be long enough for the remote system to initiate its mail transfer but short enough that the RAS connection ends at some point and then reconnects to send outgoing mail.
Use the Dial-up Connections property page to provide the logon account and password required by the remote site or Internet service provider.
| Option | Description |
|---|---|
| User name | The name used to log on to the remote server. |
| Domain | The domain of the remote system (optional). |
| Password | The user password. |
| Confirm password | Verifies the password. |
Use the Dial-up Connections property page to specify how frequently the Internet Mail Service connects to another site or an Internet provider.
| Option | Description |
|---|---|
| Daily | Specifies a daily dial-up connection. |
| Weekly | Specifies a weekly dial-up connection. |
| Every | Specifies a dial-up connection at certain intervals. Type the number of hours and minutes between connection attempts. If you select this option, a connection is made when you start the Internet Mail Service and then again at the specified interval. |
| At | Specifies a dial-up connection at a certain time. Type the time when you want to connect to your Internet service provider or a remote site. |
| When mail queued, but at most every | Specifies a dial-up connection only when messages are waiting to be sent. The number of minutes you enter determines the most frequent interval at which a dial-up connection is established, regardless of how much mail is waiting. If no mail is waiting to be sent, the dial-up connection is made as soon as an outbound message is queued as long as the specified interval has passed since the last connection was made. The default is 30 minutes. |
| Start, End | The hours during which the dial-up connection schedule takes effect. This applies only if you enter values in the Every or When mail queued for boxes. If you want the schedule to be active 24 hours a day, select the All Day check box. |
| Mon, Tue, Wed, Thu, Fri | Indicates when the Internet Mail Service dial-up schedule applies. You must select Weekly under Schedule for these options to appear. |
| Weekends | Specifies the dial-up connection schedule that will be used on the weekends. |