Replacing Custom Recipients with Mailboxes
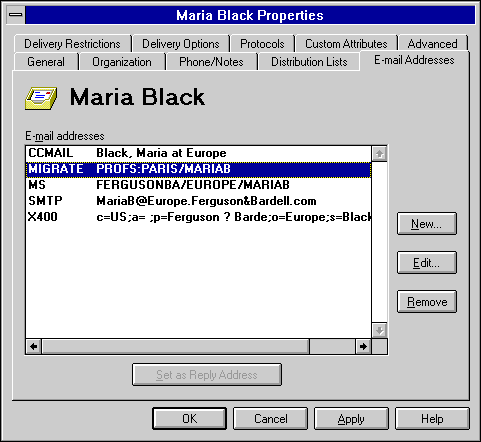
When the Migration Wizard creates a custom recipient, it adds an e-mail address of type migrate: and an address which uniquely identifies the recipient's mailbox on the existing system. For example, if Ann Devon is a custom recipient with a target address of PROFS:SYDNEY(AnnDevon), her e-mail addresses would include migrate:PROFS:SYDNEY(AnnDevon).
When a message is imported by the Migration Wizard, it checks the global address list for either of the following e-mail addresses:
- A migrate e-mail address that matches the source system mailbox address.
- A source system e-mail address with the address of the mailbox being migrated.
The Migration Wizard looks at the type of entry that has been found. If it is a mailbox, the message is imported. If it is a custom recipient, the following occurs:
- The directory information for that custom recipient is read.
- The custom recipient is deleted.
- The new mailbox is created.
- The new mailbox is added to all the distribution lists containing the custom recipient in this site.
- The directory information and e-mail information for the custom recipient is added to the mailbox.
When using the Migration Wizard, you can create mailboxes for custom recipients by clearing the Information to create mailboxes checkbox. For more information, see the chapter that describes migrating from your mail system.
For a complete list of preserved attributes, see Chapter 3.
Limitations of Migrating Custom Recipients to Mailboxes
To use the custom recipient-to-mailbox conversion system, you need to determine how you plan to create your custom recipients.
Distribution lists should be created in the same site as the custom recipients if you want their membership to be updated automatically. This may require creating the lowest level distribution lists in individual sites. If you are planning to manage distribution lists from a central site, consider nesting these distribution lists with those managed from the central site and maintaining the lowest-level distribution lists locally until after migration is complete.
You must create the custom recipient in the same Recipients container as the mailbox. You cannot move custom recipients or mailboxes between Recipients containers. Therefore, you must configure directory synchronization to import addresses into the correct Recipients container. If there are multiple sites, you need to configure directory synchronization at each site to import only those addresses that will migrate to the local site.
Replacing Custom Recipients with Mailboxes Manually
It may be necessary to create custom recipients in a different site or in a different Recipients container. In this case, the Migration Wizard cannot replace the custom recipients with mailboxes. You can select one of the following options:
- Delete the custom recipients before migration.
This allows you to create the mailboxes in the same Recipients container with the same common or directory name. This is the only way you can create the mailbox with the same e-mail addresses.
- Wait for directory synchronization to remove the custom recipient automatically.
The migrated mailboxes must have unique e-mail addresses. This requires users to notify all external correspondents with the change in their SMTP, X.400, and other external addresses. The mailboxes also need different common or directory names from the custom recipients, or they need to be created in a different Recipients container. There will also be duplicate addresses in the Address Book, unless one of the recipients is marked as hidden from the Address Book.
You must also plan how to handle the custom recipient's directory information.
E-mail addresses, telephone numbers, managers, and distribution list memberships can be handled in one of two ways:
- Preserve the directory information.
You can use the Directory Export command to export all custom recipients to a file with all the attributes you want to transfer specified. This file can then be modified for the obj-class of mailbox instead of remote and imported by selecting the Overwrite option under Multivalued Properties in the Directory Import dialog box.
- Delete the custom recipient and its directory information.
The information can be retrieved from the source files used to create the custom recipients and added to the mailbox creation data. Select this option if custom recipients were not created with any personal information, or distribution list membership either doesn't exist or is easily reconfigured.
Deleting Custom Recipients While Preserving
Directory Information
Custom recipients can be deleted only in the site where they were created. You can find out where a custom recipient was created by viewing the home site attribute in the custom recipient's General property page.
 To export custom recipients' directory information and delete the custom recipients
- Create a text export file with all the fields you want to preserve.
Obj-class,mode,common-name,display-name,address,assistant-name,given-name,initials,member,surname,proxy-addresses,secondary-proxy-addresses
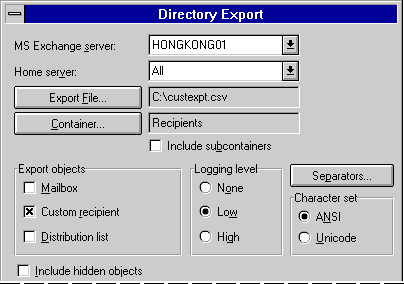
- In the Administrator program, connect to any server in the site where the custom recipients were created.
- From the Tools menu, choose Directory Export.
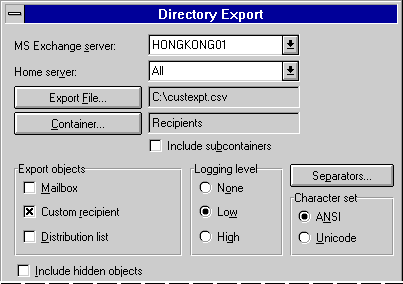
- Choose Export File, and select the export text file you have created.
- Choose Container, and select this site's Recipients container where the recipients were created.
- Under Export Objects, select Custom Recipient.
- Choose Export.
- Make a backup of the exported file.
- Edit the exported file as follows. This file becomes the new import file.
- Remove the custom recipients that you are not migrating.
- Change the obj-class from remote to mailbox.
- Change the mode field to modify.
- If the values in the common-name field of the custom recipients do not match the common-names of the mailboxes to be migrated, modify the common name value to reflect the change.
- Edit the backup of the exported file as follows. This file becomes the delete file.
- Remove the custom recipients that you are not migrating.
- Change the mode field to delete.
- From the Tools menu, choose Directory Import.
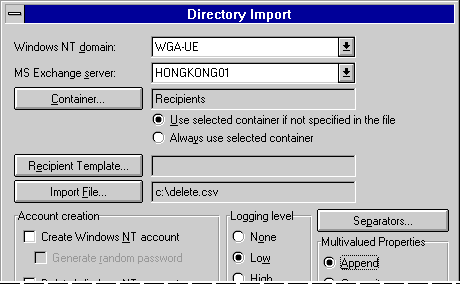
- Choose Container, and select this site's Recipients container where the recipients were created.
- Choose Import File, and select the delete file.
- Choose the Import button.
- If the recipients were deleted from a different site from where the mailboxes will be migrated, wait for directory replication to occur. When the custom recipients disappear from the global address list, continue the procedure.
- Migrate the mailboxes.
- In the Administrator program, connect to any server in the site where the mailboxes were created.
- Import the edited import file into the Recipients container where the mailboxes were created. This preserves the custom recipient's directory information and copies it to the migrated mailbox.
Deleting Custom Recipients and the Directory Information
Custom recipients can be deleted only in the site where they were created. You can find out where a custom recipient was created by viewing the home site attribute in the custom recipient's General property page.
You can delete custom recipients in the Administrator program by selecting them and choosing Delete from the Edit menu. There are several advantages of using the Directory Export and Directory Import commands: