An overdrive...NICE.
Good decision Dave. You will have a lot of fun..
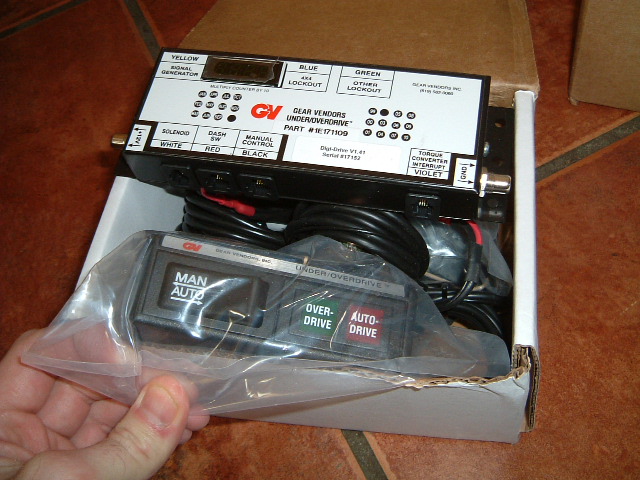
I placed the "manual/auto switch" on the LHS of the steering column under the dash, using the valcro tape.
Did you get the "6 Speed" stickers ?
I am still looking to get a good looking "Overdrive" emblem....
Dave,....PLEASE try to conduct "scientific" measurements, as to better milage, at ET. My favourite was the reduction in noise inside the car. LOVE IT !
I guess a "stock" engine in a way benefits more from an OD ??,...as a stock engine has a narrower max torque band tst~
A smaller engine will give better time to do the "Rapid Fire Gear Excange" running through the 3*2=6 gears,...I guess you will not be using 1'st over.....
Ohhhhhh I miss my Chally,....15 mounths left of my contract here in Vancouver....My only comfort, is that that the ragtop is SAFELY stored, and waiting "ready to drive" back home.
Page 1 of 1
Fitting an overdrive Part One
Fitting an overdrive Part One
Dave, does that OD unit replace the aft part of the 727 so that no mods are required to the driveshaft? With my 4.10 gears it would sure make my car more happy on the freeway.
Fitting an overdrive Part One
How much did that beauty cost you? I would love to put one in my Grape Ape, since the 4.10 gears HATE the freeway.
Fitting an overdrive Part One
I should say thanks to Johannes for putting me onto this overdrive. I think it could be the best thing I have done to the car since I got it.
I didn't see any 6-speed stickers in the box. I would rather not advertise it anyway.
It will not be giving me much better mileage because I am replacing the 3.91 gears with 4.30s. Final drive with the O/D on will be like 3.35 though. I don't want to cruise below the stall speed of the converter.
To work out how it would change your car multiply your final drive ratio by 0.78. So a 4.10 gear will be like a 3.12:1
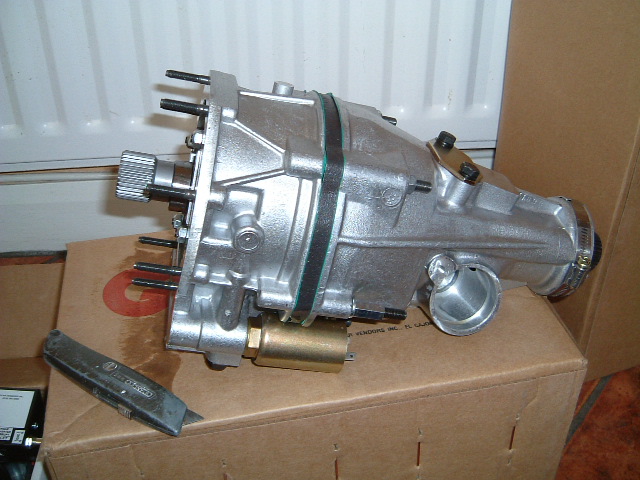
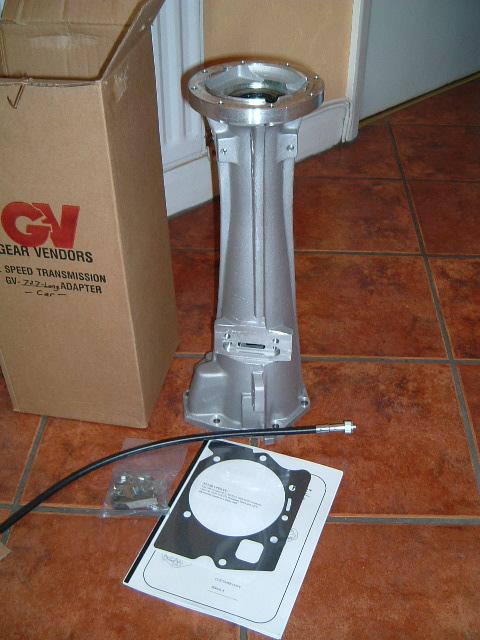
Jack. It adds about a foot to the length of the trans so you need to shorten the driveshaft and fit the yoke they supply.
Mark. It is not cheap. http://www.gearvendors.com/
Fitting an overdrive Part One
The weather has been very good today so after my chores and a beef Sunday Lunch in the pub washed down with a pint of ale I got my old clothes on and made a start.
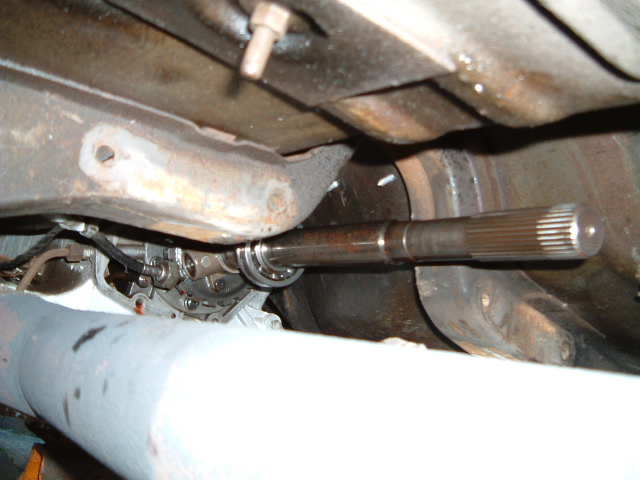
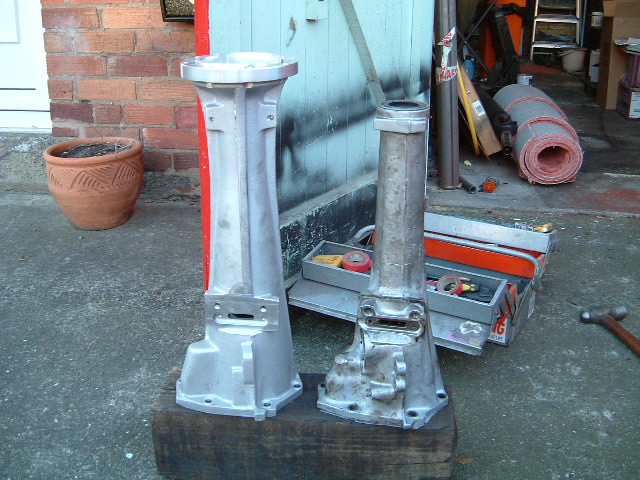
As you can see Jack I guess I need to add another couple of inches to my estimate of 12" longer than stock. I thought the tail housings would be about the same length. Instead there is a female-female adaptor to fit in the end of the tailshaft adaptor to join the trans output shaft to the overdrive input shaft. This makes the adaptor longer than I thought.
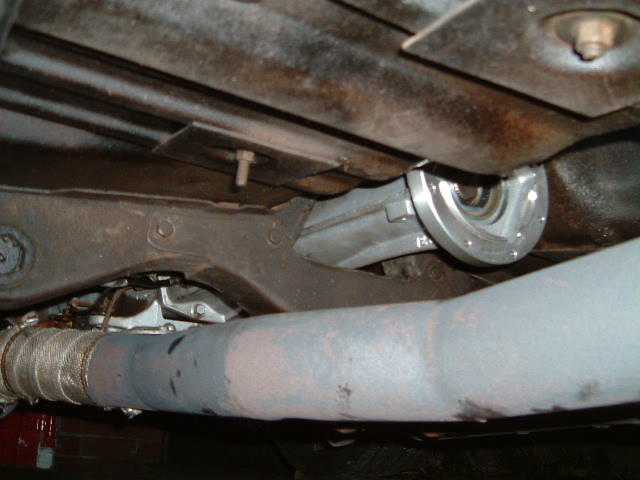
This is as far as I got due to failing light. It is dark by 6:30pm. The only problems I had were;
a) Trying to do this without dropping the exhaust at all. I ended up having to disconnect it from the headers but that was all.
b) One of the litle bolts holding the driveshaft to the axle would not come off. I spent an hour just doing that.
c) The big snap ring circlip that goes onto the bearing in the tail housing just would not go on. My circlip pliers are not much good and I wasted a half hour just getting that back on.
Edited Note! This lead to a problem later on. Check you still have output shaft end play at this point. When i did this I was not aware that the clip was hard to fit because I was pulling the overrunning clutch hard up against the back of the trans. This came to light later on....


As you can see Jack I guess I need to add another couple of inches to my estimate of 12" longer than stock. I thought the tail housings would be about the same length. Instead there is a female-female adaptor to fit in the end of the tailshaft adaptor to join the trans output shaft to the overdrive input shaft. This makes the adaptor longer than I thought.

This is as far as I got due to failing light. It is dark by 6:30pm. The only problems I had were;
a) Trying to do this without dropping the exhaust at all. I ended up having to disconnect it from the headers but that was all.
b) One of the litle bolts holding the driveshaft to the axle would not come off. I spent an hour just doing that.
c) The big snap ring circlip that goes onto the bearing in the tail housing just would not go on. My circlip pliers are not much good and I wasted a half hour just getting that back on.
Edited Note! This lead to a problem later on. Check you still have output shaft end play at this point. When i did this I was not aware that the clip was hard to fit because I was pulling the overrunning clutch hard up against the back of the trans. This came to light later on....
Fitting an overdrive Part One
I managed to squeeze in an hours work on the car tonight when I got home. I am no further forward though.
Two problems I could see straight away in the better light.
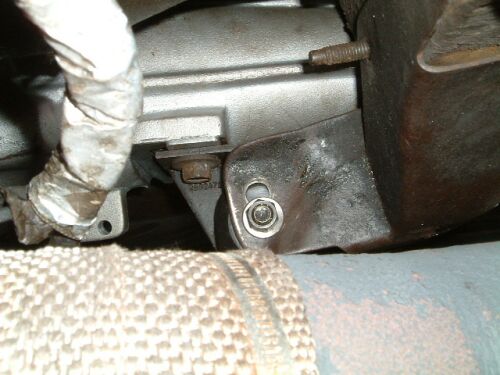
First when I tried to install the two trans mount-to-tail housing bolts I found they only go in half way then seem to bottom out. I will have to check the holes are drilled or tapped deep enough. If it is that they are not drilled deep enough I will just use shorter bolts.
But before I could get my teeth into that problem I noticed another. The new tail housing is almost up against the floorpan. There is a gap - but not much. Maybe a sixteenth?
Also the overdrive unit would need more than a dimple in the trans tunnel in this position. So the trans mount will have to be modified to drop the tail a little.
There was no mention of this little problem in the instructions but reading one of the magazine articles on their web site I see others have come accross this before me. The way they tackled this was to simply drill a new hole for the rubber or poly trans mount to lower it.
However the tail might then land on the crossmember. It depends on how far down I feel it needs to come. It was getting dark and cold so I came in the house for a cup of tea (the British way of dealing with problems).
After a few sips of Earl Grey (milk nee sugar) I thought of another way. I could lengthen the holes on the trans crossmember to drop the whole thing down as much as I want and not worry about hitting anything.
The first way would be a lot quicker and easier though so next chance I get (most likely the weekend) I will have another look in good light and see just how much I need to drop this thing. That will decide the method I will use.
Fitting an overdrive Part One
What I did when installing mine, was to modify the trans rubber mount. I figured, that if I needed a new mount later on,...I would just use the rubberpart, with the metal ovalpipe around it, and re-use the rest of my modified mount. That way, I did'nt have to do to much modifications to the cross member...apart from making a U-groove at the top, to clear the OD-adapter rib.
I also used the angle grinder just a little, on the OD-unit...where the stud/bolts connected. This to increase the clearence towards the tunnel.
A sledge hammer was used after I had marked where the OD would hit the tunnel. Of cource, by the time you have pulled out the hammer, you'll be so tired of lifting the OD up/down, that you'll think "More is better" when it comes to make "dimples" in the tunnel......
I also got the very comfortable feeling of "Payback time" when using the hammer on the car...he he..
Keep up the work dave Dave,....and to others that are considering an OD,...read the ARTICLES found on the link Dave posted earlier.
Fitting an overdrive Part One
Yes I was thinking the OD adapter/tailhousing might hit the crossmember which is why I was thinking of dropping the whole crossmember a little. I was not keen on the idea of taking a grinder to the top of the crossmember as this would not be so easily corrected if the car was ever restored.
I will decide what to do at the weekend when I have looked at it again.
I will decide what to do at the weekend when I have looked at it again.
Fitting an overdrive Part One
I have been thinking about this during the odd idle moment. I think I will drop the tail of the trans by a generous amount.
a) Because it will mean putting a smaller dent in the trans tunnel for the overdrive unit itself.
and b) It will mean the driveshaft/pinion angle will not need to be altered as much (or at all in some cases I guess).
Because the driveshaft has to be shorter this makes the pinion angle greater. Dropping the trans reduces the angle at each end of the driveshaft.
Dropping the whole crossmember to achieve this might not look as good and might start getting close to the exhaust (when I have bolted it back up) so the Johannes method is looking better at the moment.
Fitting an overdrive Part One
Modyfying the bracket, not the crossmember, will also make the gearbox end up at the same position next time you have to take the cross member/gearbox down. Specially if you will remove the OD at some time,...and put the drive train back to "stock".
......Hey, what do you know,...I still have the "outgoing E-mail" I sent a friend of mine 2 years ago.... This shows the position of the switches, the modified gearmounting bracket.
Even my tacky seat covers...he he...
I'll forward it to you, and you can post them if you want to.
......Hey, what do you know,...I still have the "outgoing E-mail" I sent a friend of mine 2 years ago.... This shows the position of the switches, the modified gearmounting bracket.
Even my tacky seat covers...he he...
I'll forward it to you, and you can post them if you want to.
Fitting an overdrive Part One
I will put them in a separate thread to avoid confusion.
Overdrive fitted by Johannes
(Message edited by roppa440 on June 12, 2003)
Overdrive fitted by Johannes
(Message edited by roppa440 on June 12, 2003)
Fitting an overdrive Part One
I was working all day Saturday and slept in a bit the next day so it was 11am Sunday before I got started again.
First job was to stop the overdrive from hitting up against the floor.
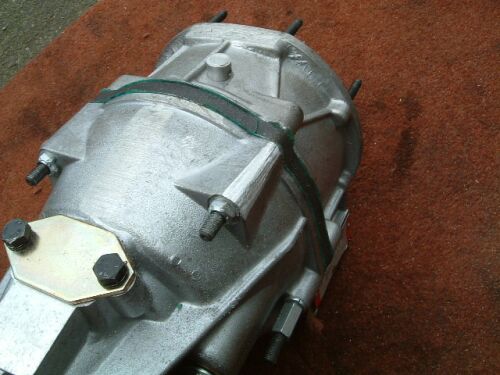
Fist step was to grind a little off the case so that I would have to hammer the floor less.
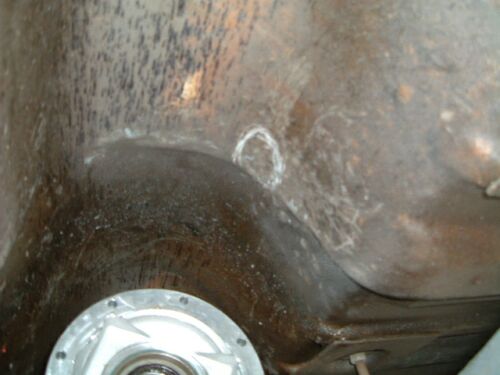
I had already made a start on this last week. The area that needs the most work is outlined. I bit of hard work with the hammer was all it took.
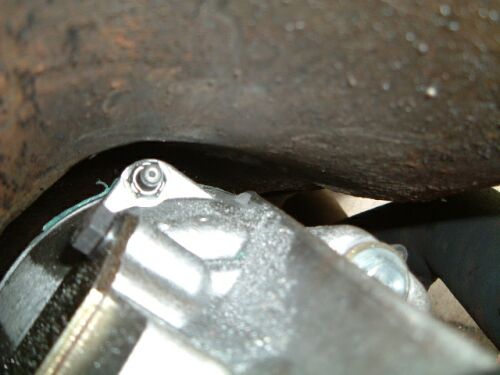
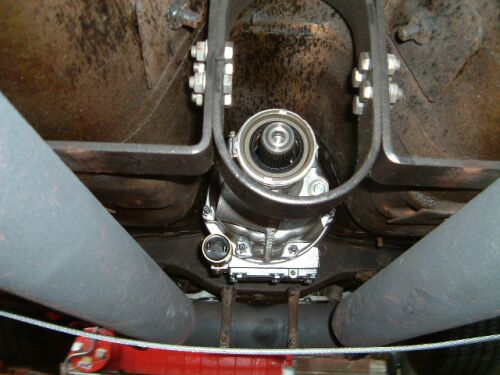
Having a digital camera helped a LOT! No way could I get my eye into this position. The camera does reach up there though and I was able to view the images as I worked.
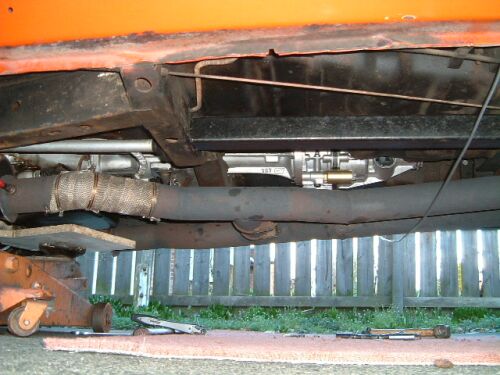
The next shot shows the unit in it's final position. It seems to have plenty of room at this height.
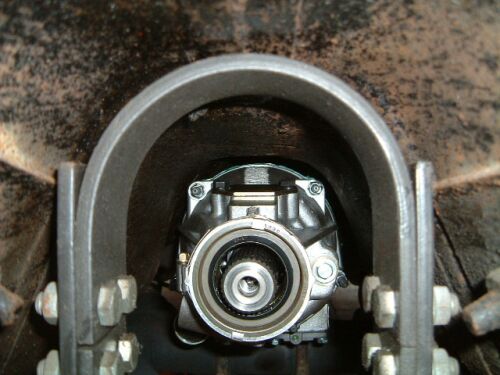
In the forground you can see the driveshaft safety loop. This was always a bit too far to the rear. Looks like it will be exactly in the right place now.
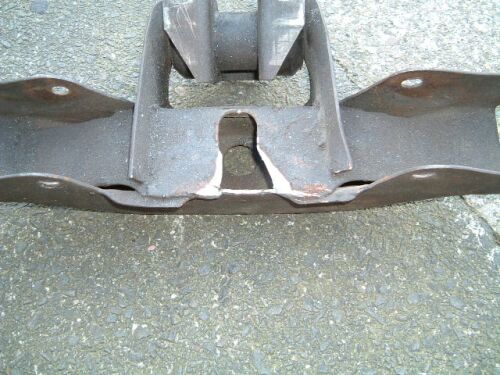
To get that much room I had to drop the back of the trans a lot. I now had to make the crossmember and trans mount hold the trans at this height.
First I drilled new holes to drop the mount.
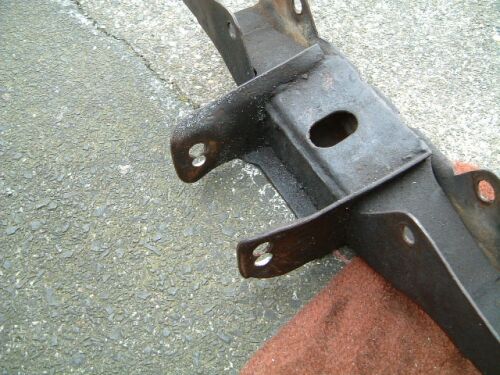
Then I had to cut a piece out of the crossmember.
This is how it looks in the car.
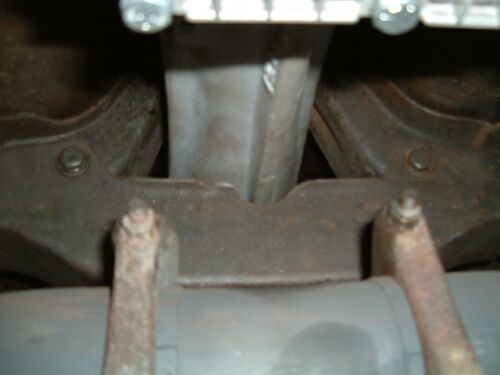
The exhaust looks like I made it with the overdrive in mind all along. Bear in mind that the exhaust is hanging down a couple of inches at the moment because it is disconnected from the collectors.
First job was to stop the overdrive from hitting up against the floor.

Fist step was to grind a little off the case so that I would have to hammer the floor less.

I had already made a start on this last week. The area that needs the most work is outlined. I bit of hard work with the hammer was all it took.

Having a digital camera helped a LOT! No way could I get my eye into this position. The camera does reach up there though and I was able to view the images as I worked.
The next shot shows the unit in it's final position. It seems to have plenty of room at this height.

In the forground you can see the driveshaft safety loop. This was always a bit too far to the rear. Looks like it will be exactly in the right place now.
To get that much room I had to drop the back of the trans a lot. I now had to make the crossmember and trans mount hold the trans at this height.
First I drilled new holes to drop the mount.

Then I had to cut a piece out of the crossmember.

This is how it looks in the car.

The exhaust looks like I made it with the overdrive in mind all along. Bear in mind that the exhaust is hanging down a couple of inches at the moment because it is disconnected from the collectors.


Fitting an overdrive Part One
What I forgot to show you was that I dropped the trans mount a little too low on the crossmember. I made up for this by inserting a shim between the trans and mount. I will leave it there for now but depending on how the driveshaft angles work out I might need to add another shim and make the overdrive a tighter fit under the floor.
Fitting an overdrive Part One
Just an idea that droped into my head as I was reading this. If the problem is that the overdrive will pump into the floor. And you dont whant that, and the space is to small. Why not make an rubber "pillow" insulator. And lay it on top of the overdrive. Just a tought...
- With Regards
- With Regards
Fitting an overdrive Part One
It is a good thought and one which I considered myself.
It is not physically possible to mount the overdrive without both putting a dent in the floor and dropping the transmission slightly. There is not just zero space at that one point but the overdrive will not lift enough to fit onto the adaptor.
The only question is how big a dent and how much to drop the trans.
At the moment there seems to be plenty of room. If I need to lift the trans a little and it gets very close to the floor I have the option of fitting something like a rubber pad in there. But I also have the option of taking it off and making a bigger dent with the hammer. However if moved up other parts of the unit start to get very close too.
I just hope the exhaust will still hook up OK after this. The collectors will be at a slightly different angle.
Fitting an overdrive Part One
Jack.
You asked about driveshaft modifications?
The driveshaft (propshaft in the UK) needs exactly 14 inches cut out of its length. The supplied slip yoke that engages onto the output shaft of the overdrive is heavier built than the original yoke.
However when this thing is on the deck and the exhaust is bolted back up it is going to be visually very discrete.
Fitting an overdrive Part One
Fitting an overdrive Part One
Work on this has come to a halt at the moment as I am getting the parts together to re-build the axle with 4.30:1 gears.
I just added another shim to raise the trans more. Getting the angles right between the trans, driveshaft, and pinion has been a major headache. I think I am there now though.
Continued in PART TWO.
Continued in PART TWO.
