Hello,
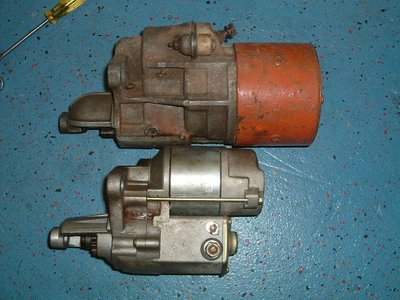
I just installed my 440 into my 72 Challenger. I have a set of TTI 1 7/8th headers. Everything fit fine with respect to the headers, except I am not able to install the starter. I have an old style one at this point. Are the new starters that much smaller that they can be installed by simply removing the drivers side header? I am hoping the motor does not need to come out, again!!!
Thanks for all the continued/valuable advice. This website is awesome!
23 posts
• Page 1 of 1
Any starter, small or full size, has to go in at the same time as the headers.
It is one of those jobs where you wish you had three hands.
The mini starters offer more room and are lighter to hold with one hand while you maneuver the header pipes with your other two hands.
Mini-starters are more powerful than the old starters and because the pipes have more clearence they do not suffer the heat problems that the originals do.
-

dave-r - Grumpy Old Man
- Posts: 9842
- Joined: 12 Oct 2003 21:45
- Location: North of the Tyne, England
-

MLMFLCN - Frequent Poster
- Posts: 238
- Joined: 10 Oct 2005 13:24
- Location: Ohio
Re: starter fit!!!
Hi,
I know what you mean in regards to the starter Ive been having problems with my ignition lately so I replaced the starter and had a hard time in doing so.
Im more or less a novice but managed to do it so just get under there and dont let it beat you....
I know what you mean in regards to the starter Ive been having problems with my ignition lately so I replaced the starter and had a hard time in doing so.
Im more or less a novice but managed to do it so just get under there and dont let it beat you....
MLMFLCN wrote:Hello,
I just installed my 440 into my 72 Challenger. I have a set of TTI 1 7/8th headers. Everything fit fine with respect to the headers, except I am not able to install the starter. I have an old style one at this point. Are the new starters that much smaller that they can be installed by simply removing the drivers side header? I am hoping the motor does not need to come out, again!!!
Thanks for all the continued/valuable advice. This website is awesome!
-

RedRaven - Frequent Poster
- Posts: 1995
- Joined: 15 Jul 2007 20:09
- Location: THE DOG HOUSE
Well your a better novice than me my man did you drop in the motor yourself, so many questions to ask you...I want to take mine out and clear it up new gaskets etc and a fresh paint job...
The really akward part about the starter motor for me was the angle you have to hold it at, my arms were killing me after it ha ha
I replace the old one with a standard one.
The really akward part about the starter motor for me was the angle you have to hold it at, my arms were killing me after it ha ha
I replace the old one with a standard one.
MLMFLCN wrote:Thanks Red Raven. I too am a novice at this. I was so beat from just getting the engine in, the starter threw me for a loop.
Do you have a Mopar mini-starter? Thanks for the encouragement, today is a new day!!!
-

RedRaven - Frequent Poster
- Posts: 1995
- Joined: 15 Jul 2007 20:09
- Location: THE DOG HOUSE
-

MLMFLCN - Frequent Poster
- Posts: 238
- Joined: 10 Oct 2005 13:24
- Location: Ohio
RedRaven has stock manifolds. There is no problem fitting a starter with those. 
With headers you lift the starter up with the headers and jiggle they both into place together. Because the headers will not fit with the starter in place and the starter will not fit with the headers in place.
Don't be shy to ask questions before you start a job you have not done before. Now and again it can save you doing a job twice.

-

dave-r - Grumpy Old Man
- Posts: 9842
- Joined: 12 Oct 2003 21:45
- Location: North of the Tyne, England
Daves just explained why my starter went in i.e. stock manifold.
Id like to know how you get on with your progress mate, Im taking some really good direction from Dave and Eddie on here...My challenger will be tearing up the blacktop soon enough!!;)
Id like to know how you get on with your progress mate, Im taking some really good direction from Dave and Eddie on here...My challenger will be tearing up the blacktop soon enough!!;)
MLMFLCN wrote:Are you running a big block with headers too?
I am happy to share what the process was, post away!
-

RedRaven - Frequent Poster
- Posts: 1995
- Joined: 15 Jul 2007 20:09
- Location: THE DOG HOUSE
Thanks for the advice Dave. I have asked lots of questions, but missed that one!!!
I am planning to rent the engine hoist again, loosen everything, remove the drivers side header, slide the new starter and header back in place and be done. Does that seem like the easiest approach at this point? Are the lightweight starters smaller in diameter?
It seems nuts that to change a starter, you have to hoist up the motor. Oh well, that's the price for more horsepower.
Red Raven...Listen to these guys, I would have not gotten this far without Dave and Eddie. Here is a photo of the engine "almost" in its final resting place. Now we'll see if I put it together correctly!!!
I am planning to rent the engine hoist again, loosen everything, remove the drivers side header, slide the new starter and header back in place and be done. Does that seem like the easiest approach at this point? Are the lightweight starters smaller in diameter?
It seems nuts that to change a starter, you have to hoist up the motor. Oh well, that's the price for more horsepower.

Red Raven...Listen to these guys, I would have not gotten this far without Dave and Eddie. Here is a photo of the engine "almost" in its final resting place. Now we'll see if I put it together correctly!!!
-

MLMFLCN - Frequent Poster
- Posts: 238
- Joined: 10 Oct 2005 13:24
- Location: Ohio
If you get the front wheels up on ramps you just need to raise the engine a little and loosen the header so you can move it around. But you might scratch something that way.
The lightweight mini-starters are shorter and smaller diameter.
The lightweight mini-starters are shorter and smaller diameter.
-

dave-r - Grumpy Old Man
- Posts: 9842
- Joined: 12 Oct 2003 21:45
- Location: North of the Tyne, England
Dave have you ever put a starter together, I took mine apart to replace one of the fittings...I have most of it re-assembled but not sure where one washer and one ring with notches goes, any ideas?
dave-r wrote:If you get the front wheels up on ramps you just need to raise the engine a little and loosen the header so you can move it around. But you might scratch something that way.
The lightweight mini-starters are shorter and smaller diameter.
-

RedRaven - Frequent Poster
- Posts: 1995
- Joined: 15 Jul 2007 20:09
- Location: THE DOG HOUSE
Dave finally I got to put it back together, check the pics and see if you can tell me where the two washers go please!!
dave-r wrote:Yes I have.
And I have no idea what you have left over without seeing what you have done.
Are they from the large battery terminal maybe?
-

RedRaven - Frequent Poster
- Posts: 1995
- Joined: 15 Jul 2007 20:09
- Location: THE DOG HOUSE
-

dave-r - Grumpy Old Man
- Posts: 9842
- Joined: 12 Oct 2003 21:45
- Location: North of the Tyne, England
-

RedRaven - Frequent Poster
- Posts: 1995
- Joined: 15 Jul 2007 20:09
- Location: THE DOG HOUSE
This is why I had to take the starter apart...I soldered the new one on, feeling pretty good apart from the two bolts.
Just want to add a note..be carful when tightening the fitting with the arrow pointing to it below because it will snap off it you tighten too much.
Just want to add a note..be carful when tightening the fitting with the arrow pointing to it below because it will snap off it you tighten too much.
Last edited by RedRaven on 04 Aug 2007 11:27, edited 1 time in total.
-

RedRaven - Frequent Poster
- Posts: 1995
- Joined: 15 Jul 2007 20:09
- Location: THE DOG HOUSE
Ok finally done it..
I did encounter problems when I placed the thrust washer on, it was when trying to sit the top section on to the bottom section, the thrust washer has to be flush in place otherwise it wont sit right and you have problems joining the two, this is real pain especially when you have to negotiate the core spring and main shaft aswell.
But with a little careful jigging from all angles slowly it sat right, I think holding the plastic section that sit on the housing flush helped as well, all bolted together sweetly.
The next step I guess is to have it tested- would any workshop be able to do this Dave yeah? I mean before I bolt it on to the engine, just in case it aint right.
Man I just read through what I’ve written- I almost sound like I know what I doing ha ha- only kidding long way to go!!!
Hey Air check it out!!
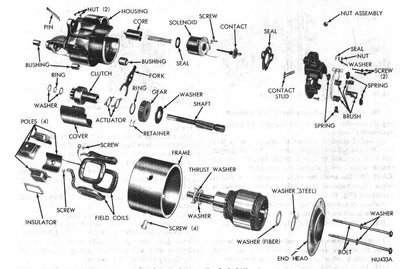
dave-r wrote:Yes. The washers are on the exploded diagram. And you have a workshop manual so you should have seen them young man.
Looks like you missed the thrust washers out.
-

RedRaven - Frequent Poster
- Posts: 1995
- Joined: 15 Jul 2007 20:09
- Location: THE DOG HOUSE
Great job Red! Now to disassemble it and put that thrust washer inside. Looks like you are learning from the right man. Dave wouldn't steer you wrong and I'm sure you will get it right! Just be careful and make sure you tighten everything to specifications and get it tested at an auto parts store that has free testing, we have Auto-Zone and Napa Big A auto parts and others, they can surely test it there for you. This would eliminate a potentially aggravating situation. Good Luck man! 

-

Eddie - Frequent Poster
- Posts: 6212
- Joined: 16 Oct 2006 21:26
- Location: Terre Haute, Ind.
Already done it before I posted, described the trouble I had put in the thrust washer, I managed it though and tried to explain what I did, maybe someone else will encounter this problem, so I hope this will help them out somehow.
-

RedRaven - Frequent Poster
- Posts: 1995
- Joined: 15 Jul 2007 20:09
- Location: THE DOG HOUSE
-

dave-r - Grumpy Old Man
- Posts: 9842
- Joined: 12 Oct 2003 21:45
- Location: North of the Tyne, England
23 posts
• Page 1 of 1


