| Operations | << | >> |
|---|
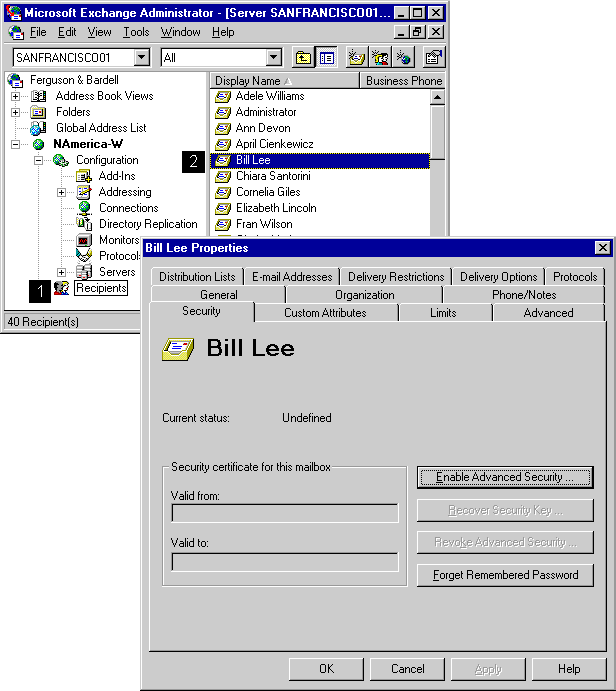
The following advanced security tasks must be performed in the Security property page of the user's mailbox.

When you enable advanced security for a mailbox, you give users temporary keys that are used to digitally sign and encrypt mail. A temporary key is used only once for a user to enroll in advanced security, and it secures the connection between the KM server and the client.
When you start the process of enrolling users in advanced security, an RPC is made to the KM server. The KM server generates a one-time temporary key and returns it to you. You must then transmit the temporary key to the user so the user can complete the advanced security process on the client.
A local private key file is created and can be copied to any computer that the user wants to use to digitally sign and encrypt mail.
Note The Administrator program must be running on a Microsoft Exchange Server computer that has RPC connectivity to the KM server.
| Option | Description |
|---|---|
| Enable Advanced Security | Creates a temporary security key for users. Use a secure method to transmit temporary keys to users. Once users have this key, they must enable advanced security. |
| Security certificate for this mailbox | Valid from is the date on the client this certificate was created. Valid to is the date when the certificate expires. There are no tasks involved in extending certificates. After one year, users are prompted to initiate renewal of a certificate. |
| Send Enrollment Message | Sends an enrollment welcome message to the user through e-mail. A confirmation message showing the name of the temporary key is returned. You can select the text in the Advanced security temporary key box, but you cannot edit the text. You can edit the enrollment welcome message to enable you to customize the text of the message. If you delete the name of the temporary key from the enrollment welcome message, you must remember the name of the temporary key and give it to the user later. This option displays if you selected the Allow email to be sent to the user with his or her temporary key and the welcome message box in the Enrollment property page of the CA object. |
| Do Not Send E-mail | The temporary key is not sent to the user through e-mail. You must give the temporary key to the user in a secure manner. For example, you can give the temporary key to the user in person. This option displays if you selected the Allow email to be sent to the user with his or her temporary key and the welcome message box in the Enrollment property page of the CA object. |
Revoking advanced security permanently disables the certificate for a mailbox. When security is revoked for a mailbox, anyone attempting to open an encrypted message previously sent from that mailbox is prompted with a warning stating that the message was secured with a revoked security certificate. The same things happens with a digital signature.
You should consider revoking advanced security when users leave their company or if users feel their security has been compromised because it appears someone is signing messages on their behalf or someone has gained access to their security file and password. You can enable security again by assigning a user another temporary key.
When you revoke security, the serial number of the certificate is added to a CRL. This list is stored in the Microsoft Exchange Server directory and the key management archive database. It is also stored on the client and is accessed each time a user attempts to verify the signature of a message. If the message is encrypted, the list is also accessed for each user in the recipient list of the encrypted message. If the originator's certificate is on the revocation list, the user is warned that the message is signed with a revoked certificate. Certificates remain on the revocation list until they expire, which is 18 months after security was first enabled for the user.
Limit the use of revocation. As the size of the revocation list increases, performance of advanced security is degraded.
| Option | Description |
|---|---|
| Revoke Advanced Security | Adds the serial number of the certificate to a revocation list. |
You can reissue the security key for a mailbox if someone loses the password, or corrupts or removes the local security information for the mailbox. From the user's perspective, this process is identical to the initial task of setting up advanced security.
You can view the status of mailbox security in the Security property page. It displays the status of security in the top portion of the property page for any mailbox.
| Current status | Description |
|---|---|
| Undefined | Security has not been set up for this mailbox. |
| New | Security has been enabled for the first time, but the one-time temporary key has not been received from the client. |
| Active | Security has been enabled, and the one-time temporary key has been received from the client. |
| Disabled | Security has been disabled for this mailbox. |
|
Key recovery in progress |
A one-time temporary key has been reissued to this mailbox but not yet received, or a previously disabled mailbox is in the process of being enabled again. |