| Operations | << | >> |
|---|
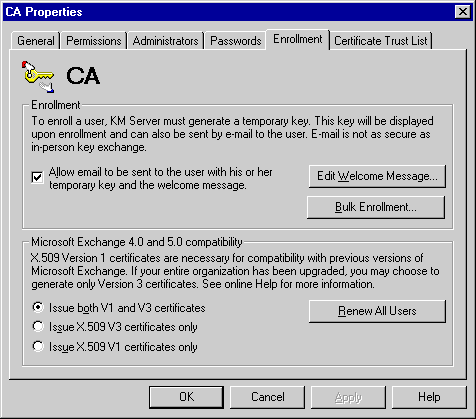
Use the Enrollment property page to individually set the policies for transmitting temporary keys to users or to bulk enroll new users.

There are two ways you can transmit a temporary key to a user.
If you choose not to send a user his or her temporary key using e-mail, you must give it to the user in person. Authenticate the user using private identification. For example, ask the user for a driver's license or social security number before giving out the temporary key.
Each time the KM server generates a temporary key, you can choose to send a message containing the temporary key.
For more information on enabling advanced security for users, see "Enabling Advanced Security for a Mailbox" later in this chapter.
If you selected the Allow email to be sent to the user with his or her temporary key and the welcome message check box in the Enrollment property page, then a temporary key is sent to the user in an e-mail when you enable advanced security message for that user's mailbox. You can customize the text of the enrollment welcome message. For example, you can include a description of your company's security policies.
The enrollment welcome message includes the name of the temporary key. You can delete the name of the temporary key from the message before sending the message to the user. For example, you can give users their temporary key in person. If you do so, you can send a generic message informing them that they should see the KM server administrator to obtain their temporary key.
Users must have security keys before they can enable advanced security on the client. You can generate security keys in bulk to save time when there are a large number of new users to enroll. You must still transmit the security keys to users individually, and each user must complete the process of enabling advanced security on the client.
Note Bulk enrollment of a large container can cause an increase in message traffic to the KM server.
| Option | Description |
|---|---|
| Container name | Displays the name of the container that contains the mailbox of users you want to enroll. The default is the Recipients container. |
| Modify | Selects a different container. Each container with users you want to enroll must be individually selected. Subcontainers are not included when you select a container. |
| Mail temporary keys to all newly enrolled users | Sends temporary keys to users through e-mail. Users who are being enrolled for the first time will receive their temporary key through e-mail. |
| Save results in a file | Writes information such as organization, site, and user name to a file that includes advanced security information for both new and users who were enrolled previously. This file enables you to obtain the status of a user's advanced security information quickly. |
Use the Enrollment property page to set policies for issuing certificates that are compatible with your site's client environment. A certificate is issued by a CA and binds the user's public key to the mailbox. In Microsoft Exchange Server, the CA is Microsoft Certificate Server, which issues, revokes, and renews digital certificates.
Microsoft Exchange Server supports the X.509 version 1 (V1) and the industry standard version 3 (V3) certificate formats. The certificate format you choose depends on the type of secure mail clients that your organization wants to support. You can choose to use one or both certificate formats. The V1 certificate format is necessary for compatibility with Microsoft Exchange Client versions 4.0 and 5.0, and Microsoft Outlook 8.0x clients. If your organization uses these clients, you must use the V1 format. If your organization uses an S/MIME-compatible client, you should also enable the V3 certificate format. If you are not using Microsoft Exchange Client versions 4.0 or 5.0, or Outlook 8.0 clients, then you can disable version 1 (V1) support.
The following describes the security formats supported for each client:
Certificates can be given a life span. This means that you can issue a certificate that expires after giving a user a certain number of days of access. The default life span of V1 and V3 certificates is 18 months. To change the life span, you must modify its span value on the Microsoft Certificate Server computer.
Note You can view the name of the Microsoft Certificate Server computer in the General property page of the CA object. The Microsoft Certificate Server computer name is created when the KM server is set up, and that the name cannot be modified.
| Option | Description |
|---|---|
| Issue both V1 and V3 certificates | Issues both V1 and V3 certificates. You can issue both certificates if there are some users in your organization who are running Microsoft Exchange Client versions 4.0 and 5.0, or Outlook 8.0x. |
| Issue X.509 V3 certificates only | Issues only V3 certificates. You can use this format if all users in your organization are running an S/MIME-compatible client. |
| Issue X.509 V1 certificates only | Issues only V1 certificates. Choose this format if the majority of your clients are Microsoft Exchange Client version 4.0 or 5.0, or Outlook 8.0x, and you want to force your S/MIME-compatible clients to use only the backward-compatible mode. Choosing this format prevents S/MIME-compatible clients from choosing the S/MIME security format, which requires V3 certificates. |
| Renew all users | Notifies all users that they should initiate enrollment with the certificate type you have specified. You can also use this option to reset any changes you make to the security message format or the issuing of V1 and V3 certificates. For example, if you have changed the default security message format in the Algorithms property page, or if you have changed the type of V1 or V3 certificate to issue, you should choose Renew all users. |