
![]()
![]()
![]()
![]()
![]()
![]()
![]()
Using a Zip® 100MB Drive
- Inserting Zip Disks
- Removing and Storing Zip disks
- Drive Sleep
- Disk Eject in Case of Power Loss
- Zip Tips
![]()
![]()
![]()
![]()
![]()
![]()
![]()
To use the Zip drive, insert a Zip disk, then select the drive letter assigned to the Zip drive in My Computer (Windows 95/98 or Windows NT 4.0) or File Manager (Windows NT 3.51 or Windows 3.1). You can store and copy files to and from the Zip drive using the same methods you use for other drives on your system. (If you need instructions on how to copy files, refer to the help file for your operating system.)
Use only Genuine 100MB* Zip disks with a Zip 100 drive. If a 250MB Zip disk is inserted into a 100MB Zip drive, the drive will automatically reject it.
*100MB capacity where 1MB = 1 million bytes. The capacity reported by your operating system may vary.

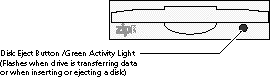
Always turn on power to the computer before inserting a Zip disk. When you insert a Zip disk, the green activity light will flash momentarily and go out. If the light continues to blink slowly, push the disk eject button to eject the Zip disk, then reinsert it.
![]() Never put anything into your Zip drive except Zip disks with the genuine Zip symbol. Using disks that do not have this symbol may cause damage to your drive or loss of data.
Never put anything into your Zip drive except Zip disks with the genuine Zip symbol. Using disks that do not have this symbol may cause damage to your drive or loss of data.
![]()
Windows 95/98 systems – Push the disk eject button or use the Iomega software eject command, which is available by right clicking on the Zip icon on the desktop or under My Computer.
Windows NT systems – Use the Iomega software eject command.
Windows 3.1 systems – Push the disk eject button.
It is not necessary to remove the Zip disk from the drive when you shut down your computer; however, if you desire to remove the Zip disk, make sure the disk activity light is off and eject the disk before turning off power to your computer.
The Zip drive has an automatic sleep mode designed to reduce power consumption and prolong the life of Zip disks. Sleep mode automatically spins down a disk after 15 minutes of inactivity, and the disk automatically spins up again when accessed. You can change the sleep mode time using your Iomega Tools software.
The computer must be powered on for normal disk ejection from the Zip drive. If you must remove a Zip disk from the drive during a power failure, access the rear of the Zip drive and push a straightened paper clip into the emergency eject hole which is located just above the power connector (see illustration below).
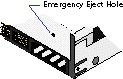
![]() Disconnect power from the computer before using the emergency disk eject hole. Do not try to forcibly remove a Zip disk from the drive. If the disk does not eject immediately, repeat the emergency disk eject procedure as described above.
Disconnect power from the computer before using the emergency disk eject hole. Do not try to forcibly remove a Zip disk from the drive. If the disk does not eject immediately, repeat the emergency disk eject procedure as described above.
![]()
Never force a Zip® disk into or out of the drive.
![]()
Never use ordinary 3.5” floppy diskettes or floppy head-cleaning disks in your Zip® drive. They will cause severe damage to the drive.
![]()
Never force a Zip® disk into or out of the drive.
![]() Never put anything into your Zip® drive except Zip disks with the genuine Zip symbol. Using disks that do not have this symbol may cause damage to your drive or loss of data.
Never put anything into your Zip® drive except Zip disks with the genuine Zip symbol. Using disks that do not have this symbol may cause damage to your drive or loss of data.
![]()
![]()
Avoid exposing the Zip® drive or Zip disks to direct sunlight, high temperature, moisture, and magnetic fields, such as from monitors and some speakers.
![]()
![]()
![]()
![]()
![]()
![]()
![]()
![]()
![]()