All,
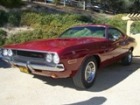
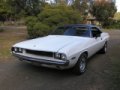
My Rallye has a spot on the passenger side rear quarter panel that I feel I need to do something about before it gets worse. I have attached pictures for everyone's viewing and suggestions are welcomed.
I am a total novice at any type of body work so go easy on me with your suggestions. Overall the paint is pretty good, painted in late 97 but still shows well
Should I take to a body shop and have them fix the spot, will they be able to match the paint?
Thanks for everyones help
Brad
36 posts
• Page 1 of 2 • 1, 2
 Viewed 2069 times")
 Viewed 2067 times")
- bradburm
- Frequent Poster
- Posts: 99
- Joined: 19 Oct 2005 18:26
- Location: Duluth, Georgia (Atlanta)
![]() by dave-r » 25 Feb 2007 10:42
by dave-r » 25 Feb 2007 10:42
You need to do two things.
First get the damage fixed at a GOOD body shop. They will match your paint OK. In fact if it is original paint they will be able to get the original formula. Also inspect the other side of the car to make sure it is not starting there. It often happens both sides.
Second. This damage is usually due to either drag racing the car on slicks. Or weakness in the chassis. Make sure everything is solid under the car.
To make sure it never happens again I strongly suggest you fit chassis connectors. These are welded in and join the front and rear subframes together. It makes the chasis MUCH stronger and not only will it prevent this happening but also it will make the car feel much more solid on the road.
-

dave-r - Grumpy Old Man
- Posts: 9842
- Joined: 12 Oct 2003 21:45
- Location: North of the Tyne, England
-
dave-r - Grumpy Old Man
- Posts: 9842
- Joined: 12 Oct 2003 21:45
- Location: North of the Tyne, England
1973 Challenger Rallye Paint/Bodywork Ideas/help
![]() by bradburm » 25 Feb 2007 14:20
by bradburm » 25 Feb 2007 14:20
Dave,
Thanks for the help.
The Paint is FE5 red so I assume it should be easy to match as I was able to obtain some through a paint place in Wisconsin. The other side is not showing any evidence of having the same issue.
Would you happen to have pictures/drawings something visual of the chassis connectors and where they are welded in and join the front and rear subframes together. Where would you suggest I get this done also?
The only change that I have made to the undercarriage is installing some air shocks (Although I did have a bad shock and actually posted on this site about a popping noise) but the popping noise has since been dealt with. I did replace the 70 series tires with some 60 series but nothing to crazy.
Again, Thanks for the invaluable help.
Brad
- bradburm
- Frequent Poster
- Posts: 99
- Joined: 19 Oct 2005 18:26
- Location: Duluth, Georgia (Atlanta)
![]() by Jon » 25 Feb 2007 15:29
by Jon » 25 Feb 2007 15:29
Can't say what caused the straightline split, possibly one of the holes for the trim clip helped start it. It appears there maybe underling rust issues though. Vinyl tops are notorious for that as they hold water in hidden areas. Especially in the bottom corners of the window. I would suggest having a good shop inspect the entire top before doing the repair.
-
Jon - Frequent Poster
- Posts: 1229
- Joined: 21 Aug 2005 15:12
- Location: Medford Oregon
![]() by christer » 25 Feb 2007 15:58
by christer » 25 Feb 2007 15:58
I did a search and found this topic:
http://challenger.mpoli.fi/forum/viewto ... =3288#3288
Stress cracks are usally located at the rear edge of the quarter glass. The crack on your car is located a bit more backwards than that. I suggest that you investigate the rear body panel from the inside using a lamp and a mirror. Any signs of an old repair or something?
- christer
- Ghost 48
- Posts: 2133
- Joined: 13 Oct 2006 19:52
- Location: Sweden
![]() by bradburm » 27 Feb 2007 17:44
by bradburm » 27 Feb 2007 17:44
This is going to be more difficult then expected. Wish I could weld and do bodywork. I went to 2 different body shops that were reccomended by others and both didnt want to do the work let alone touch the car. There issues surrounded working on old cars and just not wanting the headache associated with them.
So I will be reaching out to the North Georgia Mopar Club or Year One based here to see if they can offer some help and ideas
I did notice that Mancini racing offered the frame connectors (weldable), I assume that these would be acceptable to purchase or do you have other thoughts Dave? I assume I could take them to a frame shop and have them welded? I also read the past posts but I couldnt find any visuals to help me understand exactly where they go, so any pics or drawings are appreciated.
I will keep everyone posted and always thanks for the help.
Brad
- bradburm
- Frequent Poster
- Posts: 99
- Joined: 19 Oct 2005 18:26
- Location: Duluth, Georgia (Atlanta)
![]() by dave-r » 27 Feb 2007 17:51
by dave-r » 27 Feb 2007 17:51
Check out this thread.
http://challenger.mpoli.fi/forum/viewto ... =1688#1688
I just used plain 2x2 welded between the rear frame and the trans cross member. But there are also ones that are shaped to fit the shape of the floor. The idea of these is they weld right along the floor as well as joining the chassis. This gives even greater strength.
-
dave-r - Grumpy Old Man
- Posts: 9842
- Joined: 12 Oct 2003 21:45
- Location: North of the Tyne, England
![]() by dave-r » 27 Feb 2007 18:03
by dave-r » 27 Feb 2007 18:03
Examples of the two types.
http://www.autorust.com/k_21.html
http://chucker54.stores.yahoo.net/maefrcokit.html
http://www.autorust.com/k_21.html
http://chucker54.stores.yahoo.net/maefrcokit.html
 Viewed 2064 times")
 Viewed 2067 times")
-
dave-r - Grumpy Old Man
- Posts: 9842
- Joined: 12 Oct 2003 21:45
- Location: North of the Tyne, England
![]() by christer » 27 Feb 2007 21:28
by christer » 27 Feb 2007 21:28
ianandjess wrote:you could be right christer it does look suspiciously like a panel repare coming undone
cheers ian
Maybe, maybe not. It feels odd that the fender starts cracking in the middle of it. The crack can have started in one of the clip holes though, but it still feels a bit odd. That is why I thought it could be a badly made old repair.
- christer
- Ghost 48
- Posts: 2133
- Joined: 13 Oct 2006 19:52
- Location: Sweden
![]() by christer » 27 Feb 2007 21:45
by christer » 27 Feb 2007 21:45
I know that we have had a picure of a stress cracked rear fender here before. When I searched for that pic I stumbled on another intresting thread ( http://challenger.mpoli.fi/forum/viewto ... 5540#15540 ). It was about a stress crack in a front inner fender. What struck me when I saw the pic´s is that it looks like the crack is in an area where a spot-welded flange meets a non-spot welded flange. The thing is that the whole flange is supposed to be spot welded. I suspect that the body shop didn´t get everything right from the start. A number of bodies were probably not very good welded.
 Viewed 2064 times")
 Viewed 2067 times")
- christer
- Ghost 48
- Posts: 2133
- Joined: 13 Oct 2006 19:52
- Location: Sweden
![]() by christer » 27 Feb 2007 22:04
by christer » 27 Feb 2007 22:04
Well, where does all of this lead? My own car has had a stress crack in the left rear fender (It has now been repaired). What I noticed during the restauration of my car, was that the spot welded flange below the left door sill plate was missing most of its spot welds. Maybe one out of five was acceptable. The thresholds is very important for a cars torsional stiffness. This is maybe a thing to watch our for.
Of course I can´t say anything for sure. Maybe one of you have some own experiances to add to this story?
Of course I can´t say anything for sure. Maybe one of you have some own experiances to add to this story?
- christer
- Ghost 48
- Posts: 2133
- Joined: 13 Oct 2006 19:52
- Location: Sweden
![]() by christer » 27 Feb 2007 22:10
by christer » 27 Feb 2007 22:10
dave-r wrote:Examples of the two types.
http://www.autorust.com/k_21.html
http://chucker54.stores.yahoo.net/maefrcokit.html
Yet another alternative is http://www.xvmotorsports.com/ . Laser cut. Price $179.99. Looks slick if you ask me.
 Viewed 2067 times")
- christer
- Ghost 48
- Posts: 2133
- Joined: 13 Oct 2006 19:52
- Location: Sweden
![]() by dave-r » 28 Feb 2007 8:51
by dave-r » 28 Feb 2007 8:51
I think i would be removing that trim and lifting the vinyl a little to see what under that bit. see if it is starting at a hole and not going any higher under the vinyl.
Then I would inspect that area from the other side if possible. Just to try and see what exactly is going on.
Then I would inspect that area from the other side if possible. Just to try and see what exactly is going on.
-
dave-r - Grumpy Old Man
- Posts: 9842
- Joined: 12 Oct 2003 21:45
- Location: North of the Tyne, England
![]() by bradburm » 28 Feb 2007 14:44
by bradburm » 28 Feb 2007 14:44
Found a restoration shop and scheduling up time for them to work. Initial thought from them, is that there is some bad bodywork underneath. I will let everyone know what they ultimately find out.
The car is a 93 era restoration and I am surprised that it took this long to show up. I am also going to have them weld the frame connectors on while they are at it.
Once again, you guys are invaluable to a novice like myself and hopefully I can return the favor someday.
Best & Thank You
Brad
The car is a 93 era restoration and I am surprised that it took this long to show up. I am also going to have them weld the frame connectors on while they are at it.
Once again, you guys are invaluable to a novice like myself and hopefully I can return the favor someday.
Best & Thank You
Brad
- bradburm
- Frequent Poster
- Posts: 99
- Joined: 19 Oct 2005 18:26
- Location: Duluth, Georgia (Atlanta)
![]() by bradburm » 28 Feb 2007 14:56
by bradburm » 28 Feb 2007 14:56
One last thing, Does anyone have a copy of the Mopar Action October 2002 article on Mopar Frame Connectors, one of the websites that sells connectors referenced it and I went to the Mopar Action website and could not find that specific back issue.
Trying to learn as much as possible on this issue.
Thanks
Brad
Trying to learn as much as possible on this issue.
Thanks
Brad
- bradburm
- Frequent Poster
- Posts: 99
- Joined: 19 Oct 2005 18:26
- Location: Duluth, Georgia (Atlanta)
![]() by Eddie » 28 Feb 2007 18:05
by Eddie » 28 Feb 2007 18:05
I remember that issue. Dave is right, they used the smaller sized 1 3/4" instead of the two inch I think, but they still had to cut. I would consider any of the contoured ones from Mancini racing, auto rust tech, XV, Dave I think when they did that A-Body,(The green Brick), the cont. ones werent available? This would eliminate the floor pan cutting wouldnt it? As Christer posted, it looks really nice and once painted would look "factory". BTW, are the "bolt on" ones that bad?
-

Eddie - Frequent Poster
- Posts: 6212
- Joined: 16 Oct 2006 21:26
- Location: Terre Haute, Ind.
-
Eddie - Frequent Poster
- Posts: 6212
- Joined: 16 Oct 2006 21:26
- Location: Terre Haute, Ind.
![]() by christer » 03 Mar 2007 12:47
by christer » 03 Mar 2007 12:47
bradburm wrote:One last thing, Does anyone have a copy of the Mopar Action October 2002 article on Mopar Frame Connectors, one of the websites that sells connectors referenced it and I went to the Mopar Action website and could not find that specific back issue.
Trying to learn as much as possible on this issue.
Thanks
Brad
There you are.
 Viewed 2093 times")
 Viewed 2091 times")
 Viewed 2090 times")
 Viewed 2090 times")
- christer
- Ghost 48
- Posts: 2133
- Joined: 13 Oct 2006 19:52
- Location: Sweden
![]() by Jon » 25 Mar 2007 16:49
by Jon » 25 Mar 2007 16:49
Bradburm, did you get the quarter panel repair done along with the frame connectors? If so, how did they come out?
I am interested in installing the welded floor pan contoured units. I have concerns about whether the carpet and pad need to be removed in order to prevent a fire inside.
There is undercoating that needs to be removed also. It would clog a grinding wheel in seconds. Maybe a chemical stripper? Anyone have advice for this.
Thanks,
Jon
-
Jon - Frequent Poster
- Posts: 1229
- Joined: 21 Aug 2005 15:12
- Location: Medford Oregon
![]() by Eddie » 25 Mar 2007 22:35
by Eddie » 25 Mar 2007 22:35
Jon, I would say they would have to be, it's gonna get that floorpan very hot. I wouldn't chance it. BTW, I used POR-15 Chemical strip on the bottom side of my car when I started the resto. It's actually Methyline Chloride, nasty stuff to skin and respiration, I wore a mask and breather flat on my back, it wasnt fun. It did however, remove ALL paint and undercoating without damaging rubber or plastic chrome glass ect..I wiped it clean with old rags and paper towels. It's reasonably priced too. 2 Gallons did the job.
-
Eddie - Frequent Poster
- Posts: 6212
- Joined: 16 Oct 2006 21:26
- Location: Terre Haute, Ind.
1973 Rallye Challenger
![]() by bradburm » 23 Nov 2010 2:16
by bradburm » 23 Nov 2010 2:16
Hell where to start.
I finally got around to figuring out the cracking problem - guess what it was bondo and lots of it. So I took the quarter down to metal and found that it was dented - hence the bondo - guess thats what they did 20 or so years ago when they restored cars.
So like a dumbass, I went looking for trouble and went to the other quarter and found - you guessed it lots of bondo and more dents.
The bondo is gone and the dents are cut out and replaced with patch panels.
Good news no rust
Not stopping there I took the whole car to bare metal and have it ready to paint. Thought about black but FE 5 red is the original so going back with it.
I also welded up the sub frame connectors, redid the whole front end, new brakes etc all around. New Doug Thorley headers and exhaust and fixed the stuck gas guage.
Had the car out of commission all spring and summer but all I lack is paint and it will be done.
Once complete, I will post some pictures.
- bradburm
- Frequent Poster
- Posts: 99
- Joined: 19 Oct 2005 18:26
- Location: Duluth, Georgia (Atlanta)
-
dave-r - Grumpy Old Man
- Posts: 9842
- Joined: 12 Oct 2003 21:45
- Location: North of the Tyne, England
![]() by Adrian Worman » 23 Nov 2010 12:48
by Adrian Worman » 23 Nov 2010 12:48
Amazing what you find eh? I've got a skim of filler in my drivers door after Ajax, my old white Boxer dog, headbutted it and stretched the door skin too much to pull back out. I'll get it done properly when the car gets a decent coat of paint 
-

Adrian Worman - Frequent Poster
- Posts: 2051
- Joined: 10 Mar 2007 23:54
- Location: milton keynes
![]() by Goldenblack440 » 17 Jan 2011 12:54
by Goldenblack440 » 17 Jan 2011 12:54
Just looking at the dates of these postings -started 07, finished '10, That small crack ended up with the whole car back to bare metal! I bet that's a story often repeated. No wonder the body shops didn't want to touch it - firstly they don't like trying to match colours and red is a notoriously hard colour to match since it fades/changes colour so quick due to the inherent instability of the colour pigments. They would have wanted to do the whole quarter - lucky it had a vinyl roof, otherwise they would have had to blend it into the roof somewhere; And trying to match colour into another panel is also difficult so then they would have wanted to blend into the door. That job turned into a can of worms but i suppose you are glad you started it. I would not have been happy, i think i would have just taken the vinyl trim strip off and did a spot repair blend myself, new body filler sand back etc. Back in the old days before panel shops were made lazy from easy insurance jobs, there were plenty of skilled fellows who could have done this. My 2c worth anyway!.
-
Goldenblack440 - Frequent Poster
- Posts: 600
- Joined: 08 Jul 2007 18:57
Re: 1973 Challenger Rallye Paint/Bodywork Ideas/help
![]() by bradburm » 27 Feb 2011 14:36
by bradburm » 27 Feb 2011 14:36
All,
I am so close I can taste it, I will post more pics later but right now I am looking to find out where I can find a body side scoop trim piece. Have done the online thing to no avail and since its Sunday many places aren't open.
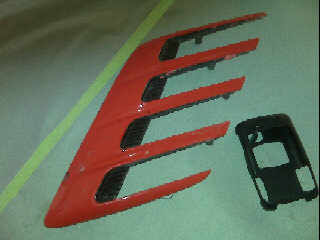
If anyone knows who might have the trim piece (black piece in picture) let me know as mine are dry rotted. I have attached a pic of the scoop and this is the finger scoop.
I am so close I can taste it, I will post more pics later but right now I am looking to find out where I can find a body side scoop trim piece. Have done the online thing to no avail and since its Sunday many places aren't open.
If anyone knows who might have the trim piece (black piece in picture) let me know as mine are dry rotted. I have attached a pic of the scoop and this is the finger scoop.
-
- frt stripe piece.jpg (8.94 KiB) Viewed 2073 times
- bradburm
- Frequent Poster
- Posts: 99
- Joined: 19 Oct 2005 18:26
- Location: Duluth, Georgia (Atlanta)
36 posts
• Page 1 of 2 • 1, 2