Re: 72 Challenger
![]() by Eddie » 04 May 2011 16:02
by Eddie » 04 May 2011 16:02
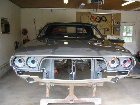
Before I started stripping the underside for New Undercoating, I noticed this. The rear valance is glued on! The right side was held on with 3 hardware store fasteners but the drivers side is glued on and hangs 2 inches below the trunk panel. I am having my bud Jim bring his welder over and I ordered a new OEM original Chrysler Rear valance fastener kit from Mr. G's. God I love body work 
 Viewed 1315 times")
-

Eddie - Frequent Poster
- Posts: 6212
- Joined: 16 Oct 2006 21:26
- Location: Terre Haute, Ind.
Re: 72 Challenger
![]() by Adrian Worman » 04 May 2011 16:05
by Adrian Worman » 04 May 2011 16:05
But don't you just love all the weird little shit that you find when you go through a car thats had another life 

Jesus built my hot rod
-

Adrian Worman - Frequent Poster
- Posts: 2051
- Joined: 10 Mar 2007 23:54
- Location: milton keynes
Re: 72 Challenger
![]() by Eddie » 04 May 2011 16:08
by Eddie » 04 May 2011 16:08
Yeah, It's kinda neat. It was in a wreck, hit from behind. So far it looks pretty solid. Now if I can just get this valance hung so it doesnt fall off 1/2 way thru Kansas
-
Eddie - Frequent Poster
- Posts: 6212
- Joined: 16 Oct 2006 21:26
- Location: Terre Haute, Ind.
Re: 72 Challenger
![]() by burdar » 04 May 2011 17:21
by burdar » 04 May 2011 17:21
Since you've got the bumper off anyway....You should lose the bumper fillers and push the bumper in next to the body. Just cut the rear brackets, overlap and reweld in the new possition. Then you can take off that triangular lisence plate bracket.
-
burdar - Frequent Poster
- Posts: 429
- Joined: 24 Mar 2009 17:27
- Location: Iowa
Re: 72 Challenger
![]() by Eddie » 04 May 2011 17:34
by Eddie » 04 May 2011 17:34
burdar wrote:Since you've got the bumper off anyway....You should lose the bumper fillers and push the bumper in next to the body. Just cut the rear brackets, overlap and reweld in the new possition. Then you can take off that triangular lisence plate bracket.
Thanks for the tip Burdar! I think I understand what you are saying. Those rectangular steel 'tabs' that are in the pic. Remove those?
 Viewed 1312 times")
-
Eddie - Frequent Poster
- Posts: 6212
- Joined: 16 Oct 2006 21:26
- Location: Terre Haute, Ind.
Re: 72 Challenger
![]() by Eddie » 04 May 2011 17:35
by Eddie » 04 May 2011 17:35
Here is a pic of the bumper. It looks the same as my 70.
 Viewed 1312 times")
-
Eddie - Frequent Poster
- Posts: 6212
- Joined: 16 Oct 2006 21:26
- Location: Terre Haute, Ind.

 Viewed 1312 times")
-
Eddie - Frequent Poster
- Posts: 6212
- Joined: 16 Oct 2006 21:26
- Location: Terre Haute, Ind.
Re: 72 Challenger
![]() by Adrian Worman » 04 May 2011 17:52
by Adrian Worman » 04 May 2011 17:52
The only difference is the jacking slots, mine sits out and proud a bit so I'm gonna get both front and rear bumpers much closer to the body. Your 70 is just bloody lovely mate, I can stare at it all day 
Jesus built my hot rod
-
Adrian Worman - Frequent Poster
- Posts: 2051
- Joined: 10 Mar 2007 23:54
- Location: milton keynes
Re: 72 Challenger
![]() by Eddie » 05 May 2011 15:18
by Eddie » 05 May 2011 15:18
Thanks for the kind words Adrian. I thinks it's going to work out fine, I might need to weld a tab to the drivers side quarter to attach the valance to. When I get the hardware kit I'll post a pic And thanks to Dave for updating the correct year.
-
Eddie - Frequent Poster
- Posts: 6212
- Joined: 16 Oct 2006 21:26
- Location: Terre Haute, Ind.
Re: 72 Challenger
![]() by Eddie » 06 May 2011 19:27
by Eddie » 06 May 2011 19:27
I removed the fuel tank, I couldnt remove the Valance because it's welded on! The body caulk I discovered around the drivers side is welded, and the center 'tab' is also welded. I think after cutting the valance off it will be ruined, at least the mounting tab will be. I'll sacrifice the valance to maintain the attachment point on the 1/4 on that side. Gotta start doing a little cutting/welding on it.
 Viewed 1293 times")
-
Eddie - Frequent Poster
- Posts: 6212
- Joined: 16 Oct 2006 21:26
- Location: Terre Haute, Ind.
 Viewed 1293 times")
-
Eddie - Frequent Poster
- Posts: 6212
- Joined: 16 Oct 2006 21:26
- Location: Terre Haute, Ind.
Re: 72 Challenger
![]() by Eddie » 06 May 2011 19:33
by Eddie » 06 May 2011 19:33
So a new 1970 fuel tank with 3/8 pickup and return line,,minus the ECS junk and new stainless straps,(since I ruined the old ones taking them off) I want stainless anyways and a new Valance with new hardware for both components should be the 'plan' gotta start cutting/stripping/priming/welding--in that order I hope!
-
Eddie - Frequent Poster
- Posts: 6212
- Joined: 16 Oct 2006 21:26
- Location: Terre Haute, Ind.
Re: 72 Challenger
![]() by burdar » 09 May 2011 14:31
by burdar » 09 May 2011 14:31
I think I understand what you are saying. Those rectangular steel 'tabs' that are in the pic. Remove those?
Sorry, I accually looked at your picture wrong. The bumper fillers are already removed. It looked like they were still on there in one of your pictures.
The only thing I would do now is remove the lisence plate spacer bracket. 70-72's didn't use those. They only used them in 73-74 because with the bumper out farther from the body, the plate light didn't eluminate that area good enough anymore. That spacer bracket pushed the plate out from the valence enough so it could be lit by the light on the bumper.
-
burdar - Frequent Poster
- Posts: 429
- Joined: 24 Mar 2009 17:27
- Location: Iowa
Re: 72 Challenger
![]() by Eddie » 09 May 2011 18:10
by Eddie » 09 May 2011 18:10
Oh, OK thanks Burdar! I managed to remove the valance but had to cut the flange off the drivers side. I will order a new Valance from Mancini Racing after I prime the underside and install/weld in the aftermarket stuff.
-
Eddie - Frequent Poster
- Posts: 6212
- Joined: 16 Oct 2006 21:26
- Location: Terre Haute, Ind.
Re: 72 Challenger
![]() by Eddie » 12 May 2011 18:01
by Eddie » 12 May 2011 18:01
A pic of the drivers side 1/4 flange to the Valance Panel. You can see the weldment.
 Viewed 1257 times")
-
Eddie - Frequent Poster
- Posts: 6212
- Joined: 16 Oct 2006 21:26
- Location: Terre Haute, Ind.
Re: 72 Challenger
![]() by Adrian Worman » 13 May 2011 8:53
by Adrian Worman » 13 May 2011 8:53
Thats a strange place to have a part of the flange missing, was there some tin worm in there then, cos otherwise looks real straight does'nt it?
Jesus built my hot rod
-
Adrian Worman - Frequent Poster
- Posts: 2051
- Joined: 10 Mar 2007 23:54
- Location: milton keynes
Re: 72 Challenger
![]() by Eddie » 13 May 2011 16:55
by Eddie » 13 May 2011 16:55
The flange is actually there, they just welded it to the 1/4. I am thinking it wasnt drilled and they didnt have the correct fasteners, so they used hardware store fasteners on one side where it was already drilled, then got stupid, and welded the 2 flanges together redneck style where there wasnt any holes. 
-
Eddie - Frequent Poster
- Posts: 6212
- Joined: 16 Oct 2006 21:26
- Location: Terre Haute, Ind.
Re: 72 Challenger
![]() by drewcrane » 15 May 2011 14:45
by drewcrane » 15 May 2011 14:45
The quarter was replaced on driver side? they must have lost the fasteners and yep Ed they did the redneck/hillbilly job,just to get it out the door............. 
Vanishing point 2014 trip of the century
-
drewcrane - Frequent Poster
- Posts: 2893
- Joined: 01 Sep 2007 12:36
- Location: "follow the laraya belt ,that should get ya there"
Re: 72 Challenger
![]() by Eddie » 15 May 2011 15:31
by Eddie » 15 May 2011 15:31
Yes, they replaced the driver's side 1/4 panel, did a decent job, if you open the drivers side door you can see where they plug welded the new panel flange in. But, this is a VERY solid car, I was just a little pee'd off because I need to get a new valance panel and the 2 brackets at a cost of 350.00 for the new sheetmetal from Mancini Racing plus 35.00 for the valance fastener kit from mr. G's. I A $2 drill bit would have saved me over 400.00 bucks.!!drewcrane wrote:The quarter was replaced on driver side? they must have lost the fasteners and yep Ed they did the redneck/hillbilly job,just to get it out the door.............
-
Eddie - Frequent Poster
- Posts: 6212
- Joined: 16 Oct 2006 21:26
- Location: Terre Haute, Ind.
Re: 72 Challenger
![]() by Eddie » 20 Jun 2011 20:04
by Eddie » 20 Jun 2011 20:04
I thought I would post a recent pic of what I have accomplished so far. I stripped off all the old undercoating at the rear. Getting ready to install the torque boxes, I have my buds Hobart MIG welder.
 Viewed 1182 times")
-
Eddie - Frequent Poster
- Posts: 6212
- Joined: 16 Oct 2006 21:26
- Location: Terre Haute, Ind.
 Viewed 1182 times")
-
Eddie - Frequent Poster
- Posts: 6212
- Joined: 16 Oct 2006 21:26
- Location: Terre Haute, Ind.
Re: 72 Challenger
![]() by drewcrane » 20 Jun 2011 20:46
by drewcrane » 20 Jun 2011 20:46
Nice Keep at
Vanishing point 2014 trip of the century
-
drewcrane - Frequent Poster
- Posts: 2893
- Joined: 01 Sep 2007 12:36
- Location: "follow the laraya belt ,that should get ya there"
-

patrick - Frequent Poster
- Posts: 1323
- Joined: 09 Jul 2007 0:56
- Location: Washington State, U.S.A.
Re: 72 Challenger
![]() by Adrian Worman » 21 Jun 2011 8:11
by Adrian Worman » 21 Jun 2011 8:11
Eddie, are you finding all good metal the more you strip it? Those pics remind me of my own shell 23 years ago, looks in identical cond and your coin top work mate 
Jesus built my hot rod
-
Adrian Worman - Frequent Poster
- Posts: 2051
- Joined: 10 Mar 2007 23:54
- Location: milton keynes
Re: 72 Challenger
![]() by Eddie » 21 Jun 2011 13:49
by Eddie » 21 Jun 2011 13:49
Adrian Worman wrote:Eddie, are you finding all good metal the more you strip it? Those pics remind me of my own shell 23 years ago, looks in identical cond and your coin top work mate
Yes, the metal is very nice. Just some surface rust at the rear but nothing serious.
-
Eddie - Frequent Poster
- Posts: 6212
- Joined: 16 Oct 2006 21:26
- Location: Terre Haute, Ind.
Re: 72 Challenger
![]() by Eddie » 14 Jul 2011 20:38
by Eddie » 14 Jul 2011 20:38
Prepped the trunk floor and the underside for the 3M undercoating thats going on after all the welding is done. Had to re-weld the rear shock bracket,,one side was just 'hanging' there.
 Viewed 1151 times")
-
Eddie - Frequent Poster
- Posts: 6212
- Joined: 16 Oct 2006 21:26
- Location: Terre Haute, Ind.
 Viewed 1151 times")
-
Eddie - Frequent Poster
- Posts: 6212
- Joined: 16 Oct 2006 21:26
- Location: Terre Haute, Ind.
 Viewed 1150 times")
-
Eddie - Frequent Poster
- Posts: 6212
- Joined: 16 Oct 2006 21:26
- Location: Terre Haute, Ind.
Re: 72 Challenger
![]() by Eddie » 14 Jul 2011 20:45
by Eddie » 14 Jul 2011 20:45
#4 I gotta wait an hour or 'No Tack' until the 2nd coat goes on which according to RB is mandatory. The fumes are making feel YOUNG again! 
 Viewed 1150 times")
-
Eddie - Frequent Poster
- Posts: 6212
- Joined: 16 Oct 2006 21:26
- Location: Terre Haute, Ind.
Re: 72 Challenger
![]() by Adrian Worman » 14 Jul 2011 21:05
by Adrian Worman » 14 Jul 2011 21:05
Don't know 'bout you Edd but I can't wait fer anything 
Jesus built my hot rod
-
Adrian Worman - Frequent Poster
- Posts: 2051
- Joined: 10 Mar 2007 23:54
- Location: milton keynes