Page 1 of 1
Update on the 70 Chally project.......gettin' close!

Posted:
16 Feb 2010 0:45by The Toy Peddler
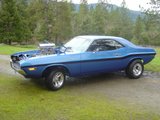
I had another great and fun day working on the Chally. I removed the front bumper to install the newly painted and shined grill and headlight bezels. Got them installed and the bumper back on without any problem which was pretty unusual for this car. I didn't really have time to give it the wash I wanted, but dusted it off a bit and took these pics. Yes, I know the Challenger emblem on the grill needs straightening, also, the tranny isn't in it so the engine is tilted back slightly, but still looks pretty cool with that huge scoop! The exterior cosmetics are pretty well done, minus the antenna and dual exhaust.
I am really getting excited because this thing is flying together now. After the wiring is complete it will be time to fire this puppy up!
Thanks for all the help and advice. It is GREATLY appreciated!
Posted:
16 Feb 2010 1:52by redgum78
Looking good

Are you having trouble sleeping in anticipation of having it going

.
I will be like a kid on Christmas eve when I get to this stage

Posted:
16 Feb 2010 4:56by patrick
Your car is beautiful, Paul!
Posted:
16 Feb 2010 8:40by dave-r
Looking really good.

You must work bloody hard to get so much done in such a short time.
Here is a tip for you though. The 1970 grille allows you to see right through the front. On cars painted anything other than a very dark colour Dodge painted the front facing metalwork of the radiator support frame matt black. This makes the grille look much better from the front. It is worth doing.

Posted:
16 Feb 2010 13:21by The Toy Peddler
I turn 55 tomorrow and will be heading to Las Vegas the next day to attend a diecast convention. I was hoping to have this to show off, but I knew a couple months back it wouldn't be ready. I am getting really excited about this. I do wake up in the middle of the night thinking about it.
There is a big cruise here in May and it will definitely be there. Then we have the "Back to the 50's" cruise in July. I can't wait for that one!
I guess I should have painted that area black when everything was getting done. I might try doing that later, but want to get it all going first.
The latest on the project from he!!
Posted:
04 Mar 2010 20:08by The Toy Peddler
Now I'm gettin' excited! I brought my baby out of the garage and gave her a much needed wash and took a few pics. All that's left is to finish the wiring, interior (which should be pretty quick) exhaust and cooling. I'm thinking 3 weeks and I will fire this puppy up!
http://s723.photobucket.com/albums/ww23 ... 779b42.pbw
Posted:
04 Mar 2010 21:48by Piston_Freddy
Linky no worky!
Posted:
04 Mar 2010 22:57by The Toy Peddler
It just worked for me. A bit slow to load but it does work.
Paul
Posted:
05 Mar 2010 8:57by dave-r
We just get the login page.
There will be a specific URL for others to see the photos.
Posted:
05 Mar 2010 15:35by The Toy Peddler
O.K., lets try this.
Posted:
05 Mar 2010 18:23by dave-r
Yeah!

For those of you that don't get it. Click on the photo and you get a slideshow.
I wish you would paint the radiator support frame black though Paul.

Posted:
06 Mar 2010 1:07by The Toy Peddler
I don't know why it happens, but the photobucket slideshows keep going back and re-running the first few slides. Pretty annoying.
I will probably paint the supports black, although at this point it will be by hand with a brush! Probably won't be that noticeable when all is done and in.
I have an all aluminum radiator that I should also paint black. Will that cut down on it's efficiency?
Posted:
06 Mar 2010 9:51by dave-r
On mine I just painted the front of it black and left the reverse side alone.
Use a correct automotive radiator paint such as the Eastwood product and it will actually make the radiator MORE efficient.