
Re: original owner 73
![]() by burdar » 22 Jul 2011 12:36
by burdar » 22 Jul 2011 12:36
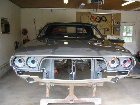
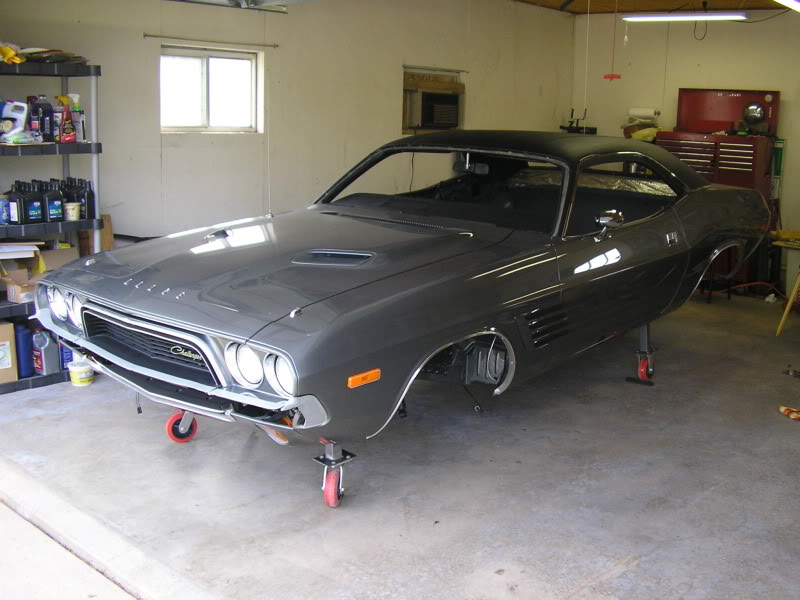
Installed the dash last night. It feels good to get that big step out of the way.
-
burdar - Frequent Poster
- Posts: 429
- Joined: 24 Mar 2009 17:27
- Location: Iowa
-

MLMFLCN - Frequent Poster
- Posts: 238
- Joined: 10 Oct 2005 13:24
- Location: Ohio
Re: original owner 73
![]() by burdar » 30 Sep 2011 20:23
by burdar » 30 Sep 2011 20:23
The car came down off the body stand a few days ago. The stand was designed in a way that wouldn't allow me to install the brake/fuel lines while the car was sitting on it. A guy from work came over with the "Donkey" and lifted the car in the air so we could unbolt the stand.
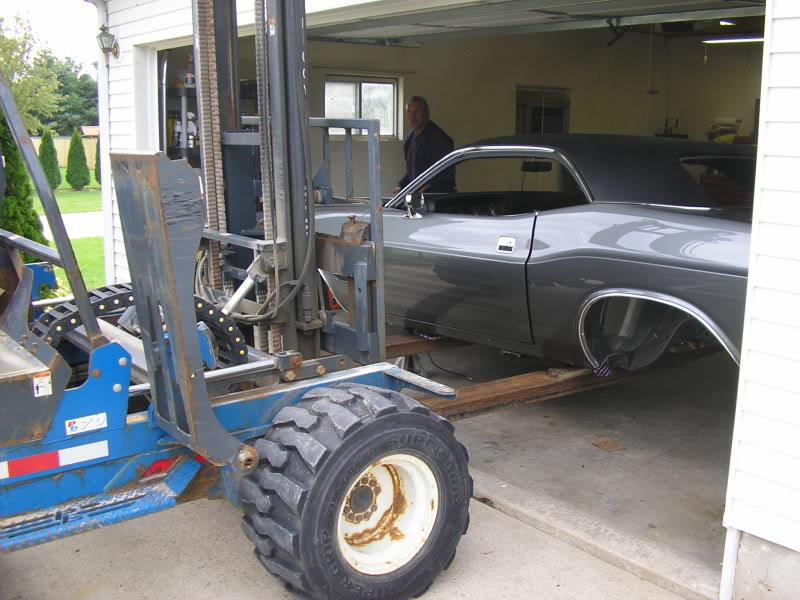
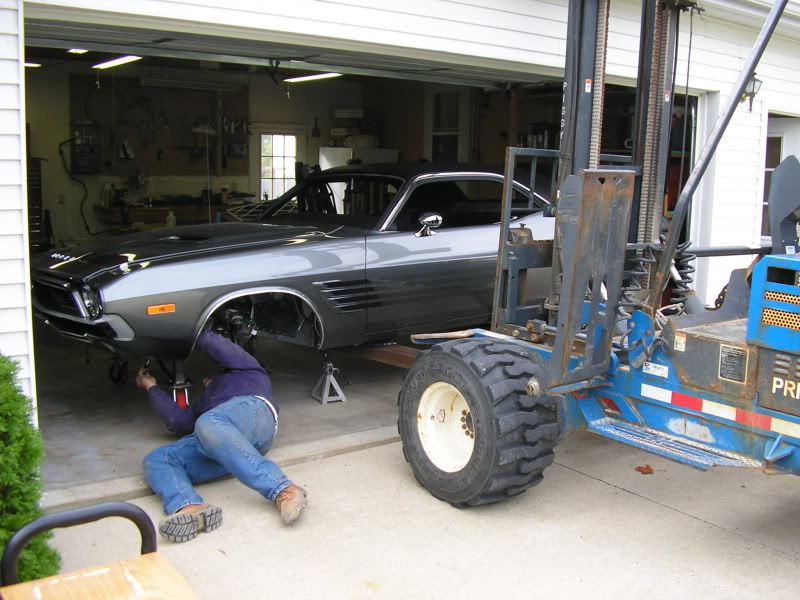
We bolted on my stands that I previously rebuilt with larger wheels. The car moves a lot smoother with the 8" wheels then it did with the 4" ones. The only issue is that the rear stands have a tendancy to kick out at the bottom. Last night I put the rear of the car on jack stands and readjusted the stands so they were straight up and down. I'm going to bolt a piece of angle iron between the stands to keep them in the propper possition. The angle iron can also be used as a jacking point. I had to get creative in order to get the car up on jack stands last night.
The main brake line is installed now and once the brace is bolted between the rear stands, I'll start installing the fuel lines and gas tank. Maybe I can get all that done this weekend.
-
burdar - Frequent Poster
- Posts: 429
- Joined: 24 Mar 2009 17:27
- Location: Iowa
Re: original owner 73
![]() by dave-r » 01 Oct 2011 12:10
by dave-r » 01 Oct 2011 12:10
That car is just looking SO good.  I really love that colour.
I really love that colour.The Dave giveth and the Dave taketh away.
-

dave-r - Grumpy Old Man
- Posts: 9842
- Joined: 12 Oct 2003 21:45
- Location: North of the Tyne, England
Re: original owner 73
![]() by RedRaven » 01 Oct 2011 16:34
by RedRaven » 01 Oct 2011 16:34
ITS FUCKIN SAVAGE LOOKIN....LOOKS REALLY WELL.........
I seek the knowledge of MOPAR
-

RedRaven - Frequent Poster
- Posts: 1995
- Joined: 15 Jul 2007 20:09
- Location: THE DOG HOUSE
Re: original owner 73
![]() by drewcrane » 01 Oct 2011 16:58
by drewcrane » 01 Oct 2011 16:58
Yea looking real nice............I wish I had a fork lift some times 
Vanishing point 2014 trip of the century
-
drewcrane - Frequent Poster
- Posts: 2893
- Joined: 01 Sep 2007 12:36
- Location: "follow the laraya belt ,that should get ya there"
Re: original owner 73
![]() by Adrian Worman » 01 Oct 2011 21:03
by Adrian Worman » 01 Oct 2011 21:03
drewcrane wrote:Yea looking real nice............I wish I had a fork lift some times
I got one.................I drive it into things
Jesus built my hot rod
-

Adrian Worman - Frequent Poster
- Posts: 2051
- Joined: 10 Mar 2007 23:54
- Location: milton keynes
Re: original owner 73
![]() by burdar » 03 Oct 2011 0:58
by burdar » 03 Oct 2011 0:58
I got a good amount of stuff done this weekend. I have most of the fuel lines clamped on. I need to adjust the lines in the engine compartment a little before clamping them to the frame. The rest of the lines are clamped on. I attached the shocks to their upper mounts and installed the passengers side over axle hanger. It isn't 100% correct looking but it's close enough for me.

I preassembled the vapor separator onto the tank since getting to the clamps would be impossible after the tank was bolted in. I made the tank pad myself using a picture of the origial pad as a guide. The stainless steel tank straps wouldn't go into the mount. I compaired them to the original straps and saw that there was more material above the notched areas then factory. I made the notches 1/8" larger and the straps went in. The J-bolts also needed grinding to fit in their mounts. The round head was too large and needed to be ground down a little.
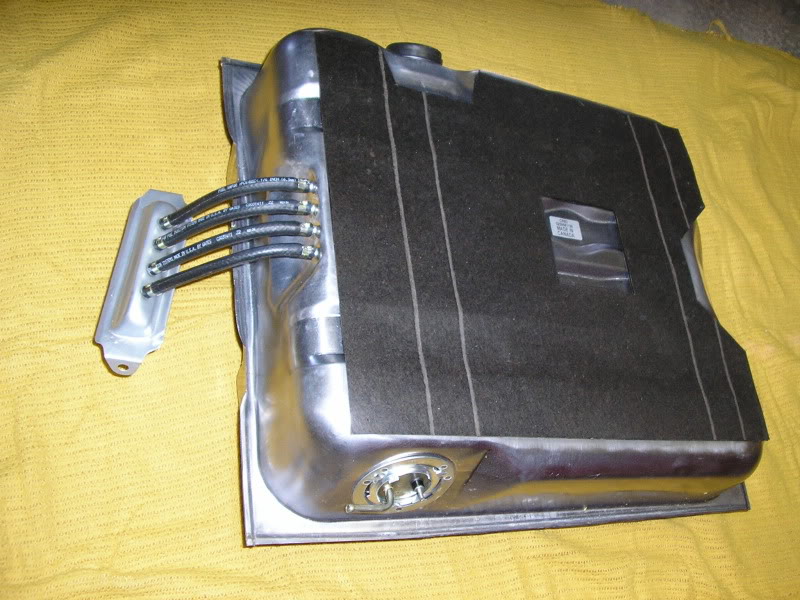
After attaching the vapor separator and making the fuel line connections, I installed the muffler heat sheilds.


I preassembled the vapor separator onto the tank since getting to the clamps would be impossible after the tank was bolted in. I made the tank pad myself using a picture of the origial pad as a guide. The stainless steel tank straps wouldn't go into the mount. I compaired them to the original straps and saw that there was more material above the notched areas then factory. I made the notches 1/8" larger and the straps went in. The J-bolts also needed grinding to fit in their mounts. The round head was too large and needed to be ground down a little.
After attaching the vapor separator and making the fuel line connections, I installed the muffler heat sheilds.
-
burdar - Frequent Poster
- Posts: 429
- Joined: 24 Mar 2009 17:27
- Location: Iowa
Re: original owner 73
![]() by dave-r » 03 Oct 2011 9:41
by dave-r » 03 Oct 2011 9:41
These detailed photos are very very useful for reference. Thanks for posting them. 
The Dave giveth and the Dave taketh away.
-
dave-r - Grumpy Old Man
- Posts: 9842
- Joined: 12 Oct 2003 21:45
- Location: North of the Tyne, England
Re: original owner 73
![]() by burdar » 27 Oct 2011 18:22
by burdar » 27 Oct 2011 18:22
A couple weeks ago I was in the garage trying to decide what I wanted to work on next. I saw the driveshaft sitting there so I decided to work on it. Probably seven years ago I wire wheeled the shaft and brushed on some POR-15. Then I sprayed it with Detail Gray spray paint.  Since then I've seen some awsome looking driveshafts restored and left bare metal. I wanted to see how nice I could get the driveshaft to look without using any paint. Well, it didn't turn out as nice as I had hoped since it was extremely pitted but I'll show what I ended up with anyway.
I started by brushing on some paint stripper to remove the Detail Gray paint. It came off easily. Here you can see the POR-15 underneith.
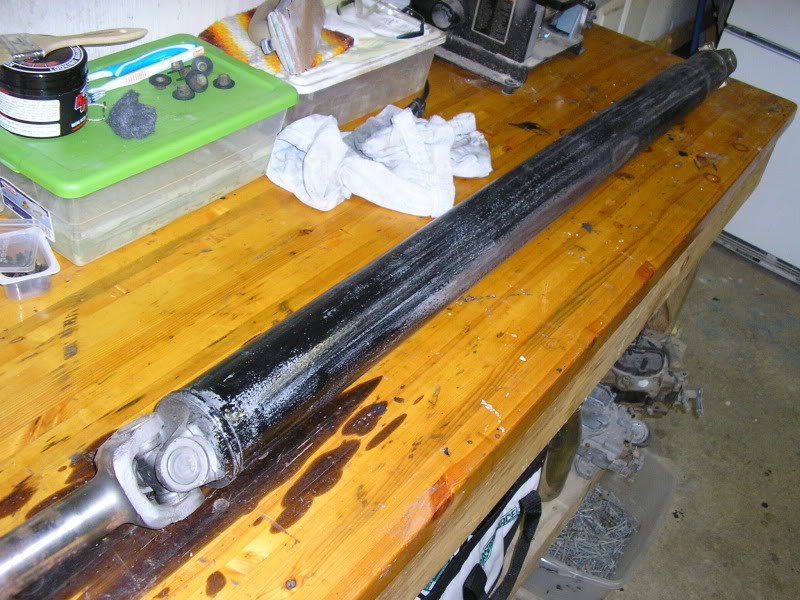
Next, I sanded off most of the POR-15 with 80 grit sand paper and removed the U-joints.
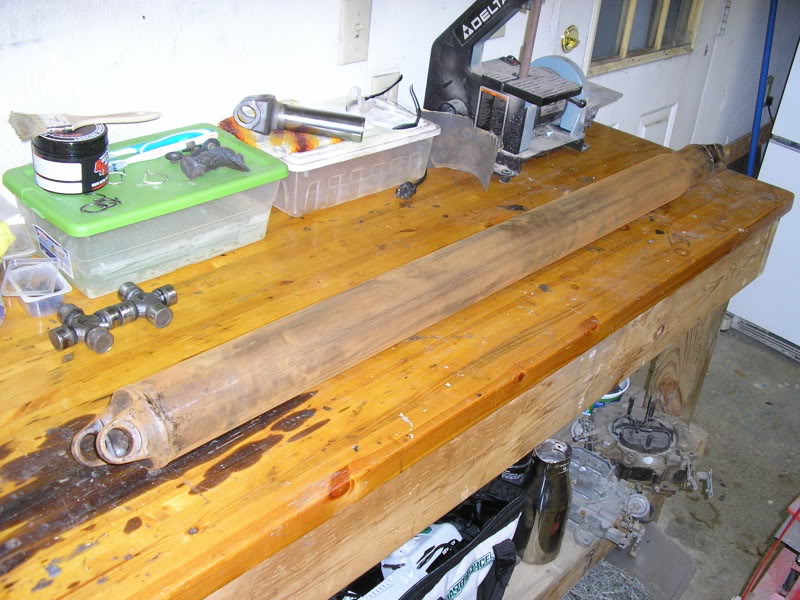
I went to the hardware store and bought some 4" PVC pipe and a cap. I poured EvapoRust in the pipe and inserted the driveshaft.
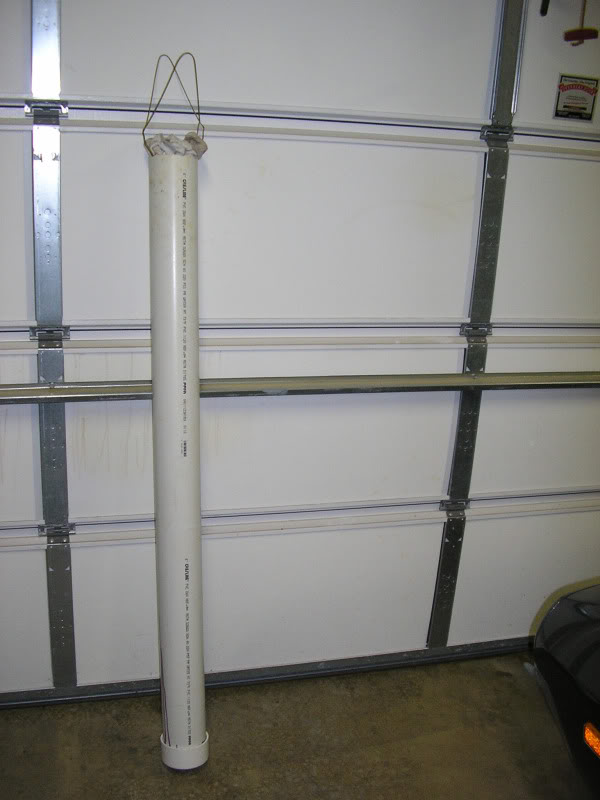
After a day of soaking, the shaft came out rust free. I still had paint and POR-15 on the ends which required a little sandblasting to clean up.

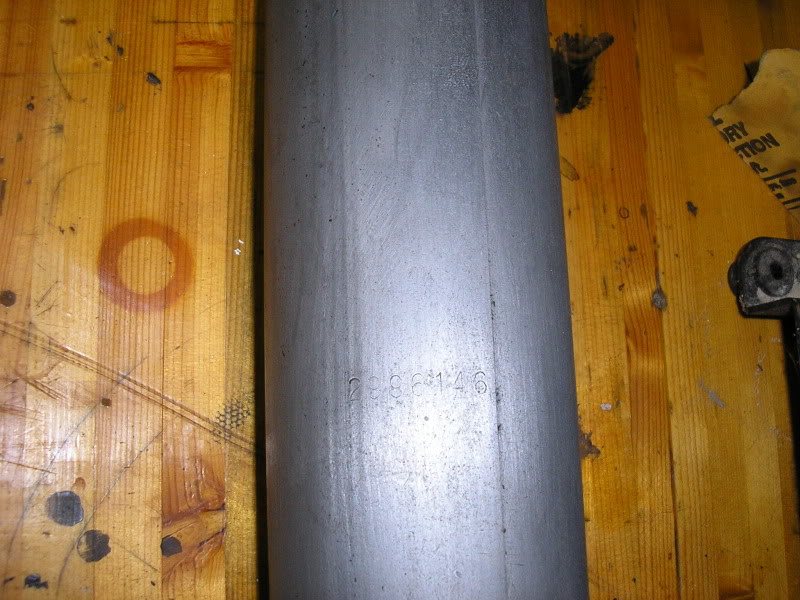
I was shocked to find a nice looking part number still on the driveshaft.
I sanded on the shaft a little but the pits weren't coming out. I got online and found out that driveshafts are only about a 1/16" thick so I decided to just leave it. I lightly bead blasted the shaft to remove some of the sanding marks. Finally, I rubbed it down with steel wool to get rid of the blasted finish. Once the ends were cleaned up I dipped them in my black oxide solution for 30 seconds to darken them. I rubbed them with steel wool to remove some of the darkness on the high spots.
I took the driveshaft to my father-in-laws house and he helped me reapply the heat markings from the end caps being welded to the tube. Over the weekend I heated the driveshaft and applied RPM to it so it won't rust again. I also applied some RPM to the new U-joints. While I had the new joints appart I noticed that one of the caps was missing two of the needles. I returned that one the other day and it is now installed. The only other thing I need to do is have it ballanced.
Here's the finished product. I took this picture without the flash to hide some of the pitting. Hopefully it will look OK under the car.

I started by brushing on some paint stripper to remove the Detail Gray paint. It came off easily. Here you can see the POR-15 underneith.
Next, I sanded off most of the POR-15 with 80 grit sand paper and removed the U-joints.
I went to the hardware store and bought some 4" PVC pipe and a cap. I poured EvapoRust in the pipe and inserted the driveshaft.
After a day of soaking, the shaft came out rust free. I still had paint and POR-15 on the ends which required a little sandblasting to clean up.
I was shocked to find a nice looking part number still on the driveshaft.
I sanded on the shaft a little but the pits weren't coming out. I got online and found out that driveshafts are only about a 1/16" thick so I decided to just leave it. I lightly bead blasted the shaft to remove some of the sanding marks. Finally, I rubbed it down with steel wool to get rid of the blasted finish. Once the ends were cleaned up I dipped them in my black oxide solution for 30 seconds to darken them. I rubbed them with steel wool to remove some of the darkness on the high spots.
I took the driveshaft to my father-in-laws house and he helped me reapply the heat markings from the end caps being welded to the tube. Over the weekend I heated the driveshaft and applied RPM to it so it won't rust again. I also applied some RPM to the new U-joints. While I had the new joints appart I noticed that one of the caps was missing two of the needles. I returned that one the other day and it is now installed. The only other thing I need to do is have it ballanced.
Here's the finished product. I took this picture without the flash to hide some of the pitting. Hopefully it will look OK under the car.
-
burdar - Frequent Poster
- Posts: 429
- Joined: 24 Mar 2009 17:27
- Location: Iowa
Re: original owner 73
![]() by drewcrane » 27 Oct 2011 19:42
by drewcrane » 27 Oct 2011 19:42
Man that por 15 dont like to come off very easily  ,nice work ,you are ahead of me so I can watch your thread and it will help me a ton
Vanishing point 2014 trip of the century
-
drewcrane - Frequent Poster
- Posts: 2893
- Joined: 01 Sep 2007 12:36
- Location: "follow the laraya belt ,that should get ya there"
Re: original owner 73
![]() by dave-r » 27 Oct 2011 20:09
by dave-r » 27 Oct 2011 20:09
That is as neat as a very neat thing.
Loving your work. I would never have thought of doing that.
RPM??
Loving your work. I would never have thought of doing that.
Over the weekend I heated the driveshaft and applied RPM to it so it won't rust again.
RPM??
The Dave giveth and the Dave taketh away.
-
dave-r - Grumpy Old Man
- Posts: 9842
- Joined: 12 Oct 2003 21:45
- Location: North of the Tyne, England
Re: original owner 73
![]() by burdar » 27 Oct 2011 20:39
by burdar » 27 Oct 2011 20:39
Dave, I'm sure you remember the white Challenger that was featured in Mopar Action Magazine. I'm pretty sure you have a link to that article on this site. RPM was developed by the owner of that car Dave Walden. It was developed for use on the car he restored after the Challenger. Here is a link to the product.
http://www.ecsautomotive.com/RPM/
I bought some RPM in the spring after I saw some of my refinished fasteners starting to develop surface rust. The sealer that was supplied with the black oxide kit I bought didn't work. I've been using the RPM on a lot of parts. I've used it on the UCA cam bolts, the master cylinder, all the phosphate looking fasteners exc. I'm going to start redoing the rear end housing shortly. Hopefully I'll be able to leave the center section bare metal and treat it with RPM.
-
burdar - Frequent Poster
- Posts: 429
- Joined: 24 Mar 2009 17:27
- Location: Iowa
Re: original owner 73
![]() by drewcrane » 27 Oct 2011 21:21
by drewcrane » 27 Oct 2011 21:21
burdar wrote:Dave, I'm sure you remember the white Challenger that was featured in Mopar Action Magazine. I'm pretty sure you have a link to that article on this site. RPM was developed by the owner of that car Dave Walden. It was developed for use on the car he restored after the Challenger. Here is a link to the product.
http://www.ecsautomotive.com/RPM/
I bought some RPM in the spring after I saw some of my refinished fasteners starting to develop surface rust. The sealer that was supplied with the black oxide kit I bought didn't work. I've been using the RPM on a lot of parts. I've used it on the UCA cam bolts, the master cylinder, all the phosphate looking fasteners exc. I'm going to start redoing the rear end housing shortly. Hopefully I'll be able to leave the center section bare metal and treat it with RPM.
I will be picking up some RPM
Vanishing point 2014 trip of the century
-
drewcrane - Frequent Poster
- Posts: 2893
- Joined: 01 Sep 2007 12:36
- Location: "follow the laraya belt ,that should get ya there"
Re: original owner 73
![]() by dave-r » 28 Oct 2011 10:09
by dave-r » 28 Oct 2011 10:09
That looks like very handy stuff. How is it applied? Brush on? With a cloth?
The Dave giveth and the Dave taketh away.
-
dave-r - Grumpy Old Man
- Posts: 9842
- Joined: 12 Oct 2003 21:45
- Location: North of the Tyne, England
Re: original owner 73
![]() by burdar » 28 Oct 2011 12:49
by burdar » 28 Oct 2011 12:49
It comes with a brush but it can be applied with a rag. RPM is a paste...You have to heat the part up to 120 degrees F. The RPM melts onto the part and turns glossy so you know which areas have been treated. Once it dries, it's invisable. It slightly dulls the surface but it can be lightly buffed once dry to bring the shine back.
I recently bought an NOS EGR valve that has some surface rust on it. I'm going to clean the rust off of it and apply the RPM to it. I think some people are trying it on exhaust manifolds too. It wasn't designed for use in high heat applications but it's a new product. New uses for it are being discovered all the time.
I recently bought an NOS EGR valve that has some surface rust on it. I'm going to clean the rust off of it and apply the RPM to it. I think some people are trying it on exhaust manifolds too. It wasn't designed for use in high heat applications but it's a new product. New uses for it are being discovered all the time.
-
burdar - Frequent Poster
- Posts: 429
- Joined: 24 Mar 2009 17:27
- Location: Iowa
Re: original owner 73
![]() by dave-r » 28 Oct 2011 15:43
by dave-r » 28 Oct 2011 15:43
That is great info thanks.
The Dave giveth and the Dave taketh away.
-
dave-r - Grumpy Old Man
- Posts: 9842
- Joined: 12 Oct 2003 21:45
- Location: North of the Tyne, England
Re: original owner 73
![]() by burdar » 30 Jan 2012 19:13
by burdar » 30 Jan 2012 19:13
I havn't been on here in quite awhile. I had computer problems and work has been slow so I've had to go back out into the shop for the winter. I'm still working on the car though. I've accually gotten a lot of parts refinished this winter. I have a batch of fasteners to RPM tonight as a matter of fact. I've been working on redoing the rear end again but don't want to show pics of it until it's done. I had the housing power coated but the pitting still remains. I need to have the pits filled and get the housing repainted before I put it back together.
Here are some pictures of things I've finished so far this winter. I should be on track to getting the engine installed this spring.
The calipers are reman pieces I bought a long time ago. The had a little surface rust on them from sitting. I blew out the pistons, removed all the seals, cleaned off the rust and RPM'd everything. I also RPM'd the new brake hose ends.

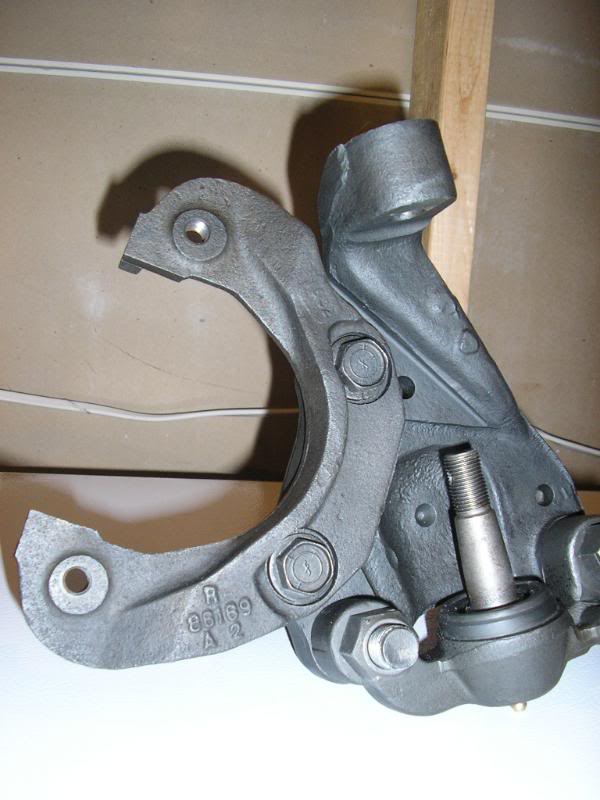
I had previously painted all the suspension parts with POR-15. With as much trouble as I had sanding off the POR on the driveshaft, I looked for a product that would remove it.(regular paint stripper won't touch it) I found the POR accually makes a paint stripper that works on the POR-15. It's called POR-Strip. Anyone that needs to remove POR-15 needs to get some of that stuff. It works awsome. The POR-15 just wrinkles up and flakes off...it doesn't turn into a gooey mess like regular paint.
I stripped the POR off the spindles and caliper brackets and then sand blasted them. I used the black oxide solution I've been using on the fasteners and brushed it onto the spindles/brackets. I RPM'd everything separately before assembling. The finished prodect came out too dark but I'm still pleased with the results.
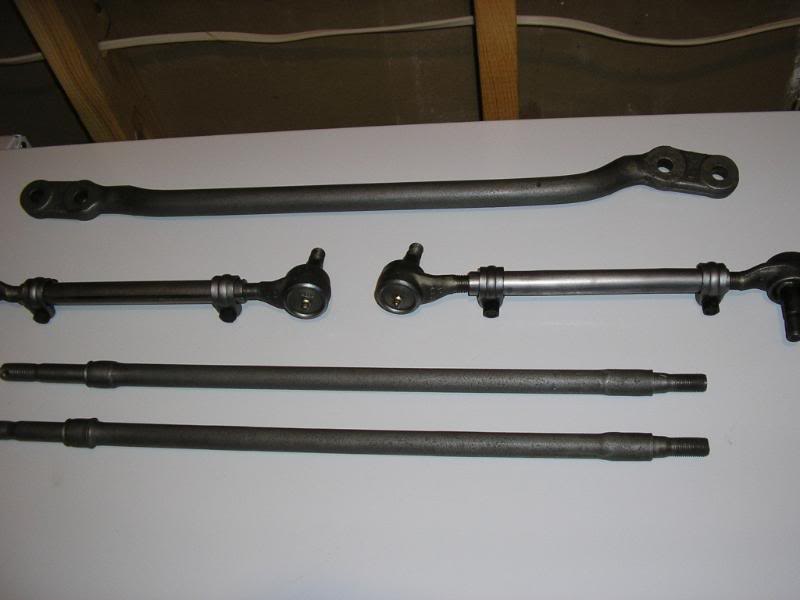
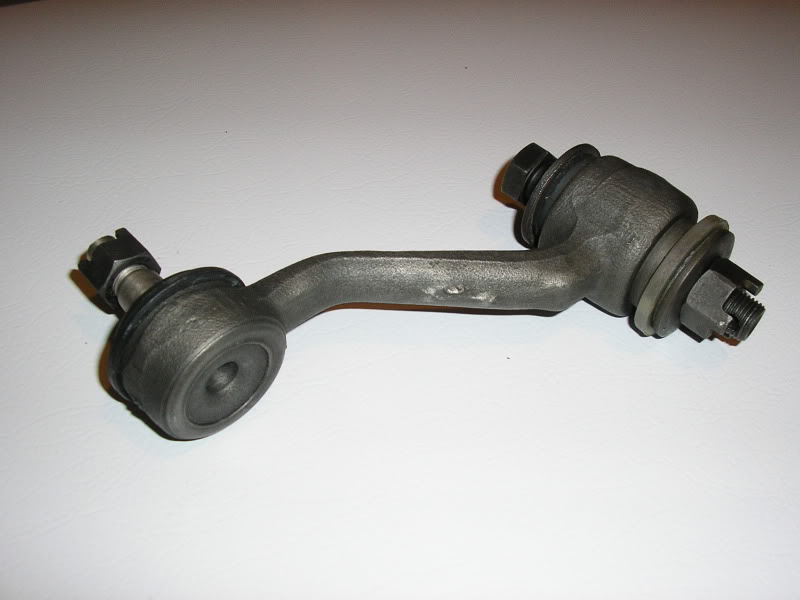
Everything in this next picture is original except for the tie rods. I've been using muriatic acid to derust parts and it works great. EvapoRust is expensive and loses its strength quickly. The acid cleans the rust off fairly quick. The only thing you have to do is neutralise the acid once your done. I've been using baking soda water. The center link and strut rods were stripped of POR and put in a smaller piece of PVC with the acid. Once the rust was gone, I filled the PVC with baking soda water and let them sit over night. The next morning I rinced them off and RPM'd them right away. The tie rod adjuster sleeves were soaking in acid as well. I lightly wire wheeled them once the rust was gone before RPMing.(same thing was done to the clamps)
I didn't want to use the acid on the original idler arm. I checked it over and found that it was still in great shape. I soaked it in EvapoRust, RPM'd it and sprayed some grease in lower end. I even saved the original rubber boot.
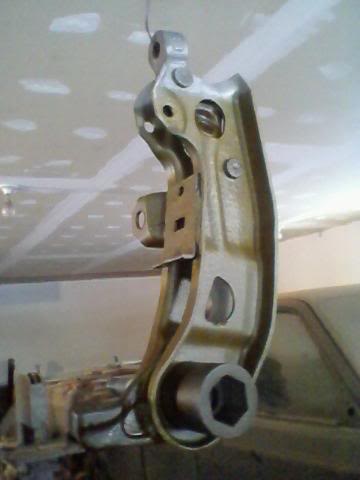
The last picture is of the LCA's. I had these sand blasted. I darkened the torsion bar socket and the cast lower ball joint piece along with the rivet heads. I rubbed the arm with steel wool, then masked off a dip line. I sprayed the LCA's with Krylon Battery Protectant. It's transparent and dries fully like paint. It doesn't stay tacky like real cosmoline. I sprayed a matte clear over the battery protectant. Once the paint was dry, I heated up the entire arm and RPM'd it. This picture was taken before the RPM was applied but it didn't affect the paint at all.
Here are some pictures of things I've finished so far this winter. I should be on track to getting the engine installed this spring.
The calipers are reman pieces I bought a long time ago. The had a little surface rust on them from sitting. I blew out the pistons, removed all the seals, cleaned off the rust and RPM'd everything. I also RPM'd the new brake hose ends.
I had previously painted all the suspension parts with POR-15. With as much trouble as I had sanding off the POR on the driveshaft, I looked for a product that would remove it.(regular paint stripper won't touch it) I found the POR accually makes a paint stripper that works on the POR-15. It's called POR-Strip. Anyone that needs to remove POR-15 needs to get some of that stuff. It works awsome. The POR-15 just wrinkles up and flakes off...it doesn't turn into a gooey mess like regular paint.
I stripped the POR off the spindles and caliper brackets and then sand blasted them. I used the black oxide solution I've been using on the fasteners and brushed it onto the spindles/brackets. I RPM'd everything separately before assembling. The finished prodect came out too dark but I'm still pleased with the results.
Everything in this next picture is original except for the tie rods. I've been using muriatic acid to derust parts and it works great. EvapoRust is expensive and loses its strength quickly. The acid cleans the rust off fairly quick. The only thing you have to do is neutralise the acid once your done. I've been using baking soda water. The center link and strut rods were stripped of POR and put in a smaller piece of PVC with the acid. Once the rust was gone, I filled the PVC with baking soda water and let them sit over night. The next morning I rinced them off and RPM'd them right away. The tie rod adjuster sleeves were soaking in acid as well. I lightly wire wheeled them once the rust was gone before RPMing.(same thing was done to the clamps)
I didn't want to use the acid on the original idler arm. I checked it over and found that it was still in great shape. I soaked it in EvapoRust, RPM'd it and sprayed some grease in lower end. I even saved the original rubber boot.
The last picture is of the LCA's. I had these sand blasted. I darkened the torsion bar socket and the cast lower ball joint piece along with the rivet heads. I rubbed the arm with steel wool, then masked off a dip line. I sprayed the LCA's with Krylon Battery Protectant. It's transparent and dries fully like paint. It doesn't stay tacky like real cosmoline. I sprayed a matte clear over the battery protectant. Once the paint was dry, I heated up the entire arm and RPM'd it. This picture was taken before the RPM was applied but it didn't affect the paint at all.
-
burdar - Frequent Poster
- Posts: 429
- Joined: 24 Mar 2009 17:27
- Location: Iowa
Re: original owner 73
![]() by Adrian Worman » 02 Feb 2012 21:27
by Adrian Worman » 02 Feb 2012 21:27
You are doing some excellent work there, the results look incredible and you've set a very high standard now that's put the majority of us to shame 

Jesus built my hot rod
-
Adrian Worman - Frequent Poster
- Posts: 2051
- Joined: 10 Mar 2007 23:54
- Location: milton keynes
Re: original owner 73
![]() by Russ » 02 Feb 2012 22:14
by Russ » 02 Feb 2012 22:14
Adrian Worman wrote:You are doing some excellent work there, the results look incredible and you've set a very high standard now that's put the majority of us to shame
Haha you got that right
-
Russ - Frequent Poster
- Posts: 60
- Joined: 13 Apr 2010 6:21
- Location: Australia
Re: original owner 73
![]() by burdar » 04 Feb 2012 14:57
by burdar » 04 Feb 2012 14:57
You are doing some excellent work there, the results look incredible and you've set a very high standard now that's put the majority of us to shame
Thanks...
Accually, there's nothing special about it. I'm just cleaning up every single part...nut and bolt before reinstalling it. Anyone can do that.
This past week I took the engine/trans off the K-member. I also separated the engine/trans. The engine went back on the engine stand. The engine has been stored at my dad's shop. They live out in the country and have quite a few mice. I noticed that there is a lot of mouse droppings and DECON ontop of the engine. There is even DECON around the exhaust valves. I'm going to partially dissasemble the engine just to make sure no mice got inside. I need to take the valve covers off anyway to install rubber gaskets instead of the cork ones I have in there now.
When I had the trans rebuilt, I told the shop I wanted the case as clean as they could get it. They ended up wire wheeling the case so it has a somewhat polished look to it. I ended up spraying the case with Eastwood's Alumablast spray paint. I'm going to strip that paint off and try to refinish the case and leave it natural. Having the case bead blasted would work but I don't want to completely disassemble the trans. I'm going to try some mag wheel cleaner that etches. If that doesn't work, I may try some oven cleaner or diluted muriatic acid. I'll try out those products on a spare trans before using it on my original case.
The K-member, sway bar brackets and k-to-rad support bracket are going to the powder coaters today. I need to put a few seals in the power steering box and paint it matte black...then the K-member assembly will be ready to assemble.
-
burdar - Frequent Poster
- Posts: 429
- Joined: 24 Mar 2009 17:27
- Location: Iowa
Re: original owner 73
![]() by Adrian Worman » 04 Feb 2012 23:29
by Adrian Worman » 04 Feb 2012 23:29
The difference between your work and most other people's may be fairly narrow but your persistence and attention to detail most certainly isn't 
On the trans case why not try those aluminium cleaning blocks we used to use on our bikes years ago
They were abrasive but left a highly polished finish on alloy that could be clearcoated, can't quite remember the brand name tho
On the trans case why not try those aluminium cleaning blocks we used to use on our bikes years ago
They were abrasive but left a highly polished finish on alloy that could be clearcoated, can't quite remember the brand name tho
Jesus built my hot rod
-
Adrian Worman - Frequent Poster
- Posts: 2051
- Joined: 10 Mar 2007 23:54
- Location: milton keynes
Re: original owner 73
![]() by burdar » 05 Feb 2012 1:20
by burdar » 05 Feb 2012 1:20
The polished finish is what I DON'T want. Bead blasting will give a more factory correct appearence but my trans is all put back together. I don't want to risk getting any media inside. I'm going to try a few other products to see if they will take away the polished look. I'm not expecting much but it's worth a shot. I need to strip the paint so I can see what I have to work with.
The K-member is now at the powder coaters. He said it would only be a few days until he had it done. I pulled the PS pump apart tonight. I wasn't going to disassemble it completely but I decided to go through the entire thing. There's not a lot to it. The most difficult thing was getting the front seal out. I need to go buy some brake clean and some PS steering fluid tomorrow so I can clean everything up, lube it and put it back together.
The K-member is now at the powder coaters. He said it would only be a few days until he had it done. I pulled the PS pump apart tonight. I wasn't going to disassemble it completely but I decided to go through the entire thing. There's not a lot to it. The most difficult thing was getting the front seal out. I need to go buy some brake clean and some PS steering fluid tomorrow so I can clean everything up, lube it and put it back together.
-
burdar - Frequent Poster
- Posts: 429
- Joined: 24 Mar 2009 17:27
- Location: Iowa
Re: original owner 73
![]() by fal308 » 07 Feb 2012 6:45
by fal308 » 07 Feb 2012 6:45
What about using baking soda as the blast medium? Supposed to be much more forgiving. Don't know if it would break down enough to flush out or not.
- fal308
- Frequent Poster
- Posts: 981
- Joined: 01 Jan 2004 13:57
- Location: Pacific MO
Re: original owner 73
![]() by burdar » 07 Feb 2012 18:14
by burdar » 07 Feb 2012 18:14
I thought about baking soda but was told by more than one person that they would never blast a trans without it completely taken apart. I've got a few other things to work on before starting the trans. I'll post picture when I have somthing to report...good or bad.
-
burdar - Frequent Poster
- Posts: 429
- Joined: 24 Mar 2009 17:27
- Location: Iowa
Re: original owner 73
![]() by burdar » 17 Feb 2012 18:59
by burdar » 17 Feb 2012 18:59
Here's another update. I made some good progress on the K-member assembly this week. I had the K-member and swaybar brackets powder coated an 80% gloss. The powder coater was only supposed to blast the swaybar so I could darken it and leave it gray. He ended up powder coating it by mistake.
I put a pitman arm seal kit in the steering box and painted it with Eastwoods Extreme Chassis Black. It has a little less gloss then the K-member which I believe is correct. The rest of the suspension componants are bare metal.(except for the LCA that has a cosmoline looking paint on it) The dust shields are supposed to be galvanised but I bead blasted them years ago thinking they were supposed to be black. I stripped off the black paint I had put on them and lightly wire wheeled them. I still have to redo the end links and install them but for the most part, the K is done.
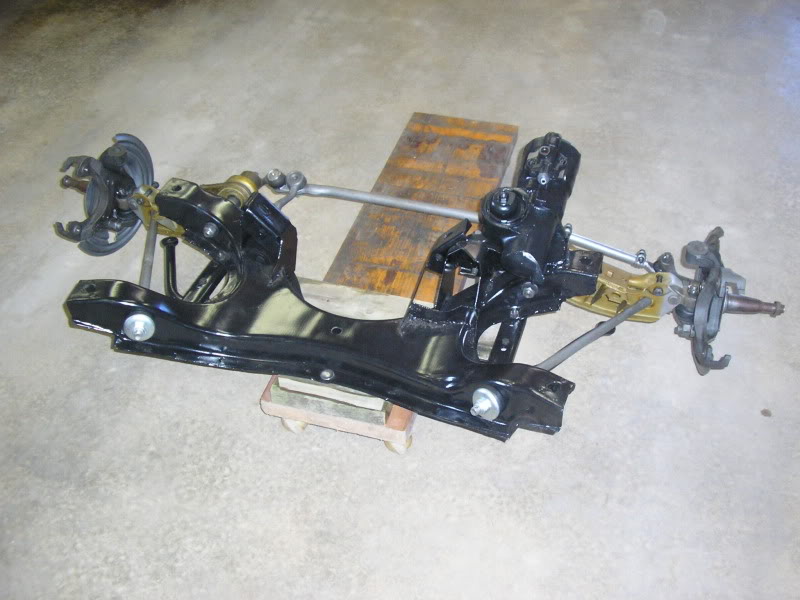

I put a pitman arm seal kit in the steering box and painted it with Eastwoods Extreme Chassis Black. It has a little less gloss then the K-member which I believe is correct. The rest of the suspension componants are bare metal.(except for the LCA that has a cosmoline looking paint on it) The dust shields are supposed to be galvanised but I bead blasted them years ago thinking they were supposed to be black. I stripped off the black paint I had put on them and lightly wire wheeled them. I still have to redo the end links and install them but for the most part, the K is done.
-
burdar - Frequent Poster
- Posts: 429
- Joined: 24 Mar 2009 17:27
- Location: Iowa
Re: original owner 73
![]() by Adrian Worman » 17 Feb 2012 20:30
by Adrian Worman » 17 Feb 2012 20:30
Excellent work as always
Jesus built my hot rod
-
Adrian Worman - Frequent Poster
- Posts: 2051
- Joined: 10 Mar 2007 23:54
- Location: milton keynes
Re: original owner 73
![]() by burdar » 21 Mar 2012 15:39
by burdar » 21 Mar 2012 15:39
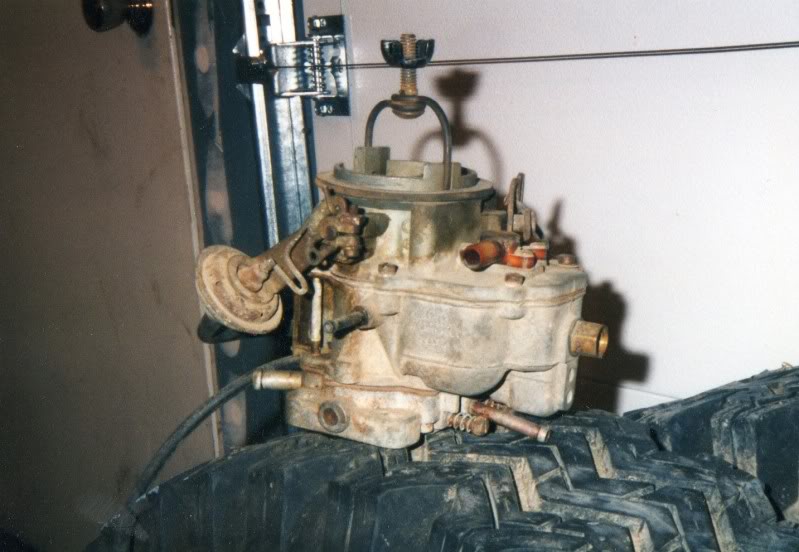
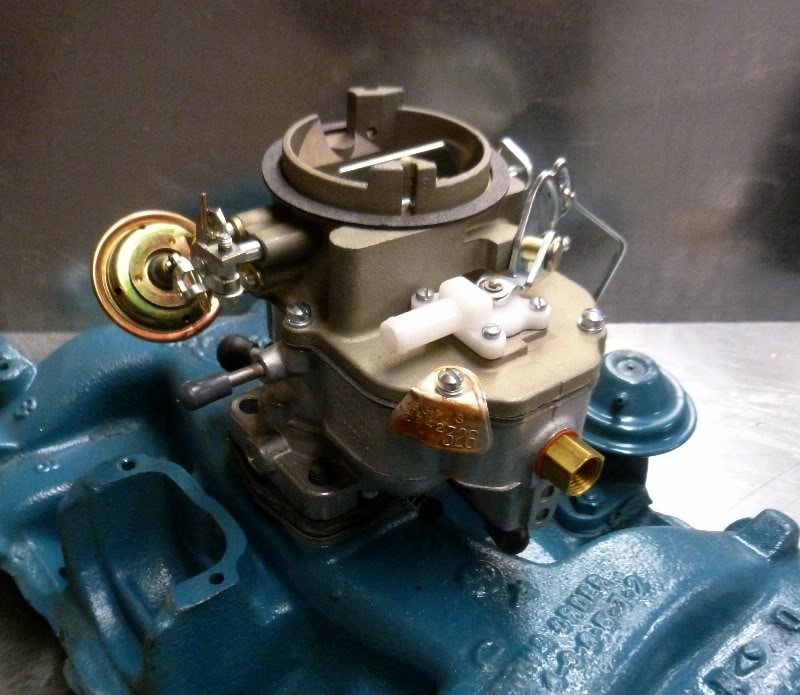
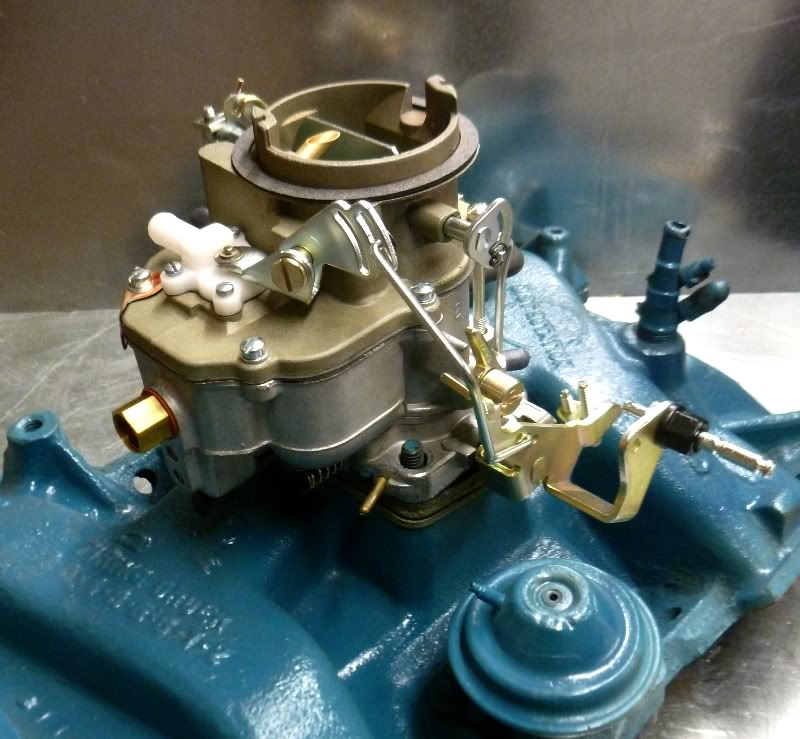
I'm just about ready to post pictures of the rear axle. I'm just finishing up the red paint on the drums and that assembly will be done. For now, here's a couple pics of the carb. Scott Smith from Harm's Auto just sent these to me yesterday. Scott is well known for his Hemi and 6-pak carb restos but he can do wonders with a puny little 318 carb too.
-
burdar - Frequent Poster
- Posts: 429
- Joined: 24 Mar 2009 17:27
- Location: Iowa
Re: original owner 73
![]() by burdar » 26 Mar 2012 17:36
by burdar » 26 Mar 2012 17:36
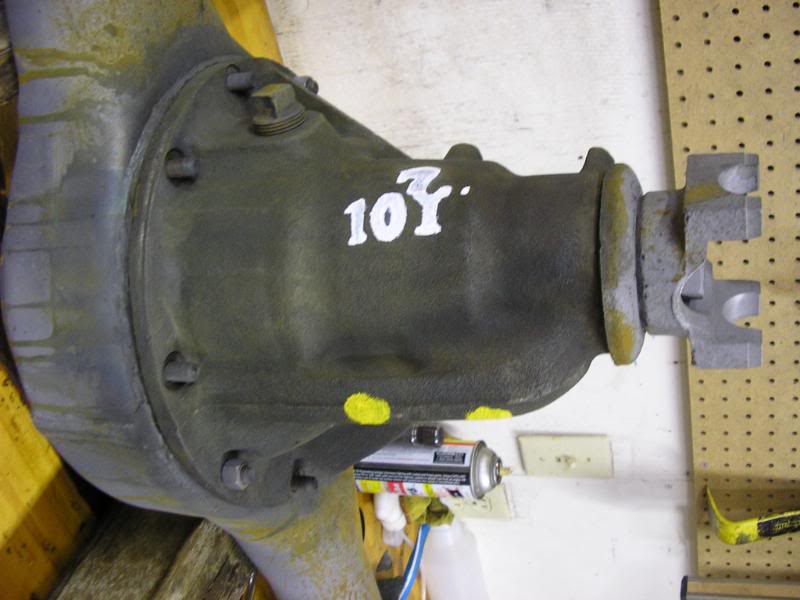
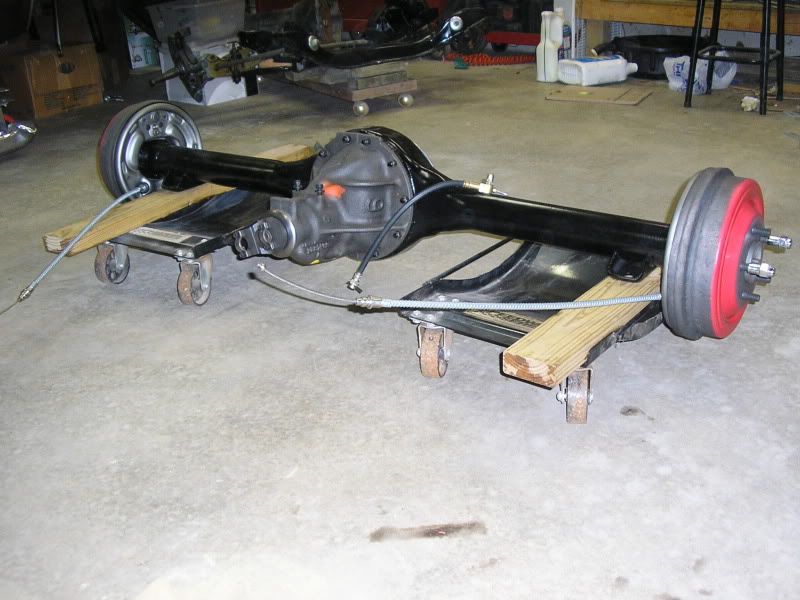
The rear axle assembly is done...again. I wasn't happy with how it turned out last time. Previously, I painted it with POR-15 and cast blast paint. This is what it looked like then....

I pulled the axles/backing plates and had the housing/center section sand blasted.
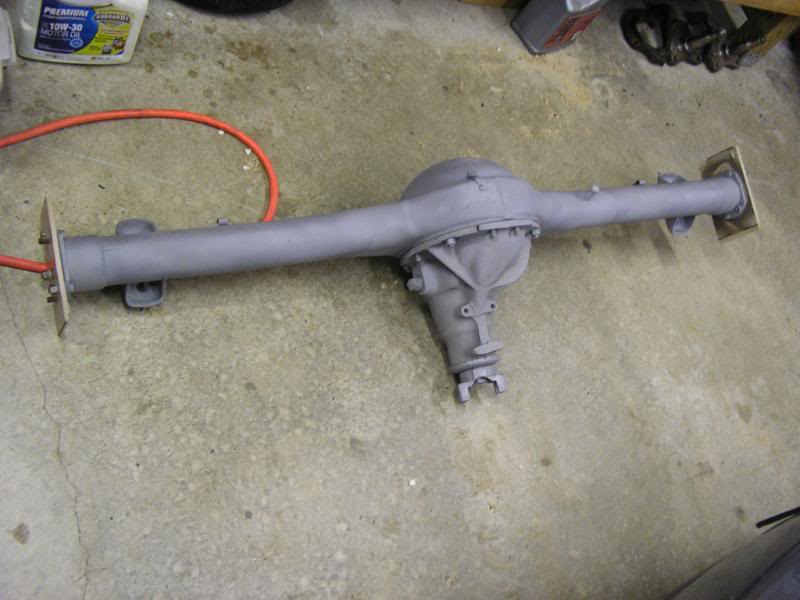
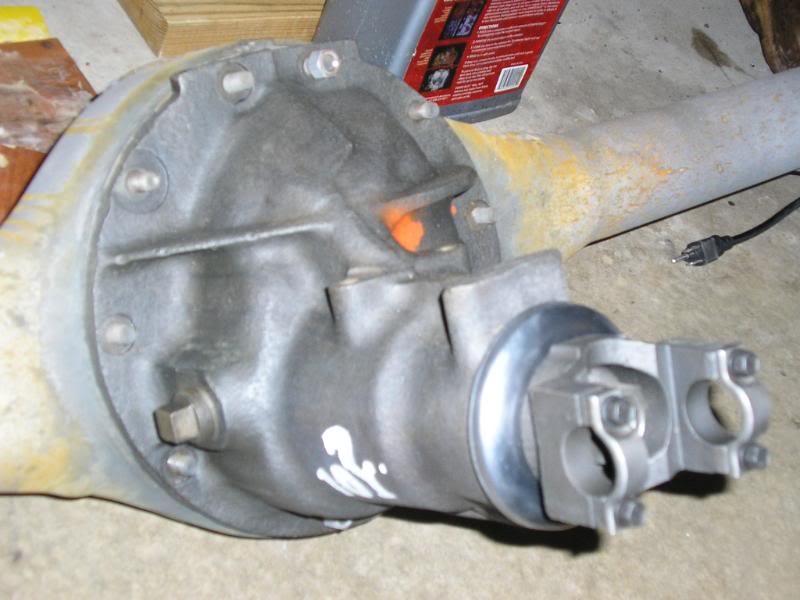
The center section was darkened to get rid of the blasted look. I tried to replicate all the marks I found on the original center section onto this one.
After applying the RPM...
The housing was sprayed with a high build primer and the pits were sanded out. Then it was painted with a semi-gloss paint. The backing plates were heavily pitted so I painted them to try and look natural. I may try to find some backing plates in better condition once the car is on the road. The drums are the original ones that I sand blasted and RPMed.

I pulled the axles/backing plates and had the housing/center section sand blasted.
The center section was darkened to get rid of the blasted look. I tried to replicate all the marks I found on the original center section onto this one.
After applying the RPM...
The housing was sprayed with a high build primer and the pits were sanded out. Then it was painted with a semi-gloss paint. The backing plates were heavily pitted so I painted them to try and look natural. I may try to find some backing plates in better condition once the car is on the road. The drums are the original ones that I sand blasted and RPMed.
-
burdar - Frequent Poster
- Posts: 429
- Joined: 24 Mar 2009 17:27
- Location: Iowa
Re: original owner 73
![]() by dave-r » 26 Mar 2012 19:06
by dave-r » 26 Mar 2012 19:06
Nice. But the red paint on the drums is far too neat for reproducing the factory application. Which I believe was done fast and with little care using a couple of strokes from a brush.
The Dave giveth and the Dave taketh away.
-
dave-r - Grumpy Old Man
- Posts: 9842
- Joined: 12 Oct 2003 21:45
- Location: North of the Tyne, England