 Viewed 3178 times")
-

dave-r - Grumpy Old Man
- Posts: 9842
- Joined: 12 Oct 2003 21:45
- Location: North of the Tyne, England
 Love that color too. I thought of doing mine in metallic grey someday. When do you think it will be back on the road?
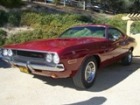
![]() by burdar » 08 Nov 2010 15:38
by burdar » 08 Nov 2010 15:38
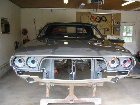
It won't be on the road for awhile. Maybe a year and a half at the earliest. I'm taking my time. Every nut and bolt is going to be redone. There's still a lot of money to spend. I'm not going to put it back together with old looking parts just to get it on the road. If I don't have the money, the car will sit until I can put the right parts on it. I'm in no hurry.
It's nice to have it back home but I really wish it had been closer during the whole process. There are a few things I'm not happy with that will need some attention before the car is done. If the car would have been closer, I would have caught some things in time to be fixed. Now I have to go back and fix some things.
It's nice to have it back home but I really wish it had been closer during the whole process. There are a few things I'm not happy with that will need some attention before the car is done. If the car would have been closer, I would have caught some things in time to be fixed. Now I have to go back and fix some things.
-
burdar - Frequent Poster
- Posts: 429
- Joined: 24 Mar 2009 17:27
- Location: Iowa
![]() by fbernard » 08 Nov 2010 20:28
by fbernard » 08 Nov 2010 20:28
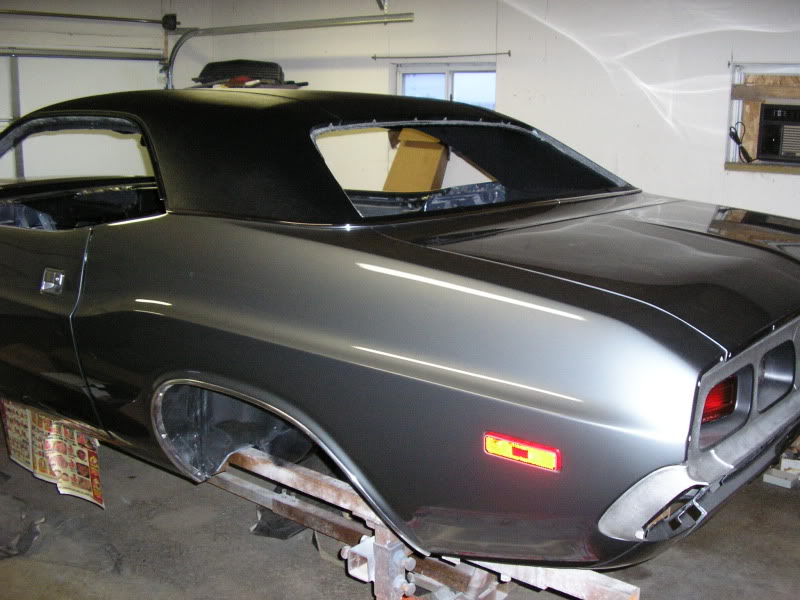
burdar wrote:The factory paint code is JA5. It's a one year only 1973 color. Dodge called it dark silver metallic...Plymouth called it Silver Frost Metallic.
Some sites (and books) list this as 1973-only, but from the paint chips, it appeared in 1972 (A5/2513, "Silver Frost Poly", same name for Dodge Plymouth and Chrysler), and was still there in 1974. I don't know if any cars came with that color in 72 or 74 though.
Dodge did call it "Dark Silver Poly" in 1973 and 1974.
From the paintref.com cross-reference website :
Doge and Chrysler (but not Plymouth) had it in 1976.
It was used again in 1983 as a Chrysler color.
They don't list it prior to 1976, and a search for Challenger colors only get 1970 models (and then goes to 1978).
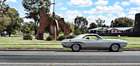
I saw a car that color at the Euronats in 2007, it was gorgeous in the sun :
(yes it's a 1973 cuda)
 Viewed 3179 times")
-

fbernard - Frequent Poster
- Posts: 733
- Joined: 19 Oct 2003 20:41
- Location: Paris, France
![]() by burdar » 08 Nov 2010 21:05
by burdar » 08 Nov 2010 21:05
There was a similar color available in 72 but it was a little lighter. There is a website that lists all colors available by year...with pictures of each. I'll try and find it.
Here it is.
http://www.aarta.com/challenger_colors/ ... olors.html
Maybe I should rephrase what I said about it being a one year only color. It was available on the E-bodies for only one year. It may have been available on other body styles in other years.
Here it is.
http://www.aarta.com/challenger_colors/ ... olors.html
Maybe I should rephrase what I said about it being a one year only color. It was available on the E-bodies for only one year. It may have been available on other body styles in other years.
-
burdar - Frequent Poster
- Posts: 429
- Joined: 24 Mar 2009 17:27
- Location: Iowa
![]() by fbernard » 09 Nov 2010 12:25
by fbernard » 09 Nov 2010 12:25
burdar wrote:It may have been available on other body styles in other years.
Absolutely, the paint chips I have don't show any body type application. And I've only seen or found 73 E-bodies in that color.
-
fbernard - Frequent Poster
- Posts: 733
- Joined: 19 Oct 2003 20:41
- Location: Paris, France
![]() by burdar » 09 Nov 2010 13:42
by burdar » 09 Nov 2010 13:42
Thanks for the kind words. I'll try to keep this thread updated a little better.
I've been busy playing around with a black oxide kit from Caswell Plating. As you know, many fasteners were phophated from the factory. The black oxide isn't 100% correct looking but it's close to the look of phosphate. The parts I've dipped have turned out really nice. As long as the sealer works like it's supposed to, the fasteners should stay looking good for a long time.
I've been busy playing around with a black oxide kit from Caswell Plating. As you know, many fasteners were phophated from the factory. The black oxide isn't 100% correct looking but it's close to the look of phosphate. The parts I've dipped have turned out really nice. As long as the sealer works like it's supposed to, the fasteners should stay looking good for a long time.
-
burdar - Frequent Poster
- Posts: 429
- Joined: 24 Mar 2009 17:27
- Location: Iowa
Re: origonal owner 73
![]() by burdar » 03 Feb 2011 15:43
by burdar » 03 Feb 2011 15:43
Time for another update. I havn't worked on the car since the snow started falling. My wife needed to get her car in the garage so the Challenger was pushed into the corner.
The last thing I worked on was getting the hood latch, hood reliece lever and safety hook refinished. To save money, I decided to work on those parts myself. I think they turned out pretty good. For some reason, the bodyshop had painted those items with a gray phosphate looking spray paint. I cleaned them up in the bead blaster and dipped them in the Black Oxide solution that I've been using on my fasteners. The latches were origonally brown phosphate but I thought they would look just fine a dark gray color. I figured anything would look better than paint. Well, as soon as I dipped them, they started turning brown. I thought the solution might be losing its strength (and that's why those parts turned brown) but after the latches were done, I dipped the hood pop-up spring and it turned gray. I don't know why the latches turned brown again but I'm glad they did.


The bodyshop also sprayed the inside of the tail light housings with a silver paint. So, I spent some time stripping the paint off of the housings.
I polished the origonal tail light lenses with Meguire's Plast-X polish and reinstalled them with new gaskets...then installed the housings on the car.
The last thing I worked on was getting the hood latch, hood reliece lever and safety hook refinished. To save money, I decided to work on those parts myself. I think they turned out pretty good. For some reason, the bodyshop had painted those items with a gray phosphate looking spray paint. I cleaned them up in the bead blaster and dipped them in the Black Oxide solution that I've been using on my fasteners. The latches were origonally brown phosphate but I thought they would look just fine a dark gray color. I figured anything would look better than paint. Well, as soon as I dipped them, they started turning brown. I thought the solution might be losing its strength (and that's why those parts turned brown) but after the latches were done, I dipped the hood pop-up spring and it turned gray. I don't know why the latches turned brown again but I'm glad they did.
The bodyshop also sprayed the inside of the tail light housings with a silver paint. So, I spent some time stripping the paint off of the housings.
I polished the origonal tail light lenses with Meguire's Plast-X polish and reinstalled them with new gaskets...then installed the housings on the car.
-
burdar - Frequent Poster
- Posts: 429
- Joined: 24 Mar 2009 17:27
- Location: Iowa
Re: origonal owner 73
![]() by burdar » 03 Feb 2011 16:01
by burdar » 03 Feb 2011 16:01
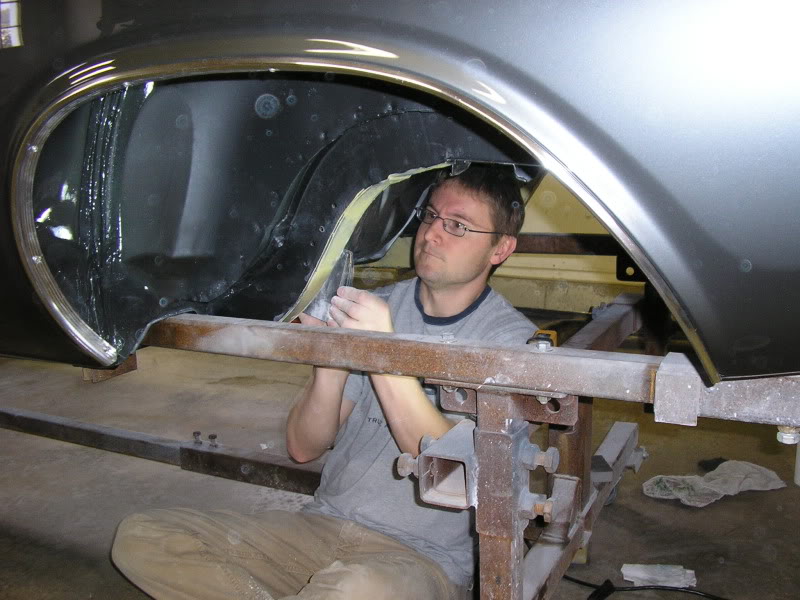
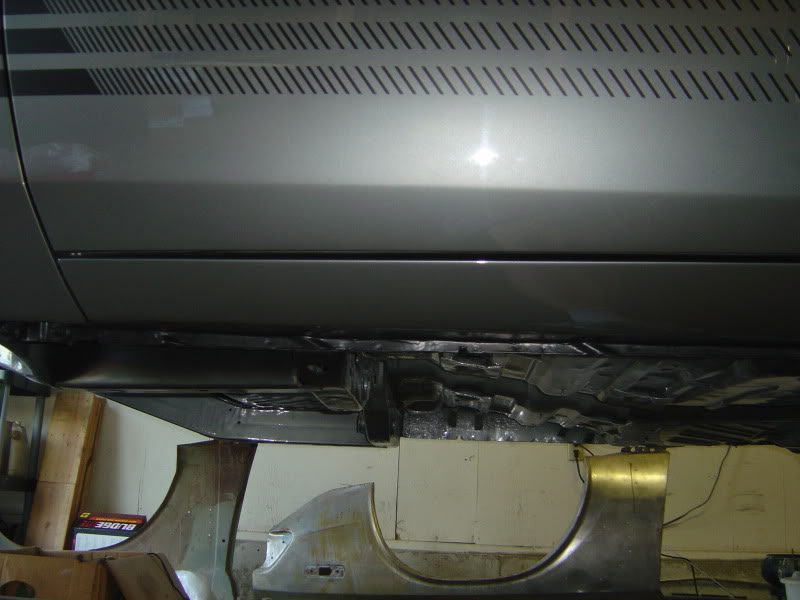
The bodywork/paint was done for a quoted price. Filling in every single pit on the underside would have cost a fortune. When I got the car back, I saw some things I didn't like. I decided to fix the most visable pitted areas myself. That's the main reason the car isn't farther along right now.
The inside of the rear framerails was pitted bretty bad so one Saturday afternoon, my best friend came over and we worked on fixing them. We ran out of time before the weather got bad so I still need to finish a few other areas before the main fuel/brake lines can go in. The rails look a lot better then they did. I'm glad we took the time to work on them.
My good griend Paul working on the rails...
I don't have a before pic but here's what the rails look like after filling in the pits. They turned out pretty good.
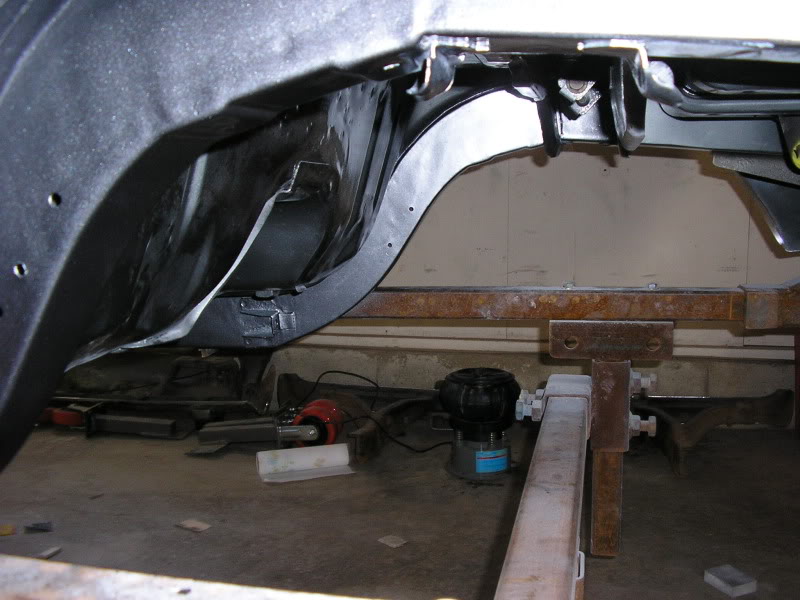
If you look just to the right of the torsion bar X-member, you can see how pitted the inner rocker area was.
I couldn't leave it like that, so it's getting fixed too.

The inside of the rear framerails was pitted bretty bad so one Saturday afternoon, my best friend came over and we worked on fixing them. We ran out of time before the weather got bad so I still need to finish a few other areas before the main fuel/brake lines can go in. The rails look a lot better then they did. I'm glad we took the time to work on them.
My good griend Paul working on the rails...
I don't have a before pic but here's what the rails look like after filling in the pits. They turned out pretty good.
If you look just to the right of the torsion bar X-member, you can see how pitted the inner rocker area was.
I couldn't leave it like that, so it's getting fixed too.
-
burdar - Frequent Poster
- Posts: 429
- Joined: 24 Mar 2009 17:27
- Location: Iowa
Re: origonal owner 73
![]() by burdar » 03 Feb 2011 16:20
by burdar » 03 Feb 2011 16:20
The horns were blasted and painted gloss black. The mounting bolts were just dirty and cleaned up really nice. The factory greenish brown plating still looks great.
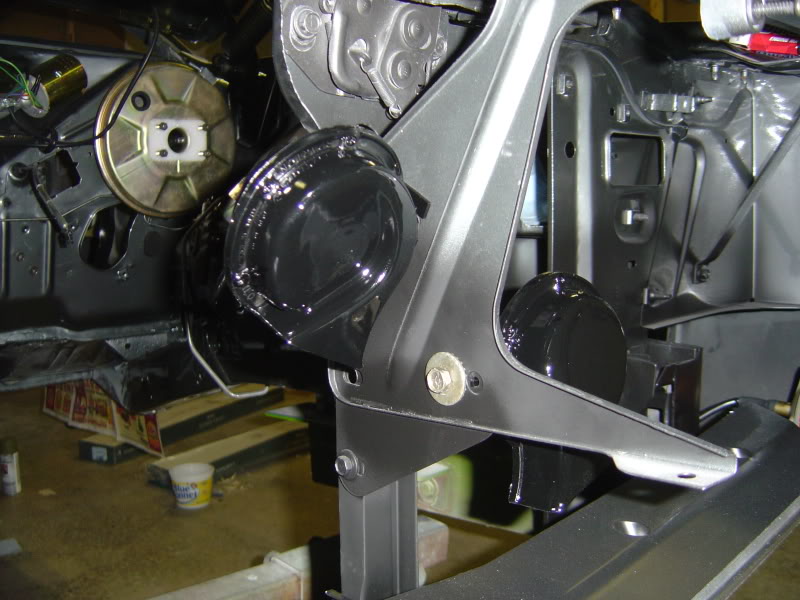
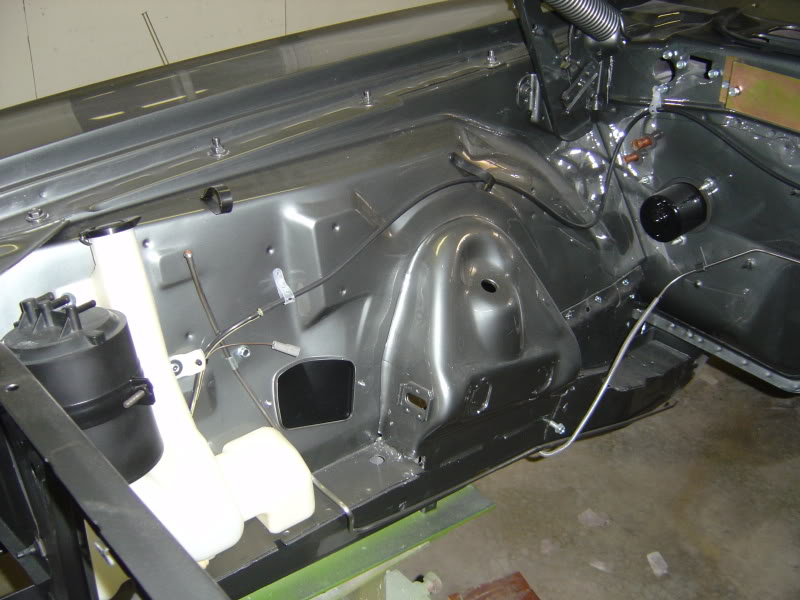
The origonal charcole canister was in decent shape. It had gotten some scrapes on the side from sitting in a box full of other parts though. I wet sanded the side of the canister and misted it with SEM Trim Black spray paint...the same paint I used for the rad blackout. If I were to do it again, I would use SEM Landau Black for just a little more gloss. The top of the canister was still in great shape. The origonal date stamping is still inplace so before I sprayed the side, I masked off the top.
The washer bottle is new but the lid doesn't have any part numbers on it. I'll probably try to reuse the origonal lid. The washer hose is the origonal and it cleaned up good. The washer squirters were replated in clear zinc.
I broke down and bought a new voltage regulator from Summit that has a generic 271 date code on it. I'd still like to get one restamped with a more correct date but this one will work for now. I have a new ECU but need to figure out how to stamp the part # and date code on it before it is installed. I can buy a number stamper online but don't want to spend the money on one when I'm only going to use it once.
The vacume control valve is the origonal that I cleaned up and misted with SEM Trim Black. The NOX valve is NOS. The wiper motor was restored by Jules.(he also replated the ECU bracket) The booster was restored by Booster Dewey.
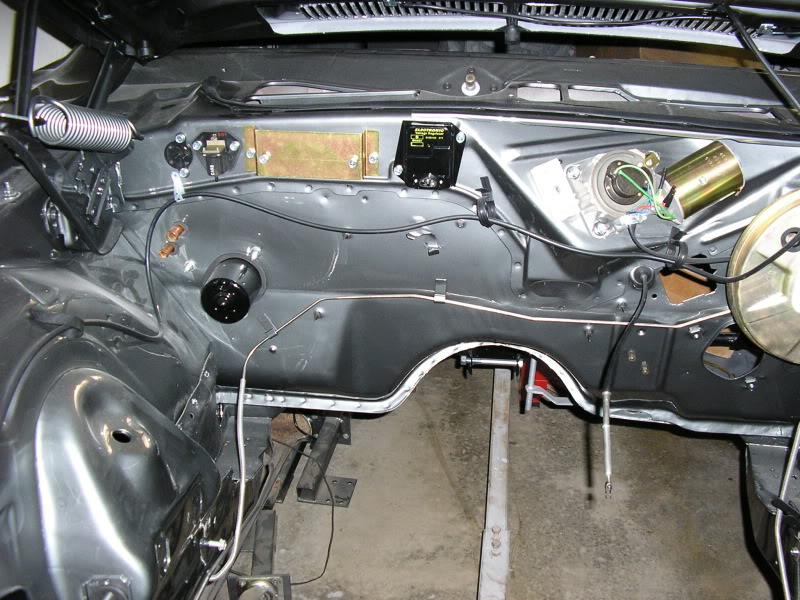
-
burdar - Frequent Poster
- Posts: 429
- Joined: 24 Mar 2009 17:27
- Location: Iowa
Re: origonal owner 73
![]() by Adrian Worman » 03 Feb 2011 16:27
by Adrian Worman » 03 Feb 2011 16:27
That is impressive stuff, keep 'em coming please 
Jesus built my hot rod
-

Adrian Worman - Frequent Poster
- Posts: 2051
- Joined: 10 Mar 2007 23:54
- Location: milton keynes
-
patrick - Frequent Poster
- Posts: 1323
- Joined: 09 Jul 2007 0:56
- Location: Washington State, U.S.A.
Re: origonal owner 73
![]() by Jimiboy » 10 Feb 2011 8:39
by Jimiboy » 10 Feb 2011 8:39
It´s really just.... this is sick! Wow! I just say... Woow! Clean car!  (I am with Adrian, this car won´t make us tired, just keep em coming)
----------------------------------------------------------------------------------------------------
Never Run Faster Then Your Guardian Angel Can Fly
Never Run Faster Then Your Guardian Angel Can Fly
-
Jimiboy - Frequent Poster
- Posts: 708
- Joined: 22 Dec 2005 10:20
- Location: Sweden
Re: origonal owner 73
![]() by burdar » 11 Feb 2011 13:59
by burdar » 11 Feb 2011 13:59
Thanks everyone! I'm glad you like it. I'm in no hurry...I'm just trying to make every part look as nice as I can before it goes back on the car. There are a few things that will be redone because they don't look good enough. One of the things I need to redo is the rear end. I need to fill the pitting in the housing and refinish things in more correct colors. Also, the engine has been sitting in my parents shop for years now. They have a lot of mice in the country so I'm going to open it back up to make sure there isn't a nest in there. The front suspension components will be gone over again too.
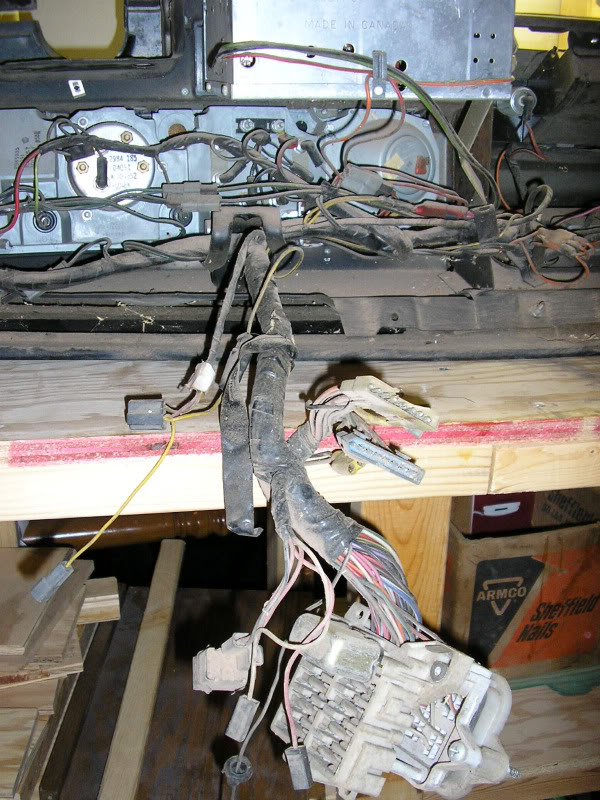
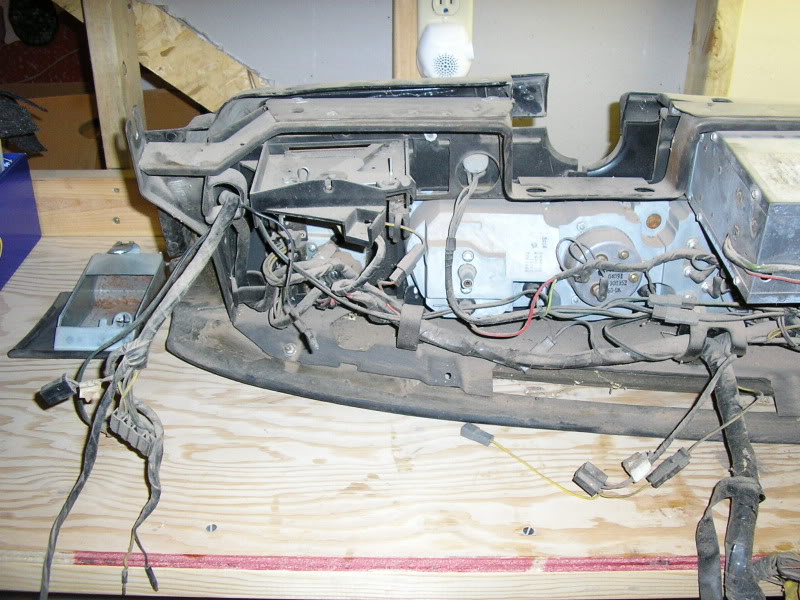
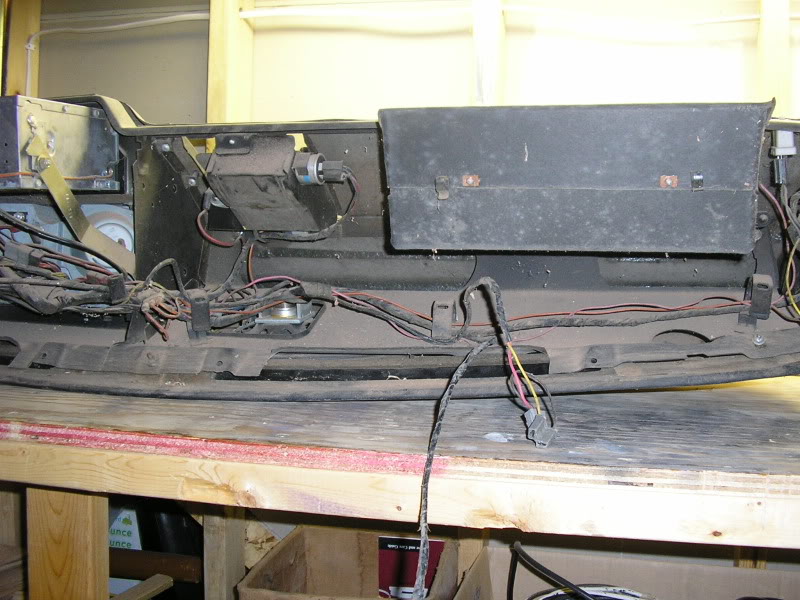
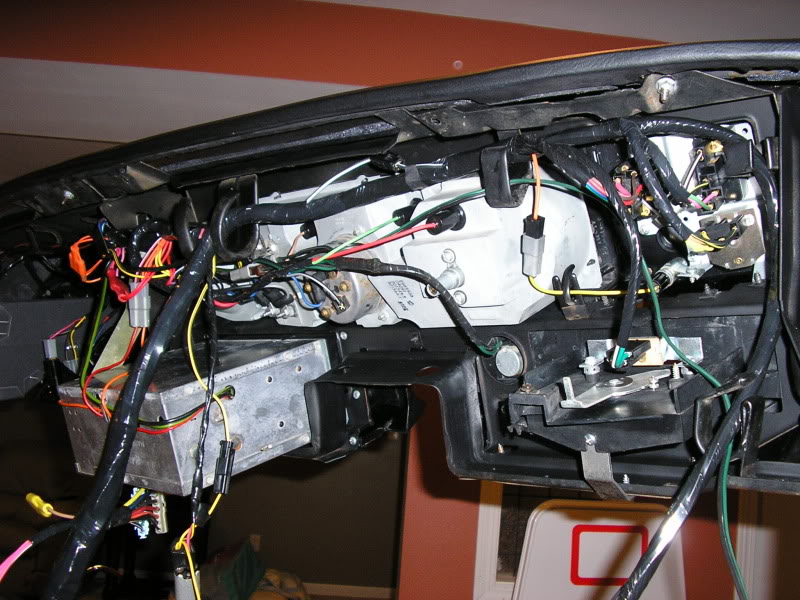
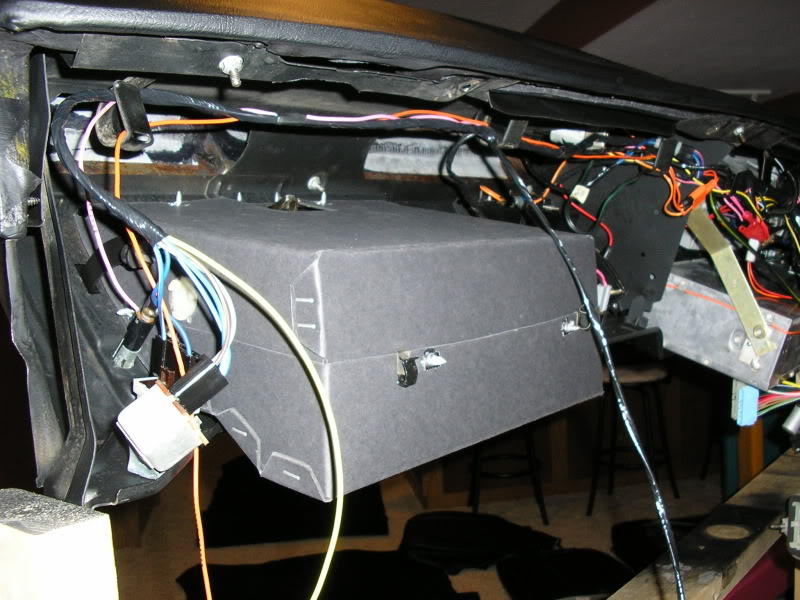
I just moved the dash assembly inside so I can start taking it apart. I thought it was going to be a huge job but it doesn't look too complicated back there. I'll just take a bunch of pictures so I know how it goes back together. I've got all new harnesses too so that should make things easier. I'll post pics of the dash assembly once it's back together.
I just moved the dash assembly inside so I can start taking it apart. I thought it was going to be a huge job but it doesn't look too complicated back there. I'll just take a bunch of pictures so I know how it goes back together. I've got all new harnesses too so that should make things easier. I'll post pics of the dash assembly once it's back together.
-
burdar - Frequent Poster
- Posts: 429
- Joined: 24 Mar 2009 17:27
- Location: Iowa
Re: origonal owner 73
![]() by burdar » 14 Feb 2011 15:09
by burdar » 14 Feb 2011 15:09
I got the dash assembly all taken apart on Saturday. It went pretty good. I was going to waite to send the gauges out to be redone but I think I'd better do that now. I want to get the dash back together ASAP while everything is still fresh in my head. Hopefully in a month or so, everything will be ready to put back together.
-
burdar - Frequent Poster
- Posts: 429
- Joined: 24 Mar 2009 17:27
- Location: Iowa
Re: origonal owner 73
![]() by burdar » 05 Apr 2011 13:12
by burdar » 05 Apr 2011 13:12
The dash assembly is taking longer then I thought. I sent the pad and the gauges out to be redone. The gauges were going to take 8-10 weeks. That means I should get them back in May sometime. I already got the pad back but it didn't fit very good. I had a lot of trimming to do. I got it looking OK except for one spot. I tried trimming about 1/4" of foam from that area and messed up the pad. I don't know if it can be fixed or not. That night I didn't get much sleep I was soooo pi$$ed at myself. I called a guy that fixes vinyl but he can't look at it until next week. I don't know what I'm going to do if he can't fix it.
I've got all the secondary dash harnesses (the ones I have to re-use) cleaned up and installed on the new main dash harness. I cleaned up the radio and repainted the face plate. I don't know what I'm going to do about the woodgrain yet. I want to get the new BE&A pieces but I just can't afford it right now. I tried cleaning up the origonals but they aren't looking good enough. Years ago I bought a vinyl woodgrain kit from Year One. I havn't been able to find it though. If I can find it, that might be an option...at least for the time being.
This past weekend I repainted the dash frame, glove box and ash tray doors. They turned out really nice. I used SEM Trim Black. It has that suede look to it and the color is a good match. I also bought some wrinkle paint to redo the radio and heater bezels but I need to waite until it's warmer outside. I've heard that you need to set the parts in the sun in order to get the paint to wrinkle.
-
burdar - Frequent Poster
- Posts: 429
- Joined: 24 Mar 2009 17:27
- Location: Iowa
Re: origonal owner 73
![]() by burdar » 09 May 2011 14:06
by burdar » 09 May 2011 14:06
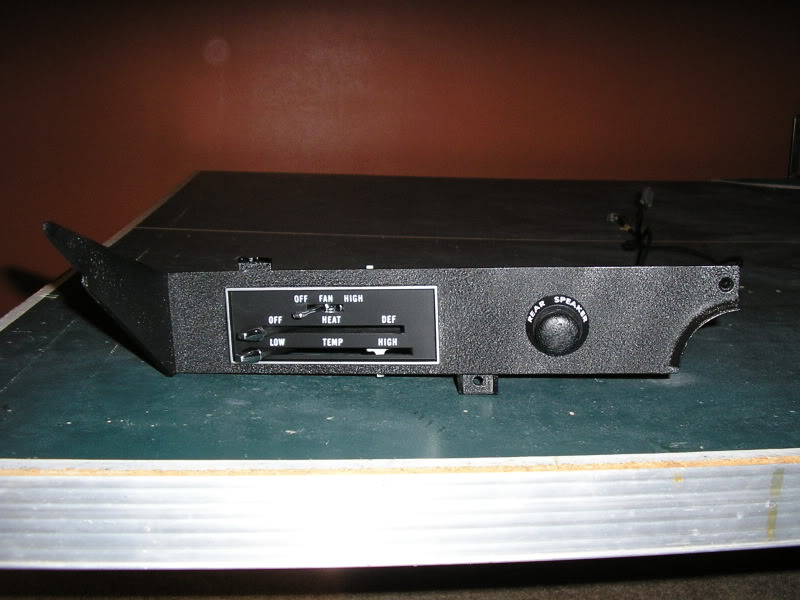
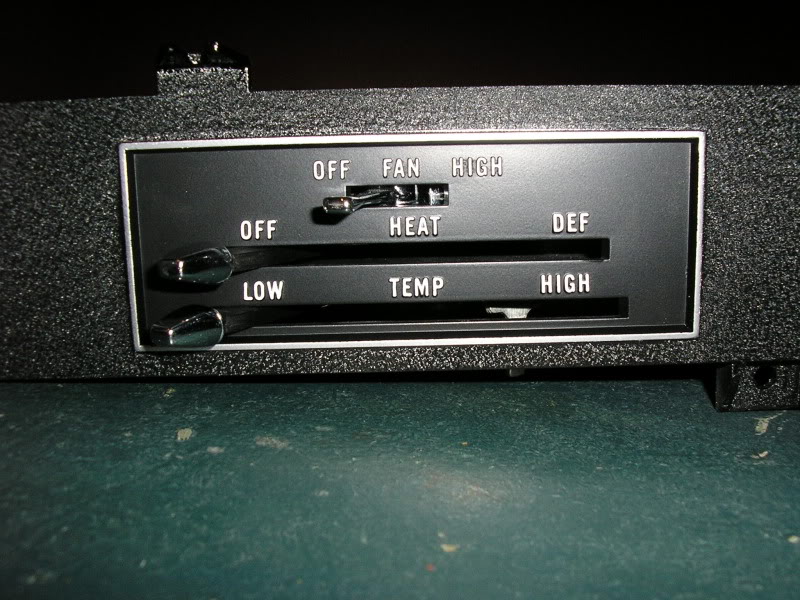
I ended up sending the dash pad back to be redone. Hopefully I'll get it back soon because I got a call that the gauges will be ready in a couple weeks. This past weekend was the warmest we've had this year. The sun was out so I thought I'd spray a test sample of the VHT wrinkle paint I bought for the heater/radio bezels. The test turned out really nice so I went ahead and sprayed the bezels. I still have to do the chrome paint around the heater controls and paint the letters white. When I have it done I'll post some pics. So far it' turning out really good.
A couple weeks ago, the guy that did the body/paint came over to help me with a few things. The first thing we did as trim the vinyl top and installed the stainless.

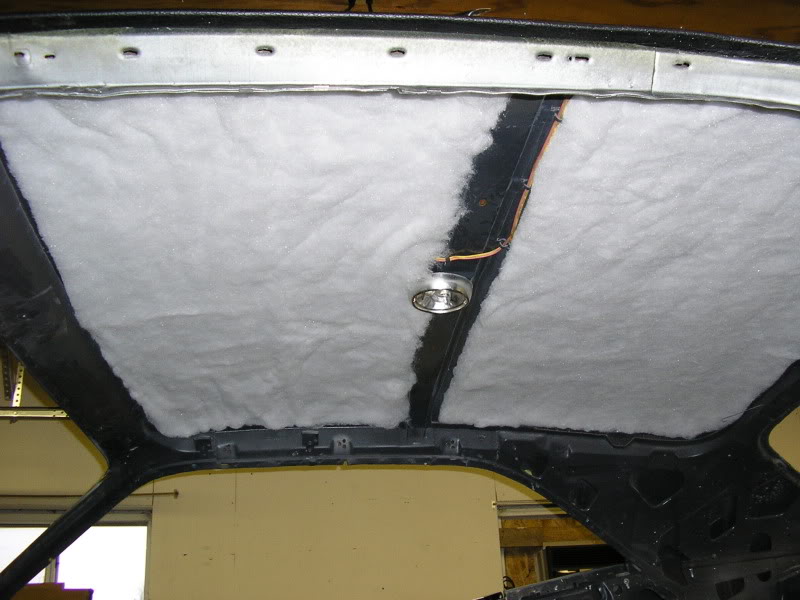
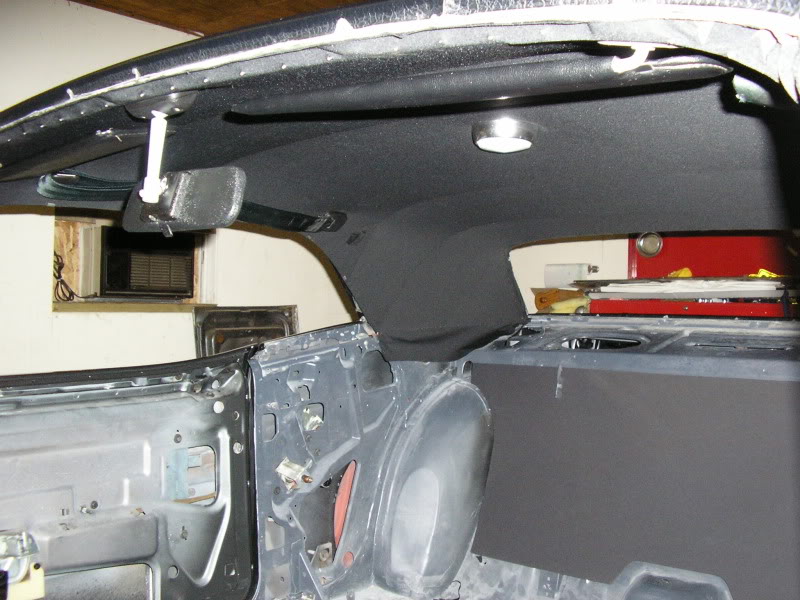
We also installed the headliner. He left right after we got the material pushed into the gripper teeth. I finished up gluing the edges and locating the accessory holes myself. Overall it was a fairly easy job. The hardest part was accually pushing the material into the gripper teeth. The headliner was a pretty thick material. I went with the correct Yorkshire material instead of the "perforated" material. The nice thing about it is that there were absolutly NO packaging wrinkles in it. It really turned out nice.
Clamps, clamps and more clamps


The shoulder belts look green in the pictures but that's just because of the flash. All the belts were in really good shape when I removed them back in the mid 90's. They had been sitting in an open box since that time though and looked pretty rough. I wrapped the shoulder belts with some rubber bands...put them in a pillow case and threw them in the washing machine. They came out looking great.
A couple weeks ago, the guy that did the body/paint came over to help me with a few things. The first thing we did as trim the vinyl top and installed the stainless.
We also installed the headliner. He left right after we got the material pushed into the gripper teeth. I finished up gluing the edges and locating the accessory holes myself. Overall it was a fairly easy job. The hardest part was accually pushing the material into the gripper teeth. The headliner was a pretty thick material. I went with the correct Yorkshire material instead of the "perforated" material. The nice thing about it is that there were absolutly NO packaging wrinkles in it. It really turned out nice.
Clamps, clamps and more clamps
The shoulder belts look green in the pictures but that's just because of the flash. All the belts were in really good shape when I removed them back in the mid 90's. They had been sitting in an open box since that time though and looked pretty rough. I wrapped the shoulder belts with some rubber bands...put them in a pillow case and threw them in the washing machine. They came out looking great.
-
burdar - Frequent Poster
- Posts: 429
- Joined: 24 Mar 2009 17:27
- Location: Iowa
Re: origonal owner 73
![]() by dave-r » 09 May 2011 15:41
by dave-r » 09 May 2011 15:41
That headliner material looks really nice. I have only ever seen the thin perforated stuff which was a headache to install.
I put my seatbelts in the dishwasher. That worked well too.
I put my seatbelts in the dishwasher. That worked well too.
The Dave giveth and the Dave taketh away.
-
dave-r - Grumpy Old Man
- Posts: 9842
- Joined: 12 Oct 2003 21:45
- Location: North of the Tyne, England
Re: origonal owner 73
![]() by burdar » 11 May 2011 12:55
by burdar » 11 May 2011 12:55
I finished painting and assembling the heater bezel last night. Here are a couple pics...
-
burdar - Frequent Poster
- Posts: 429
- Joined: 24 Mar 2009 17:27
- Location: Iowa
Re: origonal owner 73
![]() by Adrian Worman » 11 May 2011 13:08
by Adrian Worman » 11 May 2011 13:08
dave-r wrote:That headliner material looks really nice. I have only ever seen the thin perforated stuff which was a headache to install.
I put my seatbelts in the dishwasher. That worked well too.
Carol washed all my soft interior trim exactly like that Dave, worked perfectly, especilly the headliner
Jesus built my hot rod
-
Adrian Worman - Frequent Poster
- Posts: 2051
- Joined: 10 Mar 2007 23:54
- Location: milton keynes
Re: origonal owner 73
![]() by Russ » 11 May 2011 21:37
by Russ » 11 May 2011 21:37
What a thread! Great work.
Nice choice on the colour.
Nice choice on the colour.
-
Russ - Frequent Poster
- Posts: 60
- Joined: 13 Apr 2010 6:21
- Location: Australia
Re: origonal owner 73
![]() by burdar » 18 May 2011 13:12
by burdar » 18 May 2011 13:12
I refinished the A-pillar trim and the kick panels over the weekend. They turned out very nice. I cleaned the panels 4 times in preparation for the paint. 1st with just soap and water. Next was with Simple Green, followed with Mineral Spirits. Lastly, I sprayed the panels down with an emblem/adhesive remover.
First I sprayed a light coat of SEM adhesion promoter...waited 5 minutes and then sprayed a heavy coat. After waiting another 20 minutes, I sprayed two mist coats of SEM Landau Black over the panels.(waiting 5 minutes between coats)
Here is what a finished A-pillar piece looks like next to an unfinshed one. The gloss level matches the origonal gloss of the plastic almost perfectly.
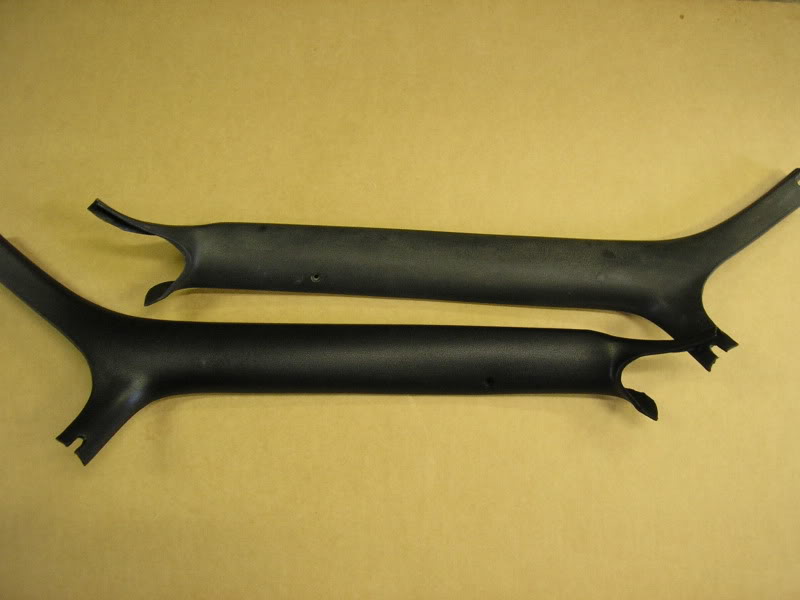
-
burdar - Frequent Poster
- Posts: 429
- Joined: 24 Mar 2009 17:27
- Location: Iowa
Re: origonal owner 73
![]() by MLMFLCN » 20 May 2011 20:06
by MLMFLCN » 20 May 2011 20:06
Wow. That looks exceptionally nice. Headliner came out great. I have a perforated/holy one, thinking of looking for this style. Much nicer finish. Keep up the excellent work.
- rich
- rich
-

MLMFLCN - Frequent Poster
- Posts: 238
- Joined: 10 Oct 2005 13:24
- Location: Ohio
Re: origonal owner 73
![]() by burdar » 07 Jun 2011 1:53
by burdar » 07 Jun 2011 1:53
Thanks Rich...I bought the headliner from Dante's Parts. It's about twice as expesive as the perforated style but I wanted the correct one for the car. It took about 2 weeks to get since it was a special order part.
I worked on the grill this past weekend. It was in decent shape to begin with but the plastic was faded and blochy in places.
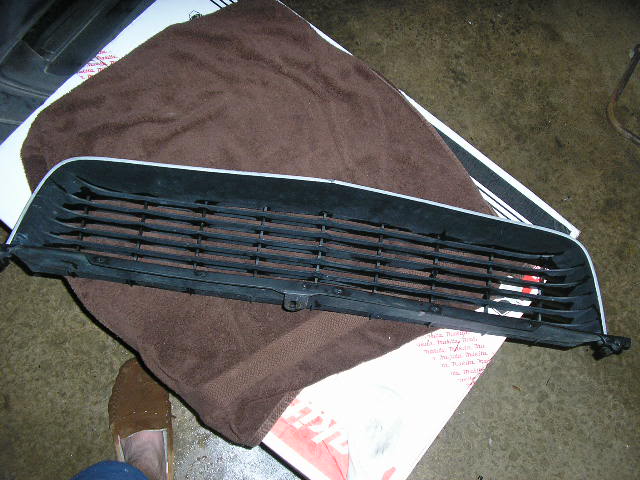
After cleaning the grill I sprayed it with SEM Trim Black. I matched that color to an area of the grill that hadn't been exposed to the elements. It was a perfect match. The grill turned out very blochy after the paint dried. I don't know why that happened but it just looked awful. Since I didn't think I could mess it up any further, I rubbed it down very lightly with steel wool. I thought that might even things out a bit. I got lucky and it accually worked. Then I masked off the front lip of the grill and painted it silver.
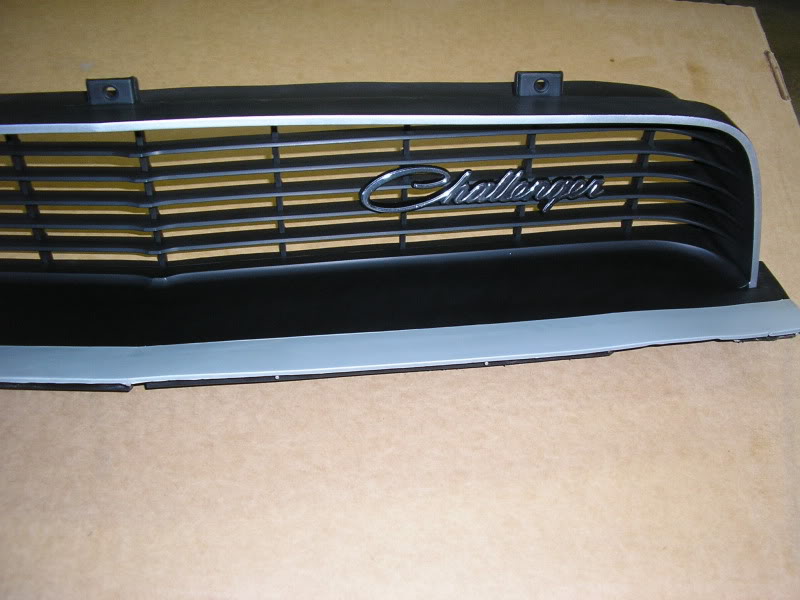
I had three Challenger emblems for the grill...I cleaned up all of them and chose the nicest one. I took a Q-tip and coated the end with petrolium jelly. I put a thin film on the face of the Challenger emblem before I sprayed the SEM Trim Black paint. Once the paint was dry, I just wiped off the petrolium jelly. The emblem turned out pretty good.
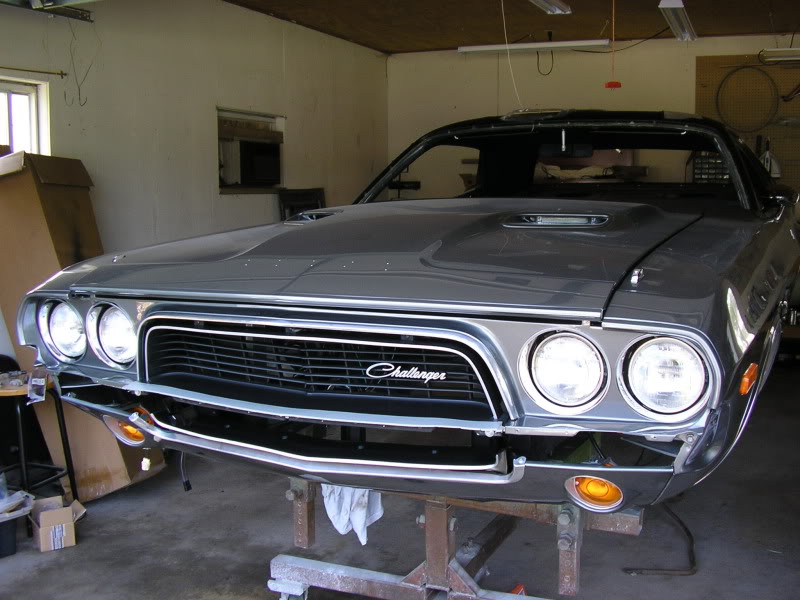
Here is how the grill turned out. I sanded the bumper filler with very fine wet/dry sandpaper and it cleaned up very nicely.
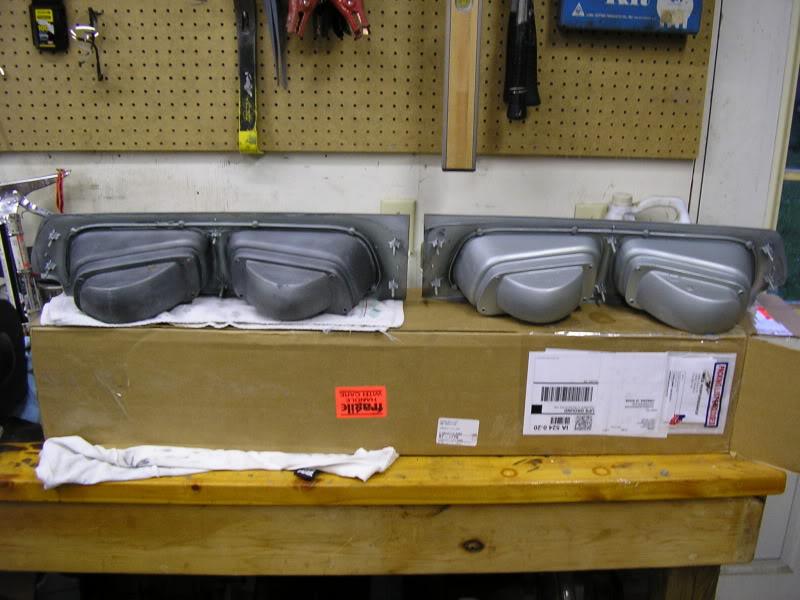
Finally, here is a picture of it installed along with the new headlight bezels.
I worked on the grill this past weekend. It was in decent shape to begin with but the plastic was faded and blochy in places.
After cleaning the grill I sprayed it with SEM Trim Black. I matched that color to an area of the grill that hadn't been exposed to the elements. It was a perfect match. The grill turned out very blochy after the paint dried. I don't know why that happened but it just looked awful. Since I didn't think I could mess it up any further, I rubbed it down very lightly with steel wool. I thought that might even things out a bit. I got lucky and it accually worked. Then I masked off the front lip of the grill and painted it silver.
I had three Challenger emblems for the grill...I cleaned up all of them and chose the nicest one. I took a Q-tip and coated the end with petrolium jelly. I put a thin film on the face of the Challenger emblem before I sprayed the SEM Trim Black paint. Once the paint was dry, I just wiped off the petrolium jelly. The emblem turned out pretty good.
Here is how the grill turned out. I sanded the bumper filler with very fine wet/dry sandpaper and it cleaned up very nicely.
Finally, here is a picture of it installed along with the new headlight bezels.
-
burdar - Frequent Poster
- Posts: 429
- Joined: 24 Mar 2009 17:27
- Location: Iowa
Re: origonal owner 73
![]() by burdar » 19 Jul 2011 20:28
by burdar » 19 Jul 2011 20:28
The new carpet, seat covers and arm rest pads arrived within the last couple weeks. I'm not too impressed with the arm rest pads. They have a wooden core...the originals used a metal core. The grain pattern isn't correct either. They do fit the contour of the door panel though.
Also, got the antenna bezel back from being rechromed. The reproduction bezel didn't fit the contour of the fender so I had to have the original one redone. The reproduction antenna mast I bought from Dales Cuda Shop has a few too many machining marks on it for my liking. I'll probably polish it slighly to get it looking like the original one.
It looks like the gauges were delivered this afternoon. As long as UPS didn't damage the package, I'll get them installed tonight. The dash assembly should be in the car very soon. Pics to follow.....
-
burdar - Frequent Poster
- Posts: 429
- Joined: 24 Mar 2009 17:27
- Location: Iowa
Re: original owner 73
![]() by Adrian Worman » 19 Jul 2011 20:47
by Adrian Worman » 19 Jul 2011 20:47
That car looks ace ...............your work is very, very good, its gonna look amazing on the street, can't wait for the pix 
Jesus built my hot rod
-
Adrian Worman - Frequent Poster
- Posts: 2051
- Joined: 10 Mar 2007 23:54
- Location: milton keynes
Re: original owner 73
![]() by burdar » 20 Jul 2011 13:10
by burdar » 20 Jul 2011 13:10
The gauges are installed in the dash. I just need to wire them up tonight and the dash assembly is ready to install. I did run into a problem with the new dash woodgrain piece though. The area around the gauges that's painted brown is larger then the original. That caused the trip odometer and clock handles to hit the overlay. I was able to push down on the trip odometer handle slightly and bend the overly so it didn't hit. The clock handle however is pretty far from fitting. I'll have to bend the overly quite a bit to be able to install the handle.
-
burdar - Frequent Poster
- Posts: 429
- Joined: 24 Mar 2009 17:27
- Location: Iowa
Re: original owner 73
![]() by burdar » 21 Jul 2011 13:32
by burdar » 21 Jul 2011 13:32
I finished up the dash assembly last night. It was my parents anniversary though so dad wasn't able to come over and give me a hand installing it. Maybe tonight. Here are some before and after pics of the dash assembly.
Before....

After...

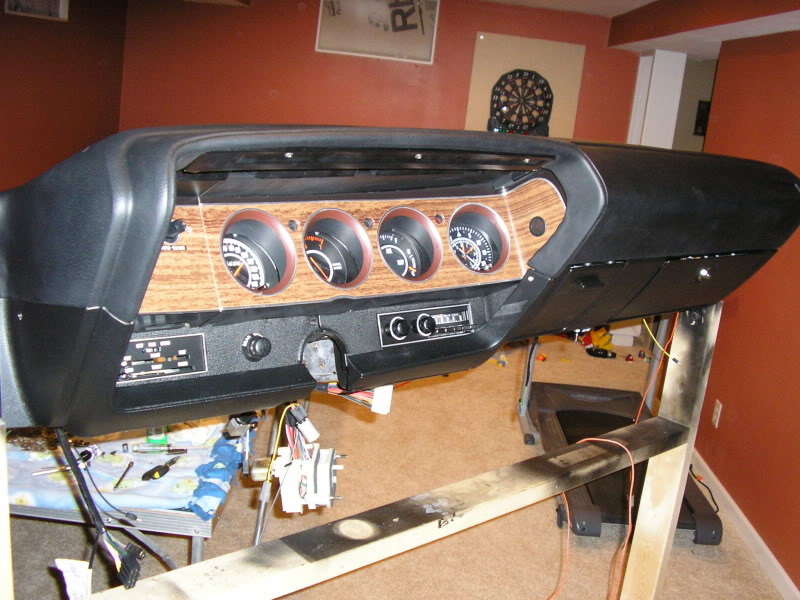
Before....
After...
-
burdar - Frequent Poster
- Posts: 429
- Joined: 24 Mar 2009 17:27
- Location: Iowa
Re: original owner 73
![]() by redgum78 » 22 Jul 2011 8:29
by redgum78 » 22 Jul 2011 8:29
Looks great Burdar. Your car is really getting close now!
-

redgum78 - Frequent Poster
- Posts: 170
- Joined: 15 Mar 2009 9:26
- Location: Australia