![]() by burdar » 30 Apr 2009 14:36
by burdar » 30 Apr 2009 14:36
Not much to update at this point. Best of Show moved their showroom at the beginning of April so work on the Challenger slowed down while cars were being moved. It is at least a month out yet at this point.
I rebuilt my body stands last month and they turned out pretty good. I origonally had 4" casters on the stands but they were way over loaded. It was hard to move the car and the wheels developed flat spots if the car stayed on one spot too long.
I took the stands to work and had one of the guys in the shop re-do all the welds for me. I cleaned them up at home and sprayed them with "hammer" paint. I bought 6" casters that have an 800 lbs load rating per caster. They also have a harder rubber wheel that shouldn't develope flat spots.
-
![GetAttachment[1].jpg](download/11877_1_GetAttachment[1].jpg "GetAttachment[1].jpg (31.32 KiB) Viewed 1702 times")
- Here is a before shot of the rear body stands with the small 4" casters.
-
![GetAttachment[2].jpg](download/11876_1_GetAttachment[2].jpg "GetAttachment[2].jpg (38.79 KiB) Viewed 1702 times")
- This is the finished product. I went with a fixed caster in the rear this time.
![GetAttachment[1].jpg](download/11877_0_GetAttachment[1].jpg "GetAttachment[1].jpg (31.32 KiB) Viewed 1702 times")
![GetAttachment[2].jpg](download/11876_0_GetAttachment[2].jpg "GetAttachment[2].jpg (38.79 KiB) Viewed 1702 times")
-
burdar - Frequent Poster
- Posts: 429
- Joined: 24 Mar 2009 17:27
- Location: Iowa
![]() by burdar » 04 May 2009 20:07
by burdar » 04 May 2009 20:07
I recieved a few more pictures today of the Challenger.
The trunk lid needed some work to sit down flush with the quarters. They installed lower door skins because of pitting on the bottom of the doors. The NEW fenders needed some work to get the body lines in the right place.
The trunk lid needed some work to sit down flush with the quarters. They installed lower door skins because of pitting on the bottom of the doors. The NEW fenders needed some work to get the body lines in the right place.
-
 Viewed 1704 times")
- The hood, front fenders and doors are back on for the bodywork phase.
-
 Viewed 1706 times")
- The door gaps have been adjusted and a little work was needed in the filler cap area.
-
![GetAttachment[2].jpg](download/11907_1_GetAttachment[2].jpg "GetAttachment[2].jpg (33.21 KiB) Viewed 1706 times")
- The holes for the Rallye fender louvers have been drilled.
 Viewed 1704 times")
 Viewed 1706 times")
![GetAttachment[2].jpg](download/11907_0_GetAttachment[2].jpg "GetAttachment[2].jpg (33.21 KiB) Viewed 1706 times")
-
burdar - Frequent Poster
- Posts: 429
- Joined: 24 Mar 2009 17:27
- Location: Iowa

 It looks really nice.
 - christer
- Ghost 48
- Posts: 2133
- Joined: 13 Oct 2006 19:52
- Location: Sweden
![]() by burdar » 04 Aug 2009 2:43
by burdar » 04 Aug 2009 2:43
Well, it's been three months since I posted any progress. Man the time flies when you are taking care of a new baby. He'll be six months on the 5th.
The restoration manager is finishing the car himself so he can put his guys on other projects. He's been working on the car on his own time so I've just kind of left him alone to do his thing. He doesn't need me calling him every week. About a month ago he said it would be close to being done by the Nats.
It's that time of year again so...I am headed out to Ohio Wednesday night for the Mopar Nationals. I'm swinging through Cleveland to check out the car before going back down to Columbus. I'm hoping the car is painted!!!
My best friends are going with me but the wife is staying home with the kid. Maybe he will get to go to the Nats in a year or two.
-
burdar - Frequent Poster
- Posts: 429
- Joined: 24 Mar 2009 17:27
- Location: Iowa
![]() by burdar » 04 Aug 2009 2:52
by burdar » 04 Aug 2009 2:52
I was reading a thread about vintage lisence plates on another site last week. It was pretty interesting.
There is a company that can make up custom plates from the state and year of your car. I went to the web site and looked up the Iowa plates. They had plates available for cars all the way back to the 50's.
The site said that the same plate was used in Iowa from 72-74. Well, just by chance...I was walking past a stack of old plates in my garage that night. I got the plates from my grandparents garage when they passed away. Anyway, I looked through them and was shocked when I found two sets of 72-74 lisence plates. Both sets have an inspection sticker from 1974 on them. One of those sets of plates is most likely, the origonal plates for the Challenger. How cool is that?
-
burdar - Frequent Poster
- Posts: 429
- Joined: 24 Mar 2009 17:27
- Location: Iowa
![]() by fal308 » 05 Aug 2009 13:08
by fal308 » 05 Aug 2009 13:08
Here in Missouri you can use any older plate as long as the number/letter combination is not in current use also. The folks that have older plates usually carry a copy of the law with them as most LEO don't know about the law.
- fal308
- Frequent Poster
- Posts: 981
- Joined: 01 Jan 2004 13:57
- Location: Pacific MO
![]() by jh27n0b » 05 Aug 2009 21:06
by jh27n0b » 05 Aug 2009 21:06
Can you post the link to the company that makes the plates. In Indiana you can plate your car in the year of manufacture. So I am looking for a 1970 Indiana plate. They start the plate numbering with the number code for the county and then follow with a letter, and then the sequential number. We have a county that is the 70th county{Shelby}. I think it would be cool to find the 383rd plate from Shelby county Indiana from 1970.
Still Dreaming
Still Dreaming
-
jh27n0b - Frequent Poster
- Posts: 389
- Joined: 02 Apr 2006 12:05
- Location: Indiana
-
jh27n0b - Frequent Poster
- Posts: 389
- Joined: 02 Apr 2006 12:05
- Location: Indiana
![]() by burdar » 10 Aug 2009 15:30
by burdar » 10 Aug 2009 15:30
Here is the link to the lisense plate website. http://www.licenseplate.tv/
No good news to share on the Challenger...I was all excited...walked into the shop and saw it. It's not even in primer yet. I was told they were working hard on a 70 Firebird that they showed at the Pontiac Nats over the weekend.
Right now the door gaps are being straightened out. A thin rod was welded to the back of the doors as well as the sides of the trunk lid. When completed, all the gaps should be around 3/16 of an inch.
I was going to waite until I got the car back before I bought any more parts for it. I was also going to wait before spending time on restoring any other components. I was told they need at least 3 more months to get it done so...I decided that I'll start gathering more parts and restoring some components to pass the time.
This weekend at the Mopar Nats, I bought all new brake and fuel lines as well as new E-brake cables for the car.
-
burdar - Frequent Poster
- Posts: 429
- Joined: 24 Mar 2009 17:27
- Location: Iowa
![]() by burdar » 30 Sep 2009 18:35
by burdar » 30 Sep 2009 18:35
A little more progress on the body to report...
The Goodmark fenders needed some more work to fit properlly. The fenders were about a 1/4" lower than the hood so they were modified. They were cut open the entire length and moved up flush with the hood. This also allowed the hood to fender gap to be adjusted.
The Goodmark fenders needed some more work to fit properlly. The fenders were about a 1/4" lower than the hood so they were modified. They were cut open the entire length and moved up flush with the hood. This also allowed the hood to fender gap to be adjusted.
-
![GetAttachment[1].jpg](download/12729_1_GetAttachment[1].jpg "GetAttachment[1].jpg (40.75 KiB) Viewed 1706 times")
- Passengers fender has been cut and a welding rod tacked in the gap to raise the edge up to meet the hood.
-
![IMG_0504[1].JPG](download/12728_1_IMG_0504[1].JPG "IMG_0504[1].JPG (2.42 MiB) Viewed 1703 times")
- Drivers side hood to fender gap. You can also see the holes for the fender mounted turn signal lights.
![GetAttachment[1].jpg](download/12729_0_GetAttachment[1].jpg "GetAttachment[1].jpg (40.75 KiB) Viewed 1706 times")
![IMG_0504[1].JPG](download/12728_0_IMG_0504[1].JPG "IMG_0504[1].JPG (2.42 MiB) Viewed 1703 times")
-
burdar - Frequent Poster
- Posts: 429
- Joined: 24 Mar 2009 17:27
- Location: Iowa
![]() by burdar » 30 Sep 2009 19:06
by burdar » 30 Sep 2009 19:06
Like I said earlier...the restoration manager is finishing the car himself. He is sticking to his origonal estimate even though the estimate was low. He had to put his guys on other "billable" projects.
One thing that had been on my mine since the beginning was the use of a 70-71 trunk lid. For some reason I couldn't stop thinking about all those extra holes on the inner structure. I had picked up that trunk lid years ago...long before the new lids came out. I also had another 72-74 lid but the rear lip was rusty. I sent both lids out with the car.
I asked if it was possible to remove a section of the 72-74 lid and use it to fill in all the extra holes that are found in the earlier trunk lids. I got an e-mail back saying that it would be cheaper just to buy a new trunk lid but if I did that...the new lid would have to be re-gapped. I had forgotten that he had already welded rods to the trunk lid to adjust the gaps. I told him not to worry about it...that if someone said anything like,"You know you don't have the right trunk lid on the car don't you?" that I would just tell them to mind their own buisness.
Well, I got another e-mail on Saturday and found out that he is filling in all the extra holes afterall...for free. He said it was the least he could do for making me wait so long to get the car back. Here's some pics.
Rusty 72-74 lid with section cut out.
Section cut out of 70-71 lid...some other holes already filled.
New section being installed in 70-71 lid.
One thing that had been on my mine since the beginning was the use of a 70-71 trunk lid. For some reason I couldn't stop thinking about all those extra holes on the inner structure. I had picked up that trunk lid years ago...long before the new lids came out. I also had another 72-74 lid but the rear lip was rusty. I sent both lids out with the car.
I asked if it was possible to remove a section of the 72-74 lid and use it to fill in all the extra holes that are found in the earlier trunk lids. I got an e-mail back saying that it would be cheaper just to buy a new trunk lid but if I did that...the new lid would have to be re-gapped. I had forgotten that he had already welded rods to the trunk lid to adjust the gaps. I told him not to worry about it...that if someone said anything like,"You know you don't have the right trunk lid on the car don't you?" that I would just tell them to mind their own buisness.
Well, I got another e-mail on Saturday and found out that he is filling in all the extra holes afterall...for free. He said it was the least he could do for making me wait so long to get the car back. Here's some pics.
Rusty 72-74 lid with section cut out.
 Viewed 1696 times")
Section cut out of 70-71 lid...some other holes already filled.
 Viewed 1696 times")
New section being installed in 70-71 lid.
 Viewed 1696 times")
-
burdar - Frequent Poster
- Posts: 429
- Joined: 24 Mar 2009 17:27
- Location: Iowa
 Viewed 1696 times")
 Viewed 1696 times")
 Viewed 1696 times")
 Viewed 1696 times")
 Viewed 1696 times")
 Viewed 1696 times")
 Viewed 1696 times")
 Viewed 1696 times")
 Viewed 1696 times")
 Viewed 1696 times")
 Viewed 1696 times")
 Viewed 1696 times")
 Viewed 1696 times")
-
burdar - Frequent Poster
- Posts: 429
- Joined: 24 Mar 2009 17:27
- Location: Iowa
-

dave-r - Grumpy Old Man
- Posts: 9842
- Joined: 12 Oct 2003 21:45
- Location: North of the Tyne, England
 Viewed 1696 times")
 Viewed 1696 times")
 Viewed 1696 times")
 Viewed 1696 times")
 Viewed 1696 times")
 Viewed 1696 times")
 Viewed 1696 times")
 Viewed 1696 times")
 Viewed 1696 times")
 Viewed 1696 times")
 Viewed 1696 times")
 Viewed 1696 times")
-
burdar - Frequent Poster
- Posts: 429
- Joined: 24 Mar 2009 17:27
- Location: Iowa
-
dave-r - Grumpy Old Man
- Posts: 9842
- Joined: 12 Oct 2003 21:45
- Location: North of the Tyne, England
![]() by burdar » 04 Jun 2010 14:58
by burdar » 04 Jun 2010 14:58
They are sanding/buffing right now. Once that is done, they will put on the strobe stripes and the vinyl top. They are planning on delivering it to me on the 19th. This is going to be a very long two weeks! I can't waite.
-
burdar - Frequent Poster
- Posts: 429
- Joined: 24 Mar 2009 17:27
- Location: Iowa
-

patrick - Frequent Poster
- Posts: 1323
- Joined: 09 Jul 2007 0:56
- Location: Washington State, U.S.A.
-

RedRaven - Frequent Poster
- Posts: 1995
- Joined: 15 Jul 2007 20:09
- Location: THE DOG HOUSE
![]() by burdar » 04 Nov 2010 13:37
by burdar » 04 Nov 2010 13:37
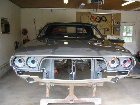
Havn't posted pics here for awhile. Got the car back the day before Fathers Day. I've been spending more time trying to figure out how it goes back together than accually wrenching on it. That's to be expected though when a car sits appart for 12 years.
wet sanding and buffing
vinyl top is installed and argent has been sprayed on the tail
finally home
wet sanding and buffing
 Viewed 1696 times")
 Viewed 1696 times")
vinyl top is installed and argent has been sprayed on the tail
 Viewed 1696 times")
 Viewed 1696 times")
finally home
 Viewed 1696 times")
 Viewed 1696 times")
 Viewed 1696 times")
 Viewed 1696 times")
Last edited by burdar on 04 Nov 2010 20:39, edited 1 time in total.
-
burdar - Frequent Poster
- Posts: 429
- Joined: 24 Mar 2009 17:27
- Location: Iowa
 Viewed 1696 times")
 Viewed 1696 times")
 Viewed 1696 times")
 Viewed 1696 times")
-
burdar - Frequent Poster
- Posts: 429
- Joined: 24 Mar 2009 17:27
- Location: Iowa
 Viewed 1696 times")
 Viewed 1696 times")
 Viewed 1696 times")
 Viewed 1696 times")

-
dave-r - Grumpy Old Man
- Posts: 9842
- Joined: 12 Oct 2003 21:45
- Location: North of the Tyne, England
![]() by fbernard » 07 Nov 2010 12:26
by fbernard » 07 Nov 2010 12:26
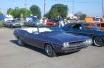
dave-r wrote:I drool every time I look at that paint.

What's the color?
I've been thinking for a while now about the new color I'll put on the convertible, and Winchester gray is the current winner. This seems a trifle lighter, and it looks great!
Could you post the references for this paint?
-

fbernard - Frequent Poster
- Posts: 733
- Joined: 19 Oct 2003 20:41
- Location: Paris, France