13 posts
• Page 1 of 1
Updates on my '72
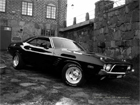
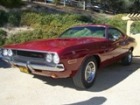
Well, I'm new around here so I thought I'd introduce myself and put up a few pics. Here is my trusty '72, complete with a custom paint job and body work. This was today, and I took off the vinyl top to do some clean up on some rust that had started around the windows. This is a 318 car that I've had since 1983 or so. I've lived in New York, and Arizona, but have always been based in Tennessee. This car took me everywhere, and still runs, but it's time for some attention, don't you think? Next I'll put up pics of my other Challenger, a '73 that I bought at a garage sale, and is almost totally disassembled awaiting lots of body work and a built 440.
Last edited by William63 on 28 Dec 2008 4:36, edited 1 time in total.
-

William63 - Posts: 4
- Joined: 15 Nov 2008 16:27
- Location: Nashville Tennessee
Looks like a "challenging" project. Just kidding. What are you planning to do to the car. I am just finishing mine up. If you are planning on doing body work and painting yourself and have no experience I can provide you with good products to use. Good luck and have fun
- charliek
- Frequent Poster
- Posts: 91
- Joined: 08 Mar 2008 16:35
- Location: New Jersey
-

Jimiboy - Frequent Poster
- Posts: 708
- Joined: 22 Dec 2005 10:20
- Location: Sweden
-

Eddie - Frequent Poster
- Posts: 6212
- Joined: 16 Oct 2006 21:26
- Location: Terre Haute, Ind.
-

bananaskin - Frequent Poster
- Posts: 170
- Joined: 13 Sep 2007 20:38
- Location: UK
The plan for this car is to get her road worthy as soon as I can. I put a new interior in a few year back, and haven't driven her much since. In the mean time, I've learned to do a little MIG welding and feel more confident trying some body work now, and as you can see, she could use it. I think now I'll have to pull the interior and the glass, and get the body more solid before I reinstall it. I have a Rally dash that I might try to put in, but that will mean omitting the air conditioning, so I'm still deciding about that. I have done the trunk and motor bay in Por-15, as well as the interior floor which was good when I did it. I need to do the underbody, and get the factory weatherproofing off to check for rust there, but things seemed solid when she went into semi-retirement. The rear quarters in front of and behind the wheel wells, the window rails, one bad spot under the trim at the rear quarter window and the spots you saw in the pics all need some metal put in. After that, I'll try my hand at aligning the new fenders more properly (a result of my smacking up the front end as you may have guessed) and then get a dash and interior in. A nice flat black retro-rod paint job would be good with me, and I think I'll leave off the vinyl top for budget and simplicity's sake. The spot in my back yard where I took the pics is where I do my work, I have a little 3 wall carport where I keep the cars, but its hard to do much in there as it's tight and has a low ceiling, so you have to understand what I'm working with. Pray for a warm sunny winter and things should keep moving. Let me know anything you can suggest. Has anyone ever used "Rust Bullet"? It's a rust coating similar to Por-15 that doesn't require so much wet surface prep.
-

William63 - Posts: 4
- Joined: 15 Nov 2008 16:27
- Location: Nashville Tennessee
William63 wrote:How did switching to a hard top go? Did you just shave the studs that hold the trim? The window trim looks like its the same as on a hard top, so is there any changes to be made around the windows?
I believe mine just had holes not studs. I puttied them but welding would have been a better choice. Nothing has popped out though. Mine had a very poorly done lead fill at the roof to quarter joint. Probably why they put a vinyl top on it at the factory. Spent quite a bit of time wet sanding/blocking those areas.
I had the same problem with rust at the rear quarters too. I took that to a metal guy because I'm not good with fitting and welding. The section in front of the rear wheels is a seam with lead filler that joins the two panels. It needs to be strong as it is a structual area and subject to flexing.
I used rust bullet recently on hidden locations like the trunk and backside of the above mentioned seam repair. It was tough to spray as it is so thick. Thinning it with acetone helped but I would hesitate to spray it on a finish surface. Tough to sand also. It is nasty stuff so use a respirator, otherwise

The factory undercoating seems to have held up pretty well so I left it alone. It's the hidden areas where the skin and interior metals meet that were problems. Seal them up good and make sure the drainage is good especially around the wheels.
-

Jon - Frequent Poster
- Posts: 1229
- Joined: 21 Aug 2005 15:12
- Location: Medford Oregon
Updates on my '72
Well, it was warm today so I got out and spent a stress free (yeah...right) afternoon taking the glass out so I can get at the rust in the rails, and fix a bulge in my dash cover that happens in warm weather. It's been my experience that the best things to do to get the glass out is to get a good night's sleep, eat a big meal before you start to work, and take your time! I took lots of breaks and did't put any sort of time limit on the job, and things went along well. The glass is now stored in the shop, and the all of the rust is exposed so I can grind it out and cover this all in Por-15. I'll grind the roof as well, and then weld the little pinholes closed so I can smooth it all out and get some primer applied. I am leaning towards making this a hard top car for simplicity and to lower cost, as well as making it harder for rust to start up in these areas again. Thanks for all of the replies to my first post....let me know what you think of my work here.
-

William63 - Posts: 4
- Joined: 15 Nov 2008 16:27
- Location: Nashville Tennessee
The first time I took my glass out I was really patient and it went well.
The second time I was too cock sure of myself, rushed it, and cracked the windshield.
Luckly someone in my club had a new replacement for sale.
The second time I was too cock sure of myself, rushed it, and cracked the windshield.
Luckly someone in my club had a new replacement for sale.
-

dave-r - Grumpy Old Man
- Posts: 9842
- Joined: 12 Oct 2003 21:45
- Location: North of the Tyne, England
-

drewcrane - Frequent Poster
- Posts: 2893
- Joined: 01 Sep 2007 12:36
- Location: "follow the laraya belt ,that should get ya there"
13 posts
• Page 1 of 1


