Challenger RTSE

Postby CraigRTSE » 23 May 2008 18:32

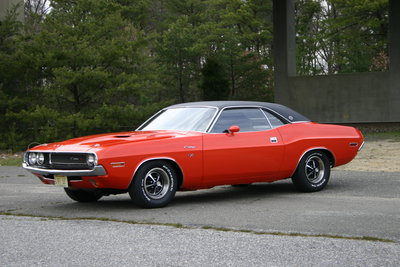
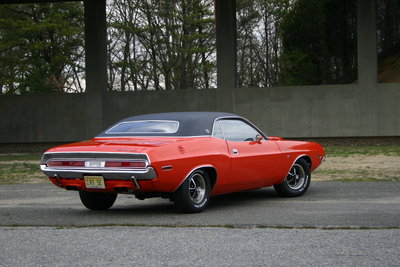
Here are some pics of my restoration, starting with when the car returned from body/paint about a year ago. It's a '70 Challenger RTSE, 440, 4spd, 3.54 dana. I've owned this car since Oct '03 and started the resto in '04, so it's been a long journey nearing its end. The car was a mess when I bought it; it's nice to see it being brought back to life. Everything on the car has either been rebuilt or replaced w/new. I hope to have the car running by late summer.

Currently the engine is at the machine shop. Once they do all the normal stuff (boring, porting, decking, etc), a friend and I will do the assembly, then take it back to the machine shop for a break-in on the dyno. Anyway, enjoy the photos. I'll post some updates as they come. And thanks again for the help in the tech sections.

Image

Image

Image

Image

Image

Image

Image

Image

Image

Image

Image

Image

Image

Image

Image

Image

Image

Image

Image

Image

Image

Image

Image

Image

Image

Image

Image

Image

Image

Image

Image

Image

Image

Image

Image

Image

Image

Image

Image

Image

Image

Image
User avatar
CraigRTSE
Frequent Poster
 
Posts: 65
Joined: 06 Aug 2007 22:00
Location: Here

Postby jh27n0b » 23 May 2008 19:36

looking good. I love the pics. Hope to see some"road" pics soon
Bob
User avatar
jh27n0b
Frequent Poster
 
Posts: 389
Joined: 02 Apr 2006 12:05
Location: Indiana

Postby rtse4406pack » 23 May 2008 19:39

hey craig,car is looking great. just love those r/t s.e. cars :wink2:
cant wait to see it finished!!
rtse4406pack
Frequent Poster
 
Posts: 302
Joined: 14 Oct 2007 22:47

Postby Eddie » 23 May 2008 20:26

Craig, very nice! Cant wait to see the engine build as well. The body is gorgeous! :thumbsup:
User avatar
Eddie
Frequent Poster
 
Posts: 6212
Joined: 16 Oct 2006 21:26
Location: Terre Haute, Ind.

Postby dave-r » 23 May 2008 21:35

Ultra neat! 8)
User avatar
dave-r
Grumpy Old Man
 
Posts: 9842
Joined: 12 Oct 2003 21:45
Location: North of the Tyne, England

Postby CraigRTSE » 25 May 2008 14:16

Thanks everyone!
User avatar
CraigRTSE
Frequent Poster
 
Posts: 65
Joined: 06 Aug 2007 22:00
Location: Here

Postby ianandjess » 25 May 2008 14:27

WOW craig that car is going to be so awesome im green with envy its going to be 1of the best cars we'll ever see the workmanship looks top notch really good to see keep us up to date
cheers ian
User avatar
ianandjess
Frequent Poster
 
Posts: 687
Joined: 10 Dec 2005 12:18
Location: australia

Postby DAYLEY/CHALLENGER » 29 May 2008 1:58

I've seen these pics before. :D :D They look good on this site too.
User avatar
DAYLEY/CHALLENGER
Frequent Poster
 
Posts: 229
Joined: 14 Dec 2006 17:32
Location: Rockingham, Nc ,USA

Postby CraigRTSE » 23 Jul 2009 0:45

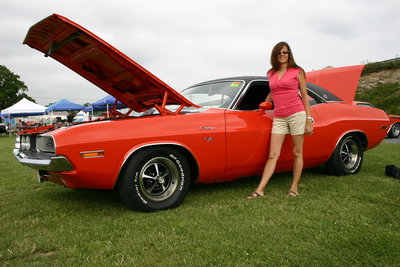
Car is done and has been on the road for a few months now. Have racked up about 1300 miles. Drove it to Carlisle, PA and won 2nd in my class. Here are some pics. Enjoy.

b50 030.jpg
User avatar
CraigRTSE
Frequent Poster
 
Posts: 65
Joined: 06 Aug 2007 22:00
Location: Here

Postby CraigRTSE » 23 Jul 2009 0:47

Another

b50 034.jpg
User avatar
CraigRTSE
Frequent Poster
 
Posts: 65
Joined: 06 Aug 2007 22:00
Location: Here

Postby CraigRTSE » 23 Jul 2009 0:48

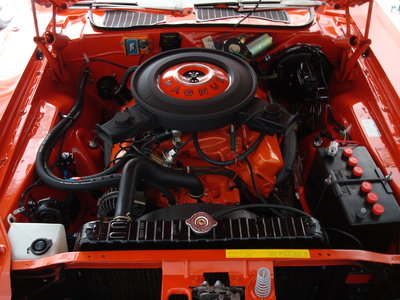
Engine

b53 004.jpg
User avatar
CraigRTSE
Frequent Poster
 
Posts: 65
Joined: 06 Aug 2007 22:00
Location: Here

Postby CraigRTSE » 23 Jul 2009 0:49

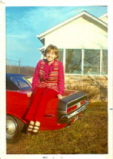
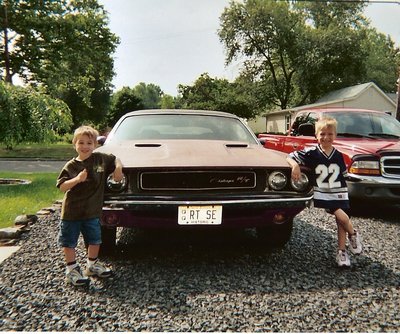
Kids & car then

ChallyKids.jpg
User avatar
CraigRTSE
Frequent Poster
 
Posts: 65
Joined: 06 Aug 2007 22:00
Location: Here

Postby CraigRTSE » 23 Jul 2009 0:50

Kids & car now

Challykids1 (Large).jpg
User avatar
CraigRTSE
Frequent Poster
 
Posts: 65
Joined: 06 Aug 2007 22:00
Location: Here

Postby CraigRTSE » 23 Jul 2009 0:52

Another

b50 043A (Large).jpg
User avatar
CraigRTSE
Frequent Poster
 
Posts: 65
Joined: 06 Aug 2007 22:00
Location: Here

Postby CraigRTSE » 23 Jul 2009 0:54

At Carlisle with my wife, the lovely ChallyGirl.

B68 042.jpg
User avatar
CraigRTSE
Frequent Poster
 
Posts: 65
Joined: 06 Aug 2007 22:00
Location: Here

Postby CraigRTSE » 23 Jul 2009 0:56

Inside

b42 013 (Large).jpg
User avatar
CraigRTSE
Frequent Poster
 
Posts: 65
Joined: 06 Aug 2007 22:00
Location: Here

Postby CraigRTSE » 23 Jul 2009 1:01

Last one

Wedding 067 (Large).jpg
User avatar
CraigRTSE
Frequent Poster
 
Posts: 65
Joined: 06 Aug 2007 22:00
Location: Here

Postby dave-r » 23 Jul 2009 11:12

A lot nicer than my orange Chally. Well done. :thumbsup:
User avatar
dave-r
Grumpy Old Man
 
Posts: 9842
Joined: 12 Oct 2003 21:45
Location: North of the Tyne, England

Postby Eddie » 23 Jul 2009 15:43

Very NICE! The Challenger too! :thumbsup: :lol:
User avatar
Eddie
Frequent Poster
 
Posts: 6212
Joined: 16 Oct 2006 21:26
Location: Terre Haute, Ind.

Postby CraigRTSE » 23 Jul 2009 23:03

airfuelEddie wrote:Very NICE! The Challenger too! :thumbsup: :lol:


I have other pics, but they have to stay in my personal stash, lol.
User avatar
CraigRTSE
Frequent Poster
 
Posts: 65
Joined: 06 Aug 2007 22:00
Location: Here

Postby 72challorange » 24 Jul 2009 0:13

Very nice, I remember looking at it there.

Tom
72challorange
 
Posts: 17
Joined: 16 Jul 2008 23:13
Location: MA, USA

Postby Goldenblack440 » 25 Jul 2009 19:09

Wow, very nice resto - it was a long wait but worth it for sure. The kids shots, before and after is a great touch. The number plates were a good score too! Can i ask a question. I was looking at the closeup door/mirror pictures and can you tell me how is the correct way to put in those mirror screw wells? The steel screw retainer things, 2 for each mirror. I bought some from RT Specialties and looking at my 71 Challenger which had some in, they looked like they were pressed in. But a panel repair shop told me you need a special tool to install them- a bit like a rivet gun? But i am not so sure. I tried pressing them into my 73, no luck, they were too loose. So how did you get them in so they are very tight? Thanks
User avatar
Goldenblack440
Frequent Poster
 
Posts: 600
Joined: 08 Jul 2007 18:57

Postby Jon » 25 Jul 2009 23:46

Looks great, it shows all your hard work. :thumbsup:

Well worth it too as she will be around for quite a while. A family heirloom as it were.

Careful letting the kids drive it though. :lol:
User avatar
Jon
Frequent Poster
 
Posts: 1229
Joined: 21 Aug 2005 15:12
Location: Medford Oregon

Postby CraigRTSE » 26 Jul 2009 23:27

Goldenblack440 wrote:Wow, very nice resto - it was a long wait but worth it for sure. The kids shots, before and after is a great touch. The number plates were a good score too! Can i ask a question. I was looking at the closeup door/mirror pictures and can you tell me how is the correct way to put in those mirror screw wells? The steel screw retainer things, 2 for each mirror. I bought some from RT Specialties and looking at my 71 Challenger which had some in, they looked like they were pressed in. But a panel repair shop told me you need a special tool to install them- a bit like a rivet gun? But i am not so sure. I tried pressing them into my 73, no luck, they were too loose. So how did you get them in so they are very tight? Thanks


Use a 10-24 hex headed screw with a flat washer and a hex nut. The screw is threaded into the insert with the hex nut threaded on the screw. While holding the screw to prevent it from turning, the hex nut is tightened to compress the threaded insert. The insert must be held tightly to the sheetmetal as the nut is tightened.
User avatar
CraigRTSE
Frequent Poster
 
Posts: 65
Joined: 06 Aug 2007 22:00
Location: Here

Postby CraigRTSE » 26 Jul 2009 23:28

Thanks for the compliments everyone!
User avatar
CraigRTSE
Frequent Poster
 
Posts: 65
Joined: 06 Aug 2007 22:00
Location: Here

Postby Goldenblack440 » 27 Jul 2009 17:10

thanks for the method Craig! pity i didn't know that before hand. so easy when you know the right way.
User avatar
Goldenblack440
Frequent Poster
 
Posts: 600
Joined: 08 Jul 2007 18:57