
136 posts
• Page 2 of 5 • 1, 2, 3, 4, 5
Dark Gold Metallic
![]() by patrick » 07 Dec 2007 5:22
by patrick » 07 Dec 2007 5:22
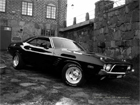
My 1973 Rallye was originally JY9-Dark Gold Metallic, with V1Y Gold, or some people claim Yellow vinyl top. My car is now FY1-Top Bananna Yellow with a black top.  Wich my wife loves. At one time, I was considering Triple Black.
  But, in the back of my mind, I've alway's wanted to see what my car looked like in her true color's.
  Keep up the great work! Patrick
Keep up the great work! Patrick-

patrick - Frequent Poster
- Posts: 1323
- Joined: 09 Jul 2007 0:56
- Location: Washington State, U.S.A.
 Viewed 2156 times")
 Viewed 2160 times")
![]() by Hezzel » 10 Jan 2008 7:19
by Hezzel » 10 Jan 2008 7:19
patrick wrote:Very nice cowl area under that fender skin Hezzel. No Rust!!
Yes patrick i´m a very lucky guy with a very solid car
The right fender was very solid to no rust at all, nothing compared with the other fender which i had the lower patch panel replaced..
-

Hezzel - Frequent Poster
- Posts: 125
- Joined: 22 Oct 2007 13:05
- Location: Sweden, Kiruna
![]() by Hezzel » 18 Jan 2008 13:08
by Hezzel » 18 Jan 2008 13:08
Small work i did today, Brake lines and fuel line and more but not in these bad pictures.
-
 Viewed 2156 times")
- More removing
-
 Viewed 2155 times")
- And more
-
 Viewed 2155 times")
- Side glass from passenger side
-
 Viewed 2155 times")
- Did this today 27/1-08
-
 Viewed 2155 times")
- Other side 27/1-08
 Viewed 2156 times")
 Viewed 2155 times")
 Viewed 2155 times")
 Viewed 2155 times")
 Viewed 2155 times")
Last edited by Hezzel on 27 Jan 2008 17:00, edited 2 times in total.
-
Hezzel - Frequent Poster
- Posts: 125
- Joined: 22 Oct 2007 13:05
- Location: Sweden, Kiruna
-
patrick - Frequent Poster
- Posts: 1323
- Joined: 09 Jul 2007 0:56
- Location: Washington State, U.S.A.
![]() by Chris » 22 Mar 2008 21:37
by Chris » 22 Mar 2008 21:37
Hi Hezzel, I was admiring your car, nice shape , I am also restoring a 71 R/T and I wondered if your bumpers also came with slots for the bumper jack as mine did? I was thinking I got 72 or 73 bumpers but maybe these are the correct ones.
- Chris
- Frequent Poster
- Posts: 90
- Joined: 03 Feb 2008 3:43
- Location: Windsor, ON Canada
![]() by dave-r » 22 Mar 2008 21:44
by dave-r » 22 Mar 2008 21:44
Allthough 72-on was correct for the bumper slots I have seen some 71s with them too.
I have read that the front bumper was the same as the 1970 bumper until Feb. '71 when a new bumper was used. This was then changed again in June.
Maybe one of these changes was the addition of the bumper jack slots?
I have read that the front bumper was the same as the 1970 bumper until Feb. '71 when a new bumper was used. This was then changed again in June.
Maybe one of these changes was the addition of the bumper jack slots?
-

dave-r - Grumpy Old Man
- Posts: 9842
- Joined: 12 Oct 2003 21:45
- Location: North of the Tyne, England
![]() by Chris » 22 Mar 2008 21:55
by Chris » 22 Mar 2008 21:55
I hope so I'd like to keep thes bumpers they are rechromed allready and look like brand new. If the dates you stated are correct though these probably arent original. My car has a build date of 8-70. but who cares.
- Chris
- Frequent Poster
- Posts: 90
- Joined: 03 Feb 2008 3:43
- Location: Windsor, ON Canada
 Viewed 2161 times")
-
Jimiboy - Frequent Poster
- Posts: 708
- Joined: 22 Dec 2005 10:20
- Location: Sweden
-

Eddie - Frequent Poster
- Posts: 6212
- Joined: 16 Oct 2006 21:26
- Location: Terre Haute, Ind.
 Viewed 2156 times")
 Viewed 2156 times")
 Viewed 2156 times")
 Viewed 2158 times")
-

bananaskin - Frequent Poster
- Posts: 170
- Joined: 13 Sep 2007 20:38
- Location: UK
 Viewed 2157 times")
 Viewed 2158 times")
![]() by Eddie » 15 Aug 2008 19:22
by Eddie » 15 Aug 2008 19:22
Do you have to wet sand and re-prime Hezzel or did they do that already? Looks good man, keep up the hard work. BTW, have you guys adopted the new envoirnmentally friendly waterbourne based 3M paints and primers? Over here the US will eventually use it 100% in the repair/autobody industry. Custom shops included when it becomes federal law like in california. It uses water as the pigment carrier instead of solvents thus reducing VOC vapors. The finish is remarkably smooth with excellent flowout. They had to use Saita paint guns constrcuted of internal stainless steel due to the water's rusting regular steel, and some solvents will have to be added because when too cold water freezes and too hot it evaportes too quickly. we didi a Jeep that was dry in less than 30 minutes. It had flashed in less than 4!  I am still learning about autobody/painting and it is a true art form. drivelines are for knuckle dragging neandrathals
BTW, have you guys adopted the new envoirnmentally friendly waterbourne based 3M paints and primers? Over here the US will eventually use it 100% in the repair/autobody industry. Custom shops included when it becomes federal law like in california. It uses water as the pigment carrier instead of solvents thus reducing VOC vapors. The finish is remarkably smooth with excellent flowout. They had to use Saita paint guns constrcuted of internal stainless steel due to the water's rusting regular steel, and some solvents will have to be added because when too cold water freezes and too hot it evaportes too quickly. we didi a Jeep that was dry in less than 30 minutes. It had flashed in less than 4! -
Eddie - Frequent Poster
- Posts: 6212
- Joined: 16 Oct 2006 21:26
- Location: Terre Haute, Ind.
![]() by Hezzel » 16 Aug 2008 9:37
by Hezzel » 16 Aug 2008 9:37
Eddie : I will probably sand it later on , my first step is remowing all paint from all lose parts and get them primed .
Jon : I´m using 120 grit sanding disc whit slowest speed on the angle grinder then removing last layer with 120 and 180 grit oscillating angle grinder.
Have removed some old bondo in small places only on the fenders nothing on the trunk lid
Jon : I´m using 120 grit sanding disc whit slowest speed on the angle grinder then removing last layer with 120 and 180 grit oscillating angle grinder.
Have removed some old bondo in small places only on the fenders nothing on the trunk lid
-
Hezzel - Frequent Poster
- Posts: 125
- Joined: 22 Oct 2007 13:05
- Location: Sweden, Kiruna
 Viewed 2154 times")
 Viewed 2154 times")
![]() by christer » 30 Aug 2008 7:37
by christer » 30 Aug 2008 7:37
Jon wrote:What size sanding disk and grit are you using to remove the paint?
Here is my favourite tool for removing old paint and surface rust. I am not sure that everyone is familiar with it so I thought I would show a pic of it.
From the beginning it was only manufactured by 3M (I think they invented it) and this product is called Scotch-brite. Quite costly at a start but now I use to buy this tool in a discount store called Biltema (only here in Sweden).
I think it works very well myself and I can warmly recommend it. The only disadvantage is that it creates a lot of dust, but except for that it is great product. One positive thing is that it doesn´t grind off anything from the sheet metal.
The disc is replaceable so you do not need to replace the shaft every time you switch discs. I prefer large diameter discs because the job gets done quicker with them.
 Viewed 2153 times")
- christer
- Ghost 48
- Posts: 2133
- Joined: 13 Oct 2006 19:52
- Location: Sweden
![]() by christer » 30 Aug 2008 18:33
by christer » 30 Aug 2008 18:33
Jon wrote:Looks interesting. Is the pad flexable enough to get the curves and hard to reach areas?
While working with this disc, you are using only the outer edge of the disc, and not not the big flat area of the disc. I hope you understand me. It works really great on big body panels. Stay away from sharp edges though, because the disc tends to get stuck on them, causing the disc to get worn quicker than normal. I can quarantee that you will not be disappointed if you buy this disc (to be used on a drilling-maschine). A complete disc will cost about $10 and worth every penny.
- christer
- Ghost 48
- Posts: 2133
- Joined: 13 Oct 2006 19:52
- Location: Sweden
![]() by fal308 » 30 Aug 2008 20:11
by fal308 » 30 Aug 2008 20:11
Eastwood sells several similar items. http://www.eastwoodco.com/shopping/prod ... ctID=12374
http://www.eastwoodco.com/shopping/prod ... ctID=10870
They also have Nyalox wheels (similar to a wire wheel) http://www.eastwoodco.com/jump.jsp?item ... 609&page=8
Have you tried a flap disc? http://eastwood.resultspage.com/search? ... =flap+disc
http://www.eastwoodco.com/shopping/prod ... ctID=10870
They also have Nyalox wheels (similar to a wire wheel) http://www.eastwoodco.com/jump.jsp?item ... 609&page=8
Have you tried a flap disc? http://eastwood.resultspage.com/search? ... =flap+disc
- fal308
- Frequent Poster
- Posts: 981
- Joined: 01 Jan 2004 13:57
- Location: Pacific MO
![]() by christer » 30 Aug 2008 21:40
by christer » 30 Aug 2008 21:40
fal308 wrote:Eastwood sells several similar items. http://www.eastwoodco.com/shopping/prod ... ctID=12374
Thanks!
 Yes, that is exactly what I am talking about. 3 discs for $30 gives $10/each (....or more correctly less than $10 each since you also get a mandrel).
 (Here is the mandrel: http://www.eastwoodco.com/jump.jsp?item ... pe=PRODUCT )
fal308 wrote:Have you tried a flap disc? http://eastwood.resultspage.com/search? ... =flap+disc
Yup, they are also very handy to have in the toolbox.
- christer
- Ghost 48
- Posts: 2133
- Joined: 13 Oct 2006 19:52
- Location: Sweden

136 posts
• Page 2 of 5 • 1, 2, 3, 4, 5