Hi everybody!
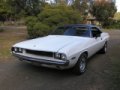
Here is some pic`s from my project.I started this in 1993 and today I put the engine and transmission in.
29 posts
• Page 1 of 1
 Viewed 615 times")
 Viewed 615 times")
 Viewed 606 times")
- Bobbe
- Posts: 12
- Joined: 02 Jan 2004 14:18
- Location: Sweden

 Viewed 611 times")
-

Jon - Frequent Poster
- Posts: 1229
- Joined: 21 Aug 2005 15:12
- Location: Medford Oregon
![]() by ianandjess » 24 Sep 2006 7:17
by ianandjess » 24 Sep 2006 7:17
gday is that the standard proceedure to put a motor in a challenger from the bottom ive always done it from the top on normal cars like these the only car i ever did it that way was a VW beatle is there any benifits by going under as opposed to over
cheers ian
cheers ian
-
ianandjess - Frequent Poster
- Posts: 687
- Joined: 10 Dec 2005 12:18
- Location: australia
![]() by dave-r » 24 Sep 2006 10:14
by dave-r » 24 Sep 2006 10:14
You can do it either way but doing it this way (the factory way) there is less chance of hiting the paint and you can also fit headers first if you have them. The front of the car is also lighter than the engine and it is easier to lift/lower straight.
I plan to do it this way for the first time when mine goes back together.
The last time I lifted the engine out the crane fell to one side as I moved it back to line up with the engine stand and almost hit my wife. Fortunatly the garage wall stopped it going right over and doing any damage. I will not be doing it that way again (or hiring cheap worn out cranes).
-

dave-r - Grumpy Old Man
- Posts: 9842
- Joined: 12 Oct 2003 21:45
- Location: North of the Tyne, England
![]() by ianandjess » 24 Sep 2006 13:44
by ianandjess » 24 Sep 2006 13:44
gday i am planning an engine & tranny transplant so ill give that method a go it looks easy enough & i should be able to put the engine & box in as 1 unit which will be a bonus
cheers ian
cheers ian
-
ianandjess - Frequent Poster
- Posts: 687
- Joined: 10 Dec 2005 12:18
- Location: australia
-
dave-r - Grumpy Old Man
- Posts: 9842
- Joined: 12 Oct 2003 21:45
- Location: North of the Tyne, England
 Viewed 606 times")
 Viewed 605 times")
 Viewed 605 times")
- Bobbe
- Posts: 12
- Joined: 02 Jan 2004 14:18
- Location: Sweden
- LITEMUP
- Frequent Poster
- Posts: 71
- Joined: 21 Oct 2003 4:05
- Location: Oklahoma, USA
 Viewed 606 times")
-

Eddie - Frequent Poster
- Posts: 6212
- Joined: 16 Oct 2006 21:26
- Location: Terre Haute, Ind.
![]() by Bobbe » 21 Jan 2007 15:21
by Bobbe » 21 Jan 2007 15:21
Hi!
Yes I`m planning to drive it to Oxelösund in June if the weather is good enough.
I started the engine for the first time since 1993 last Friday to break in the camshaft and it was no problems.Now I`m gonna start restoring the grille.
Yes I`m planning to drive it to Oxelösund in June if the weather is good enough.
I started the engine for the first time since 1993 last Friday to break in the camshaft and it was no problems.Now I`m gonna start restoring the grille.
- Bobbe
- Posts: 12
- Joined: 02 Jan 2004 14:18
- Location: Sweden
![]() by christer » 23 Jan 2007 22:19
by christer » 23 Jan 2007 22:19
Bobbe wrote:Hi!
Yes I`m planning to drive it to Oxelösund in June if the weather is good enough.
I started the engine for the first time since 1993 last Friday to break in the camshaft and it was no problems.Now I`m gonna start restoring the grille.
Sounds great! I really hope that you make it !!
You seldom see this very high level of restauration outside the US. It really looks perfect judging by the pic´s. I am sure that it has taken a lot of money and skill to achieve this very, very good result.
- christer
- Ghost 48
- Posts: 2133
- Joined: 13 Oct 2006 19:52
- Location: Sweden

![]() by JackT » 27 Jan 2007 1:23
by JackT » 27 Jan 2007 1:23
Very nice job on your car! Another plus you get from lowering the car body onto the engine/trans/front end assembly is the paint on the hood hinge bolts is correct and unbroken...... that gets a plus from me when I'm judging a stock class.
-

JackT - Frequent Poster
- Posts: 390
- Joined: 18 Oct 2003 2:29
- Location: West Hills, California, USA
- bob
- Posts: 14
- Joined: 10 Jul 2006 21:56
- Location: sweden
 Viewed 605 times")
 Viewed 602 times")
 Viewed 600 times")
 Viewed 602 times")
 Viewed 603 times")
- Bobbe
- Posts: 12
- Joined: 02 Jan 2004 14:18
- Location: Sweden
-
Eddie - Frequent Poster
- Posts: 6212
- Joined: 16 Oct 2006 21:26
- Location: Terre Haute, Ind.

-

patrick - Frequent Poster
- Posts: 1323
- Joined: 09 Jul 2007 0:56
- Location: Washington State, U.S.A.
-

jh27n0b - Frequent Poster
- Posts: 389
- Joined: 02 Apr 2006 12:05
- Location: Indiana
-

Dale1035 - Frequent Poster
- Posts: 209
- Joined: 05 Sep 2006 5:34
- Location: Henderson, Ky

29 posts
• Page 1 of 1