My Challenger story began 6 years ago, soon after I turned 11. My father came home one day, and said, "How'd you like a car like that model over there," pointing to a 70 Challenger model up on a shelf. Of course, I told him I'd love to have that car. The person who owned it was selling his house, had tried selling the car but no one would buy, so he finally told my father to get it out of his yard.
We came with a trailer to tow the car back, but when we got a glimpse of the car my heart fell. All four tires were flat, and the small spare on the front left the car nearly sitting on the frame. Both windows were rolled down all the way, and the interior could barely be seen under the two inches of pine needles and leaves. Someone had cut a hole in the roof with a sawzall and put in a cheap sunroof that didnt fit. The paint was originally Gunmetal gray but had faded to a dull gray with numerous chunks of peeling paint. The engine bay looked no better. The rusted remains of an A/C system covered most of the top of the engine, and there was no air filter on the car, leaving the carb open. A rag was stuffed in the open hole for the gas tank.
Despite the condition of the car, we took it anyways. We put some new wheels on it and dragged it home, and I worked away at it for the next month of the summer, doing all I could with my limited knowledge of cars at 11. Things werent as bad as they had seemed. There was no carpet in the car, and the man who left the windows open also had pulled the body plugs in the floor, so when the pine needles were vaccumed away, the floor was still rock solid. The engine also fired up almost instantly with some good gas and starting fluid, even with the title showing 153,000 on it. After the car was cleaned up some, it went right into the garage, where the A/C remnants were promptly ditched and some performance parts went in to build a damn strong running 318. Over the last few years, I've replaced just about every mechanical or moving part in the car, from ball joints and pitman arms to the brake cylinders in the rear and calipers in the front. I'm still running it on a 1 gallon can strapped with wire to the side of the radiator until I can get a gas tank, but I ordered a truckload of parts anticipating the completion of the car near the end of this summer.
Well I just thought I'd share with you guys my story. I've been an E-body guy forever, and a Challenger as my first car build has definitely been an awesome experience. Here's a couple pictures of it before I replaced the 72 grille, if I can get them to upload.
80 posts
• Page 1 of 3 • 1, 2, 3
A 72 In Progress....Again
![]() by Moparman1972 » 24 Jun 2006 14:48
by Moparman1972 » 24 Jun 2006 14:48
 Viewed 1897 times")
 Viewed 1892 times")
Last edited by Moparman1972 on 28 Apr 2009 23:57, edited 3 times in total.
- Moparman1972
- Frequent Poster
- Posts: 538
- Joined: 29 Apr 2006 17:10
- Location: Connecticut
![]() by dave-r » 24 Jun 2006 17:07
by dave-r » 24 Jun 2006 17:07
Reminds me of my first car. Talk about steep learning curve!
Well done on the work so far. You have a very early start. I was 30 before I managed to get the Challenger of my dreams. Buy the time you are that age you will be twice as skilled than a lot of us here.
Keep us up to date as things progress. Even if it takes years. It is nice to see how these things turn out.
-

dave-r - Grumpy Old Man
- Posts: 9842
- Joined: 12 Oct 2003 21:45
- Location: North of the Tyne, England
![]() by Moparman1972 » 24 Jun 2006 19:45
by Moparman1972 » 24 Jun 2006 19:45
I will go CRAZY if it takes another 6 months even to get it done! It's a lot closer to done than it looks in the pics. Just picked up a new fiberglass hood for it today, too. Fifty bucks at a junkyard, all set up for a shaker scoop...... Gives me lots of ideas. Too bad the drivers side bucket seat didnt survive so well, because the passenger one is quite comfortable! Oh well, cushy racing seats it is. The sacrifices a guy has to make. 
What do you guys think of a white paint job, with black valances and taillight panel? Maybe a black shaker scoop too.
OH! Almost forgot a pic of the engine! What was I thinking??!!
What do you guys think of a white paint job, with black valances and taillight panel? Maybe a black shaker scoop too.
OH! Almost forgot a pic of the engine! What was I thinking??!!
 Viewed 1896 times")
- Moparman1972
- Frequent Poster
- Posts: 538
- Joined: 29 Apr 2006 17:10
- Location: Connecticut
![]() by Ornamental » 18 Aug 2006 19:17
by Ornamental » 18 Aug 2006 19:17
Let this be said: Your father must be a real cool guy!
Like dave-r said, keep us up to date, threads like these is so much better to follow than any of the crap series on tv, you know.
As for your idea of a white paint job, with black valances and taillight panel, and maybe a black shaker scoop too, just try it.
But hey, you can always try some photochopping to test your ideas.
-
Ornamental - Posts: 3
- Joined: 18 Aug 2006 5:58
- Location: Oslo, Norway
![]() by Moparman1972 » 21 Sep 2007 14:33
by Moparman1972 » 21 Sep 2007 14:33
So these are some updated pictures of my Challenger. Currently I've got it almost entirely stripped and I'm trying to fit those fiberglass fenders still. The fiberglass place screwed me over and they're a mess, and I had to spend about 300 for a bodyman to fix the fiberglass trunk lid. The repair panels are welded in on the quarters and in the trunk, and I had to bend a piece to replace the rear edge of the trunk, as that was completely shot. Next step is to pull the rear window and repair some minor rust around the edge.
-
-
-
-
-
 Viewed 1882 times")
- Coolest welding mask ever.
 Viewed 1890 times")
 Viewed 1888 times")
 Viewed 1883 times")
 Viewed 1883 times")
 Viewed 1882 times")
- Moparman1972
- Frequent Poster
- Posts: 538
- Joined: 29 Apr 2006 17:10
- Location: Connecticut
![]() by 72challengerorange » 09 Dec 2007 22:49
by 72challengerorange » 09 Dec 2007 22:49
Keep working with the fiberglass, mine came out good for now. I'd like to get some Steel ones someday.
Remember sand fill sand fill sand fill........lOL
Tom
Remember sand fill sand fill sand fill........lOL
Tom
-
.JPG "DSC00999 (Medium).JPG (51.32 KiB) Viewed 1874 times")
- fiber fender
-
.JPG "DSC00995 (Small).JPG (42.21 KiB) Viewed 1874 times")
- fender and hood
-
.JPG "DSC01015 (Small).JPG (39.16 KiB) Viewed 1875 times")
- door fender wheel
.JPG "DSC00999 (Medium).JPG (51.32 KiB) Viewed 1874 times")
.JPG "DSC00995 (Small).JPG (42.21 KiB) Viewed 1874 times")
.JPG "DSC01015 (Small).JPG (39.16 KiB) Viewed 1875 times")
-

72challengerorange - Frequent Poster
- Posts: 137
- Joined: 16 Apr 2006 12:10
- Location: MA
![]() by Moparman1972 » 24 Dec 2007 18:52
by Moparman1972 » 24 Dec 2007 18:52
Boy, those look beautiful. Hope mine look half as good as those, as this is my first attempt at bodywork as well. I figured fiberglass would be a faster way out when I started the project, as the steel fenders were a mess. At this point though, it looks like it would have taken me less time to repair the steel ones. I do like the idea of having a fiberglass front end, though, with all the weight it takes off.
- Moparman1972
- Frequent Poster
- Posts: 538
- Joined: 29 Apr 2006 17:10
- Location: Connecticut
![]() by dave-r » 24 Dec 2007 21:24
by dave-r » 24 Dec 2007 21:24
Bear in mind that the more 'glass you use on the car the less structural strength it has. Important for handling and in the event of a crash.
Most race cars that use 'glass panels also have a full roll cage to put the strength back.
Nothing to worry about. Just keep that in mind.
Most race cars that use 'glass panels also have a full roll cage to put the strength back.
Nothing to worry about. Just keep that in mind.
-
dave-r - Grumpy Old Man
- Posts: 9842
- Joined: 12 Oct 2003 21:45
- Location: North of the Tyne, England
![]() by 72challengerorange » 27 Dec 2007 20:10
by 72challengerorange » 27 Dec 2007 20:10
Yeah I think if I crashed it would hurt. LOL
The only steel left is Inner structure fenders frame and bumper.
The grille header is fiberglass stock.
I did pick up some steel ones to work on though.
As far as the fiberglass stuff, use some black spray paint and use it as a guide. The longest board you can use and alternate angles. got to be careful of the gel coat thickness.
Tom
-
72challengerorange - Frequent Poster
- Posts: 137
- Joined: 16 Apr 2006 12:10
- Location: MA
![]() by Moparman1972 » 28 Jan 2008 14:22
by Moparman1972 » 28 Jan 2008 14:22
Yeah, the site I got the fenders from had fiberglass doors, too. Lol, I thought about those for 2 seconds before I imagined what a crash might be like. Just picked up some fiberglass bumpers to go on, too, so I pray I dont hit anything, or I'm toast.
- Moparman1972
- Frequent Poster
- Posts: 538
- Joined: 29 Apr 2006 17:10
- Location: Connecticut
![]() by Moparman1972 » 29 Mar 2008 13:57
by Moparman1972 » 29 Mar 2008 13:57
So here are some more pics. The car is currently painted in rustoleum Semi-Gloss Black, and I think I'm going to leave it like that. Kind of a rat-rod muscle car look on the outside, and it beats getting scratches in a high $$ paint job, since this will be an everyday driver. Interior is going in this weekend, I just have to finish welding the seat brackets. Finally got the manual choke hooked up, and it does wonders getting it started!  So far, there is 4,570 into this car, so I consider myself lucky restoring a mopar for that little. All parts are there, just taking the time to assemble now.
So far, there is 4,570 into this car, so I consider myself lucky restoring a mopar for that little. All parts are there, just taking the time to assemble now.-
 Viewed 1876 times")
- This was damage at the factory from something, the original paint was still on top of the bondo work. Some nasty dents that could have been smoothed out a lot more.
-
 Viewed 1875 times")
- This is more damage behind the drivers door. Where the patch is was a giant hole, and the drivers door was replaced from an obvious collision sometime in the past.
-
-
 Viewed 1874 times")
- This is the underside of the roof with the patch panel in. We joggled the metal to fit the panel in as smooth as we could on the outside.
-
 Viewed 1873 times")
- Here's a shot of the patch in place over the sawzall sunroof. It's a piece of a 90's honda civic hood that had almost the perfect curve to it. After this was in, I smashed the sunroof. After all, I couldnt get ahold of the guy that did this, lol.
-
 Viewed 1877 times")
- You wouldnt believe how many ebayed E-body doorhandles I've broken so far.
 Viewed 1876 times")
 Viewed 1875 times")
 Viewed 1875 times")
 Viewed 1874 times")
 Viewed 1873 times")
 Viewed 1877 times")
- Moparman1972
- Frequent Poster
- Posts: 538
- Joined: 29 Apr 2006 17:10
- Location: Connecticut
![]() by Moparman1972 » 30 Mar 2008 23:00
by Moparman1972 » 30 Mar 2008 23:00
They are weak right where they narrow on the side closest to the lock. My doors were also very hard to open because the door rods had straightened out (I think I had to bend them to fix the lengths, anyways), so both door handles were cracked when I got the car. Two sets that I got off ebay went the same way those did, even after I rebent the door rods after the first set. They're cheap pot metal, too, so welding them was a mess, but so far this set is holding. Made sure the doors opened within a half inch of pull on the handles, too, so no chance of pulling them to the stop and exacerbating the problem.
- Moparman1972
- Frequent Poster
- Posts: 538
- Joined: 29 Apr 2006 17:10
- Location: Connecticut
![]() by Moparman1972 » 17 Apr 2008 22:37
by Moparman1972 » 17 Apr 2008 22:37
So class was cancelled today, came home early and got some work done on my car.
Good and bad day, I guess. Got a lot of work done, but popped the radiator cap and there's cream on the surface from oil in the coolant. Popped one of the valve covers and theres no water in the oil, and I'm not losing a noticeable amount of oil. I'm hoping its oil leftover from manufacturing the radiator, even though I flushed it out before putting it in. If that's not it, I'm in big trouble.
Good and bad day, I guess. Got a lot of work done, but popped the radiator cap and there's cream on the surface from oil in the coolant. Popped one of the valve covers and theres no water in the oil, and I'm not losing a noticeable amount of oil. I'm hoping its oil leftover from manufacturing the radiator, even though I flushed it out before putting it in. If that's not it, I'm in big trouble.
-
-
 Viewed 1873 times")
- Got some of the chrome trim back on, and it looks good. Not much is going on, just the stuff around the windows and taillights.
-
-
 Viewed 1873 times")
- The old radiator was about half as big. :)
-
 Viewed 1874 times")
- The only remaining rust. The lower cowl is rotted pretty bad, but nothing to be done till the engine is pulled.
-
 Viewed 1874 times")
- Had to use these speaker holes, got the doors off of ebay. Fit's terrible, but its better than the old ones.
-
-
 Viewed 1873 times")
 Viewed 1873 times")
 Viewed 1873 times")
 Viewed 1873 times")
 Viewed 1874 times")
 Viewed 1874 times")
 Viewed 1875 times")
 Viewed 1873 times")
- Moparman1972
- Frequent Poster
- Posts: 538
- Joined: 29 Apr 2006 17:10
- Location: Connecticut
![]() by Moparman1972 » 17 Apr 2008 23:14
by Moparman1972 » 17 Apr 2008 23:14
Here's some pics of the rallye dash in. Everything works, thank God!
Made a knurled knob to replace the plastic odometer reset one that was snapped, looks exactly like the original.
Also replaced the original tach with my brand-new summit tach I got for christmas. The original tach was the only thing that didnt work with the dash.
My Dad had a fit when he saw I had taken a hacksaw to it! The new tach fits perfect and doesnt look ridiculously out of place, though. Had to split the plastic tach housing into two pieces and it just clamped on the back of the original dash housing. Only thing I cant do is adjust the shift light RPM without taking the dash out.
 Viewed 1873 times")
 Viewed 1873 times")
- Moparman1972
- Frequent Poster
- Posts: 538
- Joined: 29 Apr 2006 17:10
- Location: Connecticut
![]() by patrick » 18 Apr 2008 3:37
by patrick » 18 Apr 2008 3:37
Look's good, Moparman! Bet your dad settled down once he saw the new tach in place. You can do a more perminent attatchment after you adjust the RPM shifting light. Keep up the good work! Pat
Bet your dad settled down once he saw the new tach in place. You can do a more perminent attatchment after you adjust the RPM shifting light. Keep up the good work! Pat-
patrick - Frequent Poster
- Posts: 1323
- Joined: 09 Jul 2007 0:56
- Location: Washington State, U.S.A.
-
72challengerorange - Frequent Poster
- Posts: 137
- Joined: 16 Apr 2006 12:10
- Location: MA
![]() by Moparman1972 » 21 Apr 2008 23:29
by Moparman1972 » 21 Apr 2008 23:29
After 4 days straight, the car is really close to complete now. The carpet is in, as well as the seats and panels, and except for some dash pieces is complete. Got to sit in my car and drive it from a seat for the first time since I've owned it. It was a great feeling to have the interior together.
Started to fit the fiberglass front on it. What a mess. Finally got it to the point where I feel good about the gaps around the doors and hood. Went to mount the hood to the hinges and busted out one of the metal inserts for the bolts, so that's on hold until I can get it fixed.
Started to fit the fiberglass front on it. What a mess. Finally got it to the point where I feel good about the gaps around the doors and hood. Went to mount the hood to the hinges and busted out one of the metal inserts for the bolts, so that's on hold until I can get it fixed.
 Viewed 1873 times")
 Viewed 1873 times")
 Viewed 1873 times")
 Viewed 1873 times")
 Viewed 1873 times")
 Viewed 1874 times")
 Viewed 1873 times")
- Moparman1972
- Frequent Poster
- Posts: 538
- Joined: 29 Apr 2006 17:10
- Location: Connecticut
![]() by Moparman1972 » 23 Apr 2008 20:28
by Moparman1972 » 23 Apr 2008 20:28
Ok, more work done today.
Started fabricating the rest of the dash pieces, got the left lower panel in. Started on some other assorted things, too. Cant find the right screws to hold down the glovebox door, otherwise the pieces are all in. Going to end up going dave's route and make a metal glovebox. If you read this dave, I'm probably going to ask you for dimensions off yours! (If it fits right. )
)
Of all things, cant find my other seat cover, too. How they got split up I'll never know. Looks wretched with a tan seat right now.
Started fabricating the rest of the dash pieces, got the left lower panel in. Started on some other assorted things, too. Cant find the right screws to hold down the glovebox door, otherwise the pieces are all in. Going to end up going dave's route and make a metal glovebox. If you read this dave, I'm probably going to ask you for dimensions off yours! (If it fits right.
)
Of all things, cant find my other seat cover, too. How they got split up I'll never know. Looks wretched with a tan seat right now.
-
 Viewed 1873 times")
- Started turning a gas cap. The center will be machined out for an R/T logo. Really looks good on the car.
-
 Viewed 1873 times")
- Stainless steel Traction bars! Made one, have to make the other and mount em.
-
 Viewed 1873 times")
- Fiberglass fenders line up much better than I could have hoped for
-
 Viewed 1874 times")
- Don't look up!
-
 Viewed 1873 times")
- Seat covers make these seats look bearable. They're on the original seat tracks too!
-
 Viewed 1873 times")
- Couldnt bring the rear seats back to white after being covered in pine sap. Painted em black.
-
 Viewed 1873 times")
- Center console is a tight squeeze now.
-
 Viewed 1873 times")
- Stainless steel panel to replace the plastic one. Made tabs so it screws in to most of the original spots.
 Viewed 1873 times")
 Viewed 1873 times")
 Viewed 1873 times")
 Viewed 1874 times")
 Viewed 1873 times")
 Viewed 1873 times")
 Viewed 1873 times")
 Viewed 1873 times")
- Moparman1972
- Frequent Poster
- Posts: 538
- Joined: 29 Apr 2006 17:10
- Location: Connecticut
![]() by Moparman1972 » 26 Apr 2008 23:44
by Moparman1972 » 26 Apr 2008 23:44
Piece by piece, it gets closer. Took the entire saturday to glass in the headlight buckets.
What a mess. Fit was horrible, and even when the bucket was seated nice, the headlights would have been pointed at the sky, out of adjustment range.
Tried a fiberglass jelly, a lot thicker than the regular resin. Really helped to hold the stuff on on the underside of the fenders, so not as much mess. Also let me fill in some gaps and get the buckets looking good. Happy with how they turned out, though.
-
 Viewed 1873 times")
- Fenders painted and everything!
-
 Viewed 1873 times")
- Buckets are rock solid, the fiberglass jelly saved my bacon.
-
-
 Viewed 1873 times")
- Heres a pic of that stainless dash panel I made. Currently milling a hole for the radio in the other one.
-
 Viewed 1873 times")
 Viewed 1873 times")
 Viewed 1873 times")
 Viewed 1873 times")
 Viewed 1873 times")
- Moparman1972
- Frequent Poster
- Posts: 538
- Joined: 29 Apr 2006 17:10
- Location: Connecticut
-

Eddie - Frequent Poster
- Posts: 6212
- Joined: 16 Oct 2006 21:26
- Location: Terre Haute, Ind.
- Moparman1972
- Frequent Poster
- Posts: 538
- Joined: 29 Apr 2006 17:10
- Location: Connecticut
![]() by 73challengerguy » 29 Apr 2008 0:23
by 73challengerguy » 29 Apr 2008 0:23
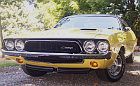
hey what size tire and rims and what offset are you running on the front and rear of the orange challenger with the crager style wheels , the pic of when its in the garage....like it......alot....
- 73challengerguy
- Frequent Poster
- Posts: 143
- Joined: 26 Apr 2008 14:40
- Location: mercer pa
![]() by Moparman1972 » 02 May 2008 15:04
by Moparman1972 » 02 May 2008 15:04
Finally got the lock ring for the fuel sending unit, going to put the gas tank in tomorrow. Car is getting registered next week, after college lets out.
Instead of getting 70 bumper brackets to pull the bumper in closer, I extended the slots in the 72 brackets, and that worked perfectly. The bumper sits in very close when I mock it up.
Finished making the dash pieces and assembled it permanently. Looks and fits great. Also had to make some braces for the fiberglass headlight buckets so my headlights didnt wobble.
Had to use my other 70 grille, the first one was tweaked along the entire length and did not line up at all. A little paint stripper and some matte black paint for the center grille did wonders.
-
 Viewed 1876 times")
- Other seat cover is finally on!
-
-
-
 Viewed 1876 times")
 Viewed 1878 times")
 Viewed 1877 times")
 Viewed 1878 times")
- Moparman1972
- Frequent Poster
- Posts: 538
- Joined: 29 Apr 2006 17:10
- Location: Connecticut
A 72 Challenger Nearing Completion
![]() by Moparman1972 » 06 May 2008 16:40
by Moparman1972 » 06 May 2008 16:40
This weekend took more time off to work on the car. I'm trying to finish it now before gas prices keep me from driving it! 
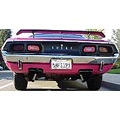
The original rear bumper is in decent shape, so its going on for now. Just had to sand and paint the tangs, because the chrome was peeling on them. Think it looks ok?
The front bumper for now is the fiberglass one, because the metal one is so badly bent it wont go on. Previous owner cut the bumper in half and stick welded it back together, and the idiots who dropped the car off to me tried towing it by the bumper in the middle, and it buckled. Rest assured, I'm making a brace out of 1 inch bar to tuck up in the bumper and bolt to the brackets, because just fiberglass is not safe.
Bolted in the grille in its permanent position. You can see in the picture that one side the top brace is above the fender, the other below, but that was necessary due to the poor shape of the fiberglass parts.
I got the gas tank in yesterday night with the help of a friend, and had to wait until today to start it up because no gas stations around here are open past 9! I took it for a spin around the block (very rural area) and it works and rides beautifully. The front end needs an alignment scarily bad, but I never did anything but rough in the tie rod lengths with it sitting in the yard.
Now that it actually looks kinda like a challenger, what do you guys think? I know it may be hack compared to all your cars, but bear in mind this was done on a very limited budget and was my first attempt at a restoration.
-
 Viewed 1877 times")
- Rear bumper with the painted tangs
-
 Viewed 1876 times")
- Sprayed the gas tank with rubberized coating and hooked up a ground strap.
-
 Viewed 1880 times")
- I was too busy staring to get much work done today!
-
-
 Viewed 1877 times")
 Viewed 1876 times")
 Viewed 1880 times")
 Viewed 1878 times")
 Viewed 1878 times")
- Moparman1972
- Frequent Poster
- Posts: 538
- Joined: 29 Apr 2006 17:10
- Location: Connecticut

![]() by Moparman1972 » 08 May 2008 0:21
by Moparman1972 » 08 May 2008 0:21
Bit of a setback today, blew some fuses out and almost started a fire after I put in my marker lights, but all fixed now.
Going back and forth on scoop designs, but heres some pictures of how I think I'm going to have it. Its just propped up by 1x2x3 blocks, still in pieces.
Opinions?
Going back and forth on scoop designs, but heres some pictures of how I think I'm going to have it. Its just propped up by 1x2x3 blocks, still in pieces.
Opinions?
 Viewed 1879 times")
 Viewed 1877 times")
 Viewed 1882 times")
- Moparman1972
- Frequent Poster
- Posts: 538
- Joined: 29 Apr 2006 17:10
- Location: Connecticut
![]() by Moparman1972 » 11 May 2008 19:43
by Moparman1972 » 11 May 2008 19:43
Planning on going to DMV Tuesday to register the Chally, heres hoping there's no problems! Have to register it a bit early now, the fuel pump in my truck went and Im looking at $250 to replace it.
Some pictures of the scoop, I tack welded the halves together and am waiting for a piece to cover the back slope. Also got my gas cap put together and on permanently.
Some pictures of the scoop, I tack welded the halves together and am waiting for a piece to cover the back slope. Also got my gas cap put together and on permanently.
 Viewed 1878 times")
 Viewed 1877 times")
 Viewed 1877 times")
- Moparman1972
- Frequent Poster
- Posts: 538
- Joined: 29 Apr 2006 17:10
- Location: Connecticut
80 posts
• Page 1 of 3 • 1, 2, 3