Postby 72challengerorange » 11 Apr 2008 1:46

Some more action.loL
I finally got the inserts and console swapped out. :thumbsup:

Also put the shifter console chrome insert in.

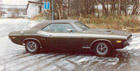
Getting ready for Sub-frame connectors.

Tom :s010:

dsc00001smallce9.jpg
dsc00001smallvy9.jpg
dsc00002smallwn4.jpg
User avatar
72challengerorange
Frequent Poster
 
Posts: 137
Joined: 16 Apr 2006 12:10
Location: MA

Postby 72challengerorange » 11 Apr 2008 1:47

Top-side of Chrome, the shift indicator doesn't snap in like the original, so I used a bit of clear adhesive to hold it in.

Tom

dsc00002smallqa6.jpg
User avatar
72challengerorange
Frequent Poster
 
Posts: 137
Joined: 16 Apr 2006 12:10
Location: MA

Postby Eddie » 11 Apr 2008 3:24

Looks perfect to me Tom! :thumbsup:
User avatar
Eddie
Frequent Poster
 
Posts: 6212
Joined: 16 Oct 2006 21:26
Location: Terre Haute, Ind.

Postby Jimiboy » 11 Apr 2008 8:09

I really like that composite look where it use to be wood.. :thumbsup: Really nice touch!
User avatar
Jimiboy
Frequent Poster
 
Posts: 708
Joined: 22 Dec 2005 10:20
Location: Sweden

Postby 72challengerorange » 12 Apr 2008 1:20

Thanks guys,

I thought the CF looked like it belonged better than the wood. Everything is black and silver and the wood just seemed wrong to me. At least once I added the CF Handle.LOL

Tom
User avatar
72challengerorange
Frequent Poster
 
Posts: 137
Joined: 16 Apr 2006 12:10
Location: MA

Postby 72challengerorange » 16 Apr 2008 0:51

Some eye candy for ya'll.LOL

Picked it up Sunday, been pre-fitting some stuff to make sure install in car goes smooth.

Tom :s006:

422 4"arm 4.1" bore

Diamond custom pistons~10.2-1 comp
Crane 302 cam hydraulic
587 Iron Heads 2.05Int 1.60Ex Port+polish 5 angle valve job
Summit Intake 770 Avenger Carb
Doug's headers p453

dsc00001smallzv5.jpg
dsc00003smallgt1.jpg
dsc00005smallez1.jpg
User avatar
72challengerorange
Frequent Poster
 
Posts: 137
Joined: 16 Apr 2006 12:10
Location: MA

Postby Moparman1972 » 17 Apr 2008 23:07

Beautiful stuff. Really like the look of the interior the way you have it. You had the same idea as me about those inserts, except I'm replacing mine with polished aluminum pieces with a pair of my extra Challenger emblems. My plastic dash pieces under the gauges were broken, so those are aluminum panels too. Having pieces laser cut at work too to make a new aluminum console.

Do you have problems cranking the windows with those speakers there? Mine are a 1/4 inch too close to the window cranks and scrape the speaker grilles if I'm not careful.

Looks like you have the exact same radiator as the one I got off ebay, too! Where'd you get the coolant catch can, that looks beautiful! I know where my next paycheck is going now.....
Moparman1972
Frequent Poster
 
Posts: 538
Joined: 29 Apr 2006 17:10
Location: Connecticut

Postby 72challengerorange » 18 Apr 2008 2:53

Thanks MM72, I got the catch can from JC Whitney of all places.LOL It was like 40 bucks. The speakers were a problem, but I got some window crank handles from the parts store and put a little bend in them in the vise, very little and they clear easy now. Pretty unoticeable that they have a bend.

Tom

Motor with acc's and MP VC's added.

dsc00002smallil3.jpg
User avatar
72challengerorange
Frequent Poster
 
Posts: 137
Joined: 16 Apr 2006 12:10
Location: MA

Postby 72challengerorange » 19 Apr 2008 23:30

Finished bolting in the Subframes, I'd like to have someone weld them in real nice for me later. I need to paint the bottom and sides later. I brushed the top sides already with some rustoleum.

Got the old Transmission/Driveshaft back in until the new one is done. Got a free converter from the engne builder for being so patient.LOL

Installed the Drivers side caliper and tied the brake lines in to the M/C and bled all 4 wheels.


Got the car down off the Jackstands getting ready for the bullet install.

Tom

dsc00001smalldq9.jpg
dsc00003smallvj9.jpg
dsc00004smallck0.jpg
dsc00005smalldi7.jpg
User avatar
72challengerorange
Frequent Poster
 
Posts: 137
Joined: 16 Apr 2006 12:10
Location: MA

Postby Eddie » 20 Apr 2008 0:12

Gorgeous!!! :thumbsup: Go TOM GO!!! :thumbsup: :mrgreen:
User avatar
Eddie
Frequent Poster
 
Posts: 6212
Joined: 16 Oct 2006 21:26
Location: Terre Haute, Ind.

Postby Jimiboy » 20 Apr 2008 10:38

Wow! That was sures some sweet eyecandy for me :thumbsup: Love the look of your engine, YEAH! :thumbsup: :P
User avatar
Jimiboy
Frequent Poster
 
Posts: 708
Joined: 22 Dec 2005 10:20
Location: Sweden

Postby Hezzel » 20 Apr 2008 12:44

It´s close now ....... :D
User avatar
Hezzel
Frequent Poster
 
Posts: 125
Joined: 22 Oct 2007 13:05
Location: Sweden, Kiruna

Postby christer » 20 Apr 2008 12:59

There is a rod/sway-bar or something pointing against the rear axle. What is it? I do not recoqnize it. (See pic below)

Nice to see your progress.

dsc00004smallck0.jpg
christer
Ghost 48
 
Posts: 2133
Joined: 13 Oct 2006 19:52
Location: Sweden

Postby 72challengerorange » 20 Apr 2008 13:21

Thanks Guys, Christer, Yes that is a Sway bar from hellwig. Not the best but it is pretty solid. I used bolts through the frame vs the self tappers they sent.

Since I put the Sway Bars(front/rear) and Subframe connectors, there is little to no creaking when the car is jacked up. If I lift at the front the rear comes up quick with little delay.

Tom :thumbsup:
User avatar
72challengerorange
Frequent Poster
 
Posts: 137
Joined: 16 Apr 2006 12:10
Location: MA

Postby christer » 20 Apr 2008 15:31

72challengerorange wrote:Thanks Guys, Christer, Yes that is a Sway bar from hellwig. Not the best but it is pretty solid. I used bolts through the frame vs the self tappers they sent.


So the sway bar bracket and the subframe connector uses the same two attaching bolts? That is neat!

If you hppen to have a pic of the rear sway bar setup from another angle then please post it.
christer
Ghost 48
 
Posts: 2133
Joined: 13 Oct 2006 19:52
Location: Sweden

Postby dave-r » 20 Apr 2008 17:44

Get those frame connectors welded in and it will be better. :thumbsup:
User avatar
dave-r
Grumpy Old Man
 
Posts: 9842
Joined: 12 Oct 2003 21:45
Location: North of the Tyne, England

Postby 72challengerorange » 21 Apr 2008 4:00

christer wrote:
72challengerorange wrote:Thanks Guys, Christer, Yes that is a Sway bar from hellwig. Not the best but it is pretty solid. I used bolts through the frame vs the self tappers they sent.


So the sway bar bracket and the subframe connector uses the same two attaching bolts? That is neat!

If you hppen to have a pic of the rear sway bar setup from another angle then please post it.


It actually bolts to the framerail under the sF conn.

I'll get some pics soon.

Tom
User avatar
72challengerorange
Frequent Poster
 
Posts: 137
Joined: 16 Apr 2006 12:10
Location: MA

Postby 72challengerorange » 21 Apr 2008 4:01

dave-r wrote:Get those frame connectors welded in and it will be better. :thumbsup:


It is on the list to do, but there are some other pressing matters.LOL

Tom :thumbsup:
User avatar
72challengerorange
Frequent Poster
 
Posts: 137
Joined: 16 Apr 2006 12:10
Location: MA

Postby 72challengerorange » 21 Apr 2008 4:02

Like this!

Tom :s024:

dsc00002smallys1.jpg
dsc00003smallkv2.jpg
dsc00004smalldm9 (1).jpg
User avatar
72challengerorange
Frequent Poster
 
Posts: 137
Joined: 16 Apr 2006 12:10
Location: MA

Postby Hezzel » 22 Apr 2008 7:06

Oh Yeah :thumbsup:
User avatar
Hezzel
Frequent Poster
 
Posts: 125
Joined: 22 Oct 2007 13:05
Location: Sweden, Kiruna

Postby 72challengerorange » 24 Apr 2008 23:53

More progress.

Tom :thumbsup:

dsc00001smallar0.jpg
dsc00003smallts7.jpg
User avatar
72challengerorange
Frequent Poster
 
Posts: 137
Joined: 16 Apr 2006 12:10
Location: MA

Postby Moparman1972 » 25 Apr 2008 0:11

Really like the air cleaner on there. You have all the hardware to seal it with the T/A hood?
Moparman1972
Frequent Poster
 
Posts: 538
Joined: 29 Apr 2006 17:10
Location: Connecticut

Postby 72challengerorange » 25 Apr 2008 1:22

Moparman1972 wrote:Really like the air cleaner on there. You have all the hardware to seal it with the T/A hood?


Still working on something. I'll take a look at it when the hood is on.

Tom

dsc00002smallvx4.jpg
dsc00004smallho9.jpg
User avatar
72challengerorange
Frequent Poster
 
Posts: 137
Joined: 16 Apr 2006 12:10
Location: MA

Postby dave-r » 25 Apr 2008 7:55

I am working on a way to panel off the underside of the R/T hood on mine so the 3-inch filter gets air from the two scoops. I don't think I will seal it completely though.
User avatar
dave-r
Grumpy Old Man
 
Posts: 9842
Joined: 12 Oct 2003 21:45
Location: North of the Tyne, England

Postby 72challengerorange » 25 Apr 2008 19:31

Yeah figured that most of the air will be fresh with the T/A hood anyways.

Tom
User avatar
72challengerorange
Frequent Poster
 
Posts: 137
Joined: 16 Apr 2006 12:10
Location: MA

Postby 73challengerguy » 26 Apr 2008 14:51

could u tell me what size tires and rims and backspacing u used on your orange car........i beleive those are torq thrust?
73challengerguy
Frequent Poster
 
Posts: 143
Joined: 26 Apr 2008 14:40
Location: mercer pa

Postby 72challengerorange » 26 Apr 2008 23:15

73challengerguy wrote:could u tell me what size tires and rims and backspacing u used on your orange car........i beleive those are torq thrust?


These are Foose Nitrous II's 17x8 w/4.5" BS F+R 245/45/17F and 255/45/17R. :thumbsup:

Tom

dsc00001smalldq9.jpg
Last edited by 72challengerorange on 26 Apr 2008 23:19, edited 1 time in total.
User avatar
72challengerorange
Frequent Poster
 
Posts: 137
Joined: 16 Apr 2006 12:10
Location: MA

Postby 72challengerorange » 26 Apr 2008 23:18

Working...
MP Starter
Doug's Headers
Summit 2.5" exhaust

Tom

dsc00001smallre2.jpg
dsc00003smallot9.jpg
dsc00005smallnd6.jpg
dsc00006smallak7.jpg
dsc00007smallla2.jpg
dsc00009smallfi1.jpg
User avatar
72challengerorange
Frequent Poster
 
Posts: 137
Joined: 16 Apr 2006 12:10
Location: MA

Postby dave-r » 27 Apr 2008 9:05

Tip. Use heat reflective tape on the wires to the starter motor to stop them getting hot from the headers.

Same with the transmission cooler lines. or you can route the lines away from the headers using -6AN line.
User avatar
dave-r
Grumpy Old Man
 
Posts: 9842
Joined: 12 Oct 2003 21:45
Location: North of the Tyne, England

Postby 72challengerorange » 27 Apr 2008 13:26

dave-r wrote:Tip. Use heat reflective tape on the wires to the starter motor to stop them getting hot from the headers.

Same with the transmission cooler lines. or you can route the lines away from the headers using -6AN line.


Thanks Dave, I think I will get some as the trans lines are pretty colose( I bent them down to clear. I upgraded the starter wire to a 1/0 IIRC to help too. I do have a starter wrap for it.

When I swap the trans to the 727 I'll do something a bit more permanent, maybe the -6AN lines.

Tom :thumbsup:
User avatar
72challengerorange
Frequent Poster
 
Posts: 137
Joined: 16 Apr 2006 12:10
Location: MA