i dicked around & got the 6 pack linkages sorted out today as i was off work sick so i did something that wasnt to strenuous took a bit of mucking about to stop them binding ,ive got it set up so the secondaries start to open just after 1/2 throttle on the primary & they all reach WOT together so i think that should work ok ill post a pic tomorow i didnt take a photo yet
cheers ian
-
ianandjess - Frequent Poster
- Posts: 687
- Joined: 10 Dec 2005 12:18
- Location: australia
-

dave-r - Grumpy Old Man
- Posts: 9842
- Joined: 12 Oct 2003 21:45
- Location: North of the Tyne, England
![]() by ianandjess » 06 Mar 2009 15:38
by ianandjess » 06 Mar 2009 15:38
heres the set up ive got its obviously home made after fiddling about i didnt use all the bits that came with it & added a few bits & it now seems to be servicable ill find out when its all put together on the car
cheers ian
cheers ian
-
 2009_03060004.AVI
- (11.16 MiB) Downloaded 149 times
-
 Viewed 2685 times")
-
ianandjess - Frequent Poster
- Posts: 687
- Joined: 10 Dec 2005 12:18
- Location: australia
![]() by dave-r » 06 Mar 2009 15:51
by dave-r » 06 Mar 2009 15:51
OK. I see what you have there now.
Someone fitted the smaller side hung float fuel bowls so that you could use metering blocks on all three carbs.
However I see that the rear carb has the accelerator pump missing. You will need to fit that so that all three pump shots work.
Someone fitted the smaller side hung float fuel bowls so that you could use metering blocks on all three carbs.
However I see that the rear carb has the accelerator pump missing. You will need to fit that so that all three pump shots work.
-
dave-r - Grumpy Old Man
- Posts: 9842
- Joined: 12 Oct 2003 21:45
- Location: North of the Tyne, England
![]() by ianandjess » 06 Mar 2009 16:34
by ianandjess » 06 Mar 2009 16:34
your on the ball as always dave i do have spare carbs that i will rat the parts from to give the 3rd carb an accelerater pump & have worked out how to fit 1 spring to close all carbs but ive got to buy a lighter spring than what i have its to heavy i dont want to over load the throttle cable
but this sort of fiddling about is just so i know what i need to purchase before it goes together for real
cheers ian
but this sort of fiddling about is just so i know what i need to purchase before it goes together for real
cheers ian
-
ianandjess - Frequent Poster
- Posts: 687
- Joined: 10 Dec 2005 12:18
- Location: australia
-
ianandjess - Frequent Poster
- Posts: 687
- Joined: 10 Dec 2005 12:18
- Location: australia
![]() by dave-r » 06 Mar 2009 19:54
by dave-r » 06 Mar 2009 19:54
My linkage is a bit different but works basically the same.
I use a secondary return spring hooked from the front carb to the center throttle shaft.
With the two springs the throttle is a little on the heavy side but with the price of fuel that is not a bad thing.
I took a photo of my rear carb pump too for you. Because I don't use metering blocks on the outer carbs the pump levers have to be bent forward.
 Viewed 2683 times")
 Viewed 2681 times")
 Viewed 2681 times")
 Viewed 2682 times")
-
dave-r - Grumpy Old Man
- Posts: 9842
- Joined: 12 Oct 2003 21:45
- Location: North of the Tyne, England
![]() by ianandjess » 06 Mar 2009 23:10
by ianandjess » 06 Mar 2009 23:10
thanx for those pics dave a nice tidy setup i see you have a kick down lever i wont be needing 1 my tranny is full manual valve body but it might get changed if i get sick of shifting an auto
cheers ian
cheers ian
-
ianandjess - Frequent Poster
- Posts: 687
- Joined: 10 Dec 2005 12:18
- Location: australia
![]() by Eddie » 07 Mar 2009 15:50
by Eddie » 07 Mar 2009 15:50
Until now I havent seen your set-up Dave,,sweet! How does it work on the street with an automatic tranny? Any 'loading up' at part throttle cruise? Taking off after a long idle time? For high RPM Power it looks like the way to go. For street, I dont know. Any input appreciated, it looks interesting, like having a triple pumper!
-

Eddie - Frequent Poster
- Posts: 6212
- Joined: 16 Oct 2006 21:26
- Location: Terre Haute, Ind.
![]() by Eddie » 07 Mar 2009 17:17
by Eddie » 07 Mar 2009 17:17
This is for you IAN&Dylan, I know you guys are screwing together your own strokers as I am . I dont know if you have the instruction sheet from 440 source, but the old supplier I had, didnt have anything at all. I had Eagle mails this to me with a set of new ARP2000 Con Rod fasteners. This is for the Eagle/440 source/PEP H-Beams which are all forged and manufactured at the same place. Mine were PEP which are marketed as the H-Beams, which are identical to the Eagle B/RB H-Beams. I called PEP and spoke with their engineer who stated"our rods are identical to the Eagle's as a matter of fact our bolt part#'s are the same". I then called Eagle and spoke with them. They stated "our rods are all copied by various offshore parts vendors and the bolts are all the same part number from ARP, I also called them,(ARP), to confirm this..
 Viewed 2685 times")
-
Eddie - Frequent Poster
- Posts: 6212
- Joined: 16 Oct 2006 21:26
- Location: Terre Haute, Ind.
![]() by dave-r » 07 Mar 2009 19:13
by dave-r » 07 Mar 2009 19:13
Eddie it has a fantastic throttle response.
It revs so fast it is like a snappy fox terrier trying to take your fingers off.
I tried it on a near stock 440 once (a mate was having problems and he wouldn't believe me they were only carb related so I swapped manifolds to prove a point) and it made his 440 rev even faster than mine.
The only problem I have had is sometimes a lack of fuel from the pump shots on the first throttle press if the car has not long been restarted after being shut down for a bit.
Typically this happened in the lanes waiting to get onto the track on hot days. I used to have to make sure I stamped on the throttle after the burnout and before going to the line. That way I made sure it was not going to bog due to lack of pump shot.
I am pretty sure this was down to the fuel bowls and pumps getting very hot and boiling the pump shot fuel away. Which is why I have mounted the carbs on an ally heat plate.
An aluminium plate like this reduces temperatures quite effectively. The old slide and film projectors I used to use at work often had an ally plate mounted above the lamp to stop the projector casing getting hot. Often you got a 30 C. increase in surface temp if you left it out and the casing would become too hot to touch.
I think this will cure the problem. I even have an upturned lip on the front edge to protect the bottom of the fuel bowl at the front from the heat blowing from the radiator fan.
-
dave-r - Grumpy Old Man
- Posts: 9842
- Joined: 12 Oct 2003 21:45
- Location: North of the Tyne, England
![]() by ianandjess » 08 Mar 2009 7:53
by ianandjess » 08 Mar 2009 7:53
i got that 3rd carb sorted out today & modified a hemi 6 throttle cable bracket to fit so i can use my stock 318 throttle cable now ill have to wait till the motor is built & in to find out how it works but all the carbs look like they were kitted & then never used so they should be ok
thanks for that info to eddie
cheers ian
thanks for that info to eddie
cheers ian
 Viewed 2680 times")
-
ianandjess - Frequent Poster
- Posts: 687
- Joined: 10 Dec 2005 12:18
- Location: australia
-
Eddie - Frequent Poster
- Posts: 6212
- Joined: 16 Oct 2006 21:26
- Location: Terre Haute, Ind.
![]() by ianandjess » 27 Sep 2009 12:07
by ianandjess » 27 Sep 2009 12:07
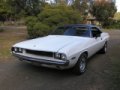
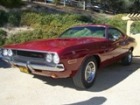
gday guys i put my cars in a car show for the first time heres some pics of the valiant & the challenger together & some pics of the challenger at home also pics of other cars in the show there were alot of other but dont want to bore you all with too many other brand cars
cheers ian
cheers ian
 Viewed 2680 times")
 Viewed 2681 times")
 Viewed 2680 times")
 Viewed 2680 times")
 Viewed 2680 times")
 Viewed 2680 times")
 Viewed 2680 times")
 Viewed 2682 times")
 Viewed 2681 times")
 Viewed 2680 times")
-
ianandjess - Frequent Poster
- Posts: 687
- Joined: 10 Dec 2005 12:18
- Location: australia
![]() by ianandjess » 29 Sep 2009 11:29
by ianandjess » 29 Sep 2009 11:29
i thought i would take a few more pics of it while its still clean it might be a while before i can do much more work on it ive got to get some debt out of the way so the challenger will have to be on hold for now
but im happy with the way its looking for now any way so thats the main thing
i hope you guys like it to
cheers ian
but im happy with the way its looking for now any way so thats the main thing
i hope you guys like it to
cheers ian
 Viewed 2681 times")
 Viewed 2680 times")
 Viewed 2680 times")
 Viewed 2681 times")
 Viewed 2681 times")
 Viewed 2681 times")
 Viewed 2680 times")
-
ianandjess - Frequent Poster
- Posts: 687
- Joined: 10 Dec 2005 12:18
- Location: australia

![]() by ianandjess » 30 Sep 2009 11:47
by ianandjess » 30 Sep 2009 11:47
thanks jon i still have the 318 in the challenger the 440 is still on the engine stand in my shed i also have to get a tailshaft ,headers ,exhaust, redo the electrics & a/c & fit the suspesion & steering parts ive got then its ready to be licsenced but the exhaust & tailshaft will hold me up for a while work is slow at the moment so the funds are low
cheers ian
cheers ian
-
ianandjess - Frequent Poster
- Posts: 687
- Joined: 10 Dec 2005 12:18
- Location: australia

-
Jon - Frequent Poster
- Posts: 1229
- Joined: 21 Aug 2005 15:12
- Location: Medford Oregon
![]() by ianandjess » 18 Oct 2009 14:06
by ianandjess » 18 Oct 2009 14:06
here are a couple of pics of the console now it got the brushed stainless i think it looks ok hope you guys like it ill do the door trim inserts soon & post pics of them to
do you like my new foot wear 10 bucks at target
do you like my new foot wear 10 bucks at target
 Viewed 2680 times")
 Viewed 2680 times")
 Viewed 2680 times")
-
ianandjess - Frequent Poster
- Posts: 687
- Joined: 10 Dec 2005 12:18
- Location: australia

-
Eddie - Frequent Poster
- Posts: 6212
- Joined: 16 Oct 2006 21:26
- Location: Terre Haute, Ind.

-

drewcrane - Frequent Poster
- Posts: 2893
- Joined: 01 Sep 2007 12:36
- Location: "follow the laraya belt ,that should get ya there"

-
dave-r - Grumpy Old Man
- Posts: 9842
- Joined: 12 Oct 2003 21:45
- Location: North of the Tyne, England
![]() by ianandjess » 16 Jul 2010 7:27
by ianandjess » 16 Jul 2010 7:27
hey guys ive finally been able to do a bit of work on it so i got into the engine while we had some big rains & my bobcat was parked up
see how well the ports match the gasket i was supprised it bearly warrants touching it but ive got to do the manifold so i may aswell give the heads a little touch while im at it
the bottom end all went together without any problems i forgot to get the camera out while i was doing it but im sure we're all familiar with the internals of a mopar engine now
cheers ian
 Viewed 2681 times")
 Viewed 2682 times")
-
ianandjess - Frequent Poster
- Posts: 687
- Joined: 10 Dec 2005 12:18
- Location: australia
-
Eddie - Frequent Poster
- Posts: 6212
- Joined: 16 Oct 2006 21:26
- Location: Terre Haute, Ind.
-

RedRaven - Frequent Poster
- Posts: 1995
- Joined: 15 Jul 2007 20:09
- Location: THE DOG HOUSE
![]() by ianandjess » 21 Jul 2010 7:01
by ianandjess » 21 Jul 2010 7:01
gday guys ive made a start with the die grinder heres a couple of pics
i also opened the water pump housing up a bit to thanks to eddies advice
cheers ian
i also opened the water pump housing up a bit to thanks to eddies advice
cheers ian
-
 Viewed 2681 times")
- before
-
 Viewed 2681 times")
- after i think ill remove a bit more yet but its a lot bigger when i stick my finger in it
-
 Viewed 2681 times")
- from the inside
-
 Viewed 2681 times")
- intake before
-
 Viewed 2681 times")
- intake after
-
 Viewed 2681 times")
- heads only need a light touch
 Viewed 2681 times")
 Viewed 2681 times")
 Viewed 2681 times")
 Viewed 2681 times")
 Viewed 2681 times")
 Viewed 2681 times")
-
ianandjess - Frequent Poster
- Posts: 687
- Joined: 10 Dec 2005 12:18
- Location: australia