It must have been from your 'old cam' days  So Dave, this new cam you are now using is a better grind with more lobe seperation? Is this why the vacum increase? I bet it's not a smaller bumpstick is it? Care to share the specs?
-

Eddie - Frequent Poster
- Posts: 6212
- Joined: 16 Oct 2006 21:26
- Location: Terre Haute, Ind.
Old cam was Hughes Hydraulic HE3844BL
Valve lift (w/1.6:1 ratio) 0.571"/0.576"
Duration (@ 0.050” tappet lift) 238/244 degrees.
Lobe Separation Angle 108 I think?
New cam is Hughes Solid HTL3742BS
Valve lift (w1.6:1 ratio) 0.569"/0.579"
Duration (@ 0.050” tappet lift) 237/242 degrees.
Lobe Separation Angle 109
I have also increased the initial advance from 14 to around 18 degrees. I don't know if that has had any effect or not?
-

dave-r - Grumpy Old Man
- Posts: 9842
- Joined: 12 Oct 2003 21:45
- Location: North of the Tyne, England
massive water leak, i have had that problem,and alot of people seem to have the same problem , the housing gets warped, the aluminum unit i have is thicker and hasent leaked yet so far.......... 

-

drewcrane - Frequent Poster
- Posts: 2893
- Joined: 01 Sep 2007 12:36
- Location: "follow the laraya belt ,that should get ya there"
-

dave-r - Grumpy Old Man
- Posts: 9842
- Joined: 12 Oct 2003 21:45
- Location: North of the Tyne, England
those things are a pain in the ass , I sealed mine up one time and let it sit for 24 hours, i flat filed the surfaces,mad sure they were clean and dry assembled it and let it sit for 24 hours and put coolant in and once it got hot it still had a slow leak, so i pitched the housing and found a billit unit and it has not leaked since 

-

drewcrane - Frequent Poster
- Posts: 2893
- Joined: 01 Sep 2007 12:36
- Location: "follow the laraya belt ,that should get ya there"
Nice cam Dave. I like the fact that it's a solid with a bit more seperation angle, this is good for vacum but one degree shouldnt be that dramatic, but I'm glad you do have that much vacum, helps driveability on the bottom end. Drew&Dave if you guys are fed up with leaks in general try Napa's very own sealer/adhesive RTV type of product, it's called 'The Right Stuff" it's around 19.00 a tube 5 ounces worth. I've NEVER used anything like it. Sure it's bit more, but well worth it. I use it everyday on T-stat housings, intakes, fittings, oil pan gasket, transmission pan gasket, axle lube cover, ect.. never had a leak using this product. It will even seal those cheap chrome plated T-stat housings made in Tawain!!  http://www.autobarn.net/per99070.html It's da bomb
-

Eddie - Frequent Poster
- Posts: 6212
- Joined: 16 Oct 2006 21:26
- Location: Terre Haute, Ind.
-

drewcrane - Frequent Poster
- Posts: 2893
- Joined: 01 Sep 2007 12:36
- Location: "follow the laraya belt ,that should get ya there"
It's great stuff, seals like a vault, I used it exclusively on my stroker engine project, and it hasnt leaked a drop!  It's THE only RTV type of sealer/gasket maker/ adhesive we use in our shop and I should mention it's Oxygen Sensor Safe for both you'rs and Dave's Bosch wide band Oxygen sensors.
 It's THE only RTV type of sealer/gasket maker/ adhesive we use in our shop and I should mention it's Oxygen Sensor Safe for both you'rs and Dave's Bosch wide band Oxygen sensors.
-

Eddie - Frequent Poster
- Posts: 6212
- Joined: 16 Oct 2006 21:26
- Location: Terre Haute, Ind.
airfuelEddie wrote:Nice cam Dave. I like the fact that it's a solid with a bit more seperation angle, this is good for vacum but one degree shouldnt be that dramatic, but I'm glad you do have that much vacum, helps driveability on the bottom end.
Well according to Desktop Dyno the change is good for an extra 25hp across the whole rpm range up to peak power (which is at a slightly lower rpm as a result) and a little less power after peak.
But the big difference is from idle to 2000rpm where there is a lot more torque. An extra 100 lb/ft of torque at 2000rpm.
Of course desktop dyno is not accurate. But it is usually ballpark.
-

dave-r - Grumpy Old Man
- Posts: 9842
- Joined: 12 Oct 2003 21:45
- Location: North of the Tyne, England
Thats a nice cam with 100 extra ft. lbs.!! and doesnt give up power at higher engine speeds!dave-r wrote:airfuelEddie wrote:Nice cam Dave. I like the fact that it's a solid with a bit more seperation angle, this is good for vacum but one degree shouldnt be that dramatic, but I'm glad you do have that much vacum, helps driveability on the bottom end.
Well according to Desktop Dyno the change is good for an extra 25hp across the whole rpm range up to peak power (which is at a slightly lower rpm as a result) and a little less power after peak.
But the big difference is from idle to 2000rpm where there is a lot more torque. An extra 100 lb/ft of torque at 2000rpm.
Of course desktop dyno is not accurate. But it is usually ballpark.
 Oh and yes, retarding the timing WILL reduce idle speed vacum! So when you 'put in' a few more degrees initial,(base timing), it increased the vacum. Along with the extra lobe seperation all contributed to the increase I think. As you already know Peak power means nothing, area under the curve does, this cam has it in spades!!
  What are you gonna set the rev limiter to Dave?
 -

Eddie - Frequent Poster
- Posts: 6212
- Joined: 16 Oct 2006 21:26
- Location: Terre Haute, Ind.
OK. I worked it out. If I use the GV overdrive I can get an ideal shift spread at 6300rpm.
Without the overdrive i will have to shift higher than that to get an ideal shift but I wouldn't like to go over 6500rpm in any case so i will use the GV unit and set the limiter at 6600 or something.
Without the overdrive i will have to shift higher than that to get an ideal shift but I wouldn't like to go over 6500rpm in any case so i will use the GV unit and set the limiter at 6600 or something.
-

dave-r - Grumpy Old Man
- Posts: 9842
- Joined: 12 Oct 2003 21:45
- Location: North of the Tyne, England
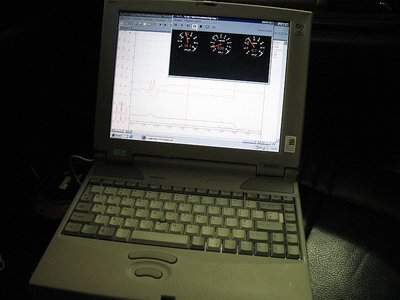
I managed to aquire a free laptop to use on the car tuning. 
It is over 10 years old and like a brick but it works.
It had Windows 95 on it but I managed to install '98 so it would run the Logworks 3 software.
With the laptop hooked up to the LM-1 unit I was able to monitor everything in real time!
I was also able to record directly onto the laptop.
So with that i was able to make the following changes.
Timing is now 18 degrees initial and 35 degrees total. At some point I will plot the exact timing curve on a graph.
Idle speed is now around 860rpm in Neutral and 800 rpm in "Drive".
Vacuum is 9 inches in neutral and 7.5 inches in Drive.
I fitted a spare 7.5 power valve in the center carb and i think it is effecting the idle mixture. So I will need a lower rated valve. Just not as low as the 2.5 I had in there before.
-

dave-r - Grumpy Old Man
- Posts: 9842
- Joined: 12 Oct 2003 21:45
- Location: North of the Tyne, England
Just remember after the changes, 14.7 or 1.0 Lamda is 'stoi' and you are at 13.5,(normal) at high idle, with the old power valve, under load it will enrichen of course because you'll be on a different circuit than the idle circuit. It would be nice to see 12.5-13.2 fully warmed up, under load. A 3.5 or 4.5 power valve should fix you up. And with real time input, it's like 'seeing' into the engine as it actually happens.  Nice work Dave, just dont look at those 'other' sites when you are driving by yourself.
 Nice work Dave, just dont look at those 'other' sites when you are driving by yourself.
-

Eddie - Frequent Poster
- Posts: 6212
- Joined: 16 Oct 2006 21:26
- Location: Terre Haute, Ind.
I think the power valve I have may be leaking a bit so i need to sort that out before i do any more tuning. I was thinking of ordering a 4.5 valve. My aim at this point was to just get the car at a ballpark idle which I have now done. So now I need to move on and get the brakes bled and the front/rear glass back in.
Then i will just about be ready for its MOT test and road licence.
Then i will just about be ready for its MOT test and road licence.
-

dave-r - Grumpy Old Man
- Posts: 9842
- Joined: 12 Oct 2003 21:45
- Location: North of the Tyne, England
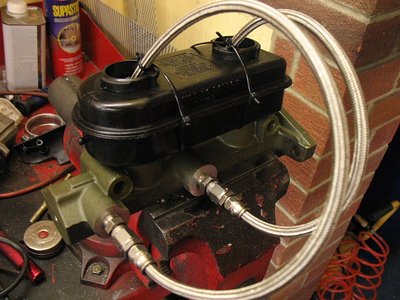
Trying to sort out the brakes at the moment.
I had a faulty brass fitting that wouldn't seal. Then I went and stripped the threads trying to tighten it.
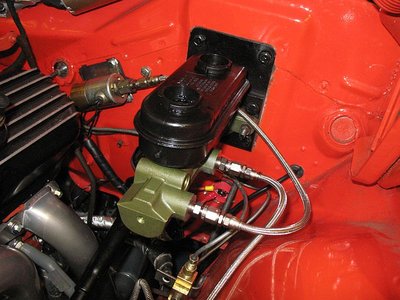
So I had a pair of braided hoses made up with steel fittings.
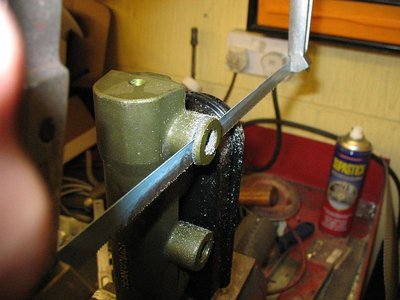
However the steel fittings were slightly too short for the ports on the master cylinder. So I had to cut the master cylinder to get a sealed fit.
In the end I found just 2mm would have done. But never mind.
-

dave-r - Grumpy Old Man
- Posts: 9842
- Joined: 12 Oct 2003 21:45
- Location: North of the Tyne, England
-

ianandjess - Frequent Poster
- Posts: 687
- Joined: 10 Dec 2005 12:18
- Location: australia
Two hold-ups with the car at the moment.
First of all my line lock has gone faulty and is acting like a one-way valve. This might be my fault as I had it apart and I may have lost a spring out of it or something.
A replacement is on order.
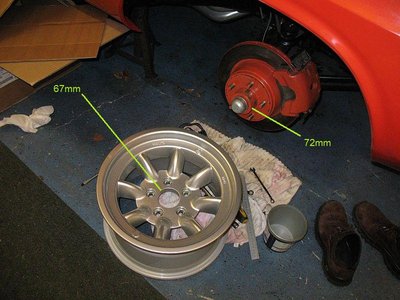
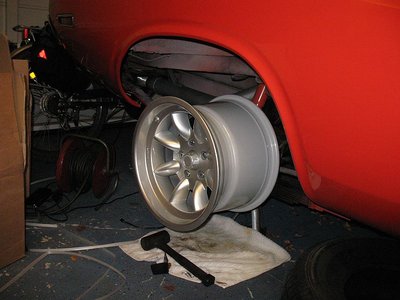
Second problem is I bought new wheels and the front ones don't fit.
Again this is probably my fault as I never thought to state what size the spindle on the front discs is. I am currently trying to find someone with a big lathe to turn them out 5mm more (2.5mm off the edge all round).
-

dave-r - Grumpy Old Man
- Posts: 9842
- Joined: 12 Oct 2003 21:45
- Location: North of the Tyne, England
-

dave-r - Grumpy Old Man
- Posts: 9842
- Joined: 12 Oct 2003 21:45
- Location: North of the Tyne, England
jh27n0b wrote:Good looking wheels Dave. Another option is to have the center holes opened up on a milling machine. Maybe easier to find a bridgeport style mill with a boring head than to find a lathe that will swing 16 plus inches.
Bob
 Excellent idea. It will not hold center as well as a lathe, but that kind of precision isn't necessary. I have done that many times for my friends' rims
- Moparman1972
- Frequent Poster
- Posts: 538
- Joined: 29 Apr 2006 17:10
- Location: Connecticut
I dont think too many people will be looking under your "arches" Dave. Instead, I think they'll be lookin at those sweet wheels and fat meats! 
 Plus in time those will be covered in sticky molten rubber, so look at it as "free undercoating"
 Plus in time those will be covered in sticky molten rubber, so look at it as "free undercoating"
 -

Eddie - Frequent Poster
- Posts: 6212
- Joined: 16 Oct 2006 21:26
- Location: Terre Haute, Ind.
-

dave-r - Grumpy Old Man
- Posts: 9842
- Joined: 12 Oct 2003 21:45
- Location: North of the Tyne, England
-

Jimiboy - Frequent Poster
- Posts: 708
- Joined: 22 Dec 2005 10:20
- Location: Sweden
I am going to the factory that made the wheels on Monday morning.
A 400 mile round trip but Tim on here is letting me sleep at his place overnight 12 miles from the factory.
They are going to machine all 4 wheels to take larger diameter center caps at no extra charge.
I am going to take one of the disc brakes with me to make bloody sure though.
A 400 mile round trip but Tim on here is letting me sleep at his place overnight 12 miles from the factory.
They are going to machine all 4 wheels to take larger diameter center caps at no extra charge.
I am going to take one of the disc brakes with me to make bloody sure though.
-

dave-r - Grumpy Old Man
- Posts: 9842
- Joined: 12 Oct 2003 21:45
- Location: North of the Tyne, England
