![]() by Eddie » 01 Mar 2008 23:51
by Eddie » 01 Mar 2008 23:51
WOW! Huge difference there Dave! I like it! Black looks so mean and classy at the same time.  I dont know about that paint spot. Maybe it can be localised sanded down, then carefully matched to the rest?
-

Eddie - Frequent Poster
- Posts: 6212
- Joined: 16 Oct 2006 21:26
- Location: Terre Haute, Ind.
![]() by patrick » 02 Mar 2008 3:51
by patrick » 02 Mar 2008 3:51
Look's beautiful except for what Eddie mentioned.  P.S. I love those little space heater's. I use those in my pantry. And, use those in my garage, in the winter time to keep the Mistress warm and dry.
P.S. I love those little space heater's. I use those in my pantry. And, use those in my garage, in the winter time to keep the Mistress warm and dry. -

patrick - Frequent Poster
- Posts: 1323
- Joined: 09 Jul 2007 0:56
- Location: Washington State, U.S.A.
![]() by dave-r » 02 Mar 2008 19:41
by dave-r » 02 Mar 2008 19:41
I had it masked off as well you know? But removed the masking just to get a little glue up under the edge. 
I think it will touch up OK. Something that can wait until after the car is running.
Headliner is next!
I think it will touch up OK. Something that can wait until after the car is running.
Headliner is next!
-

dave-r - Grumpy Old Man
- Posts: 9842
- Joined: 12 Oct 2003 21:45
- Location: North of the Tyne, England
![]() by Jimiboy » 03 Mar 2008 13:07
by Jimiboy » 03 Mar 2008 13:07
I like your pics Dave, looking all good!  How do you do in the splice of the winyltop? Do you fold a "doubble" on the piece on top of the other? or do you use a trim of some sort? I think it could be nice putting my hood somwhere else then on the ground...
  Looks really nice anyhow!
-
Jimiboy - Frequent Poster
- Posts: 708
- Joined: 22 Dec 2005 10:20
- Location: Sweden
![]() by dave-r » 03 Mar 2008 14:09
by dave-r » 03 Mar 2008 14:09
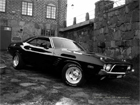
The seam that runs down each side is manufactured into the material.
This is the "wide seam" version of the top. Where the seams run closer to the edges of the roof. This top was originally designed for the SE formal roof only. The other models were to get the top with a more narrow seam.
But in practice on the factory floor they just seemed to have fitted what ever vinal top was to hand. So your Challenger could have come with either.
I have had a narrow seam one fitted in the past. I thought fitting a wide seam version would make a change.
I did have to make one seam though. I made a pleat right in the middle of the thin bit that runs under the rear window. I couldn't get it to fit any other way. I am sure the seams are supposed to run down the outside of the sail panels more. But I couldn't get it to stretch out that way.
It's the best I could do and it don't look too bad. It sure isn't going to get re-done!
-
dave-r - Grumpy Old Man
- Posts: 9842
- Joined: 12 Oct 2003 21:45
- Location: North of the Tyne, England
![]() by Jon » 03 Mar 2008 17:58
by Jon » 03 Mar 2008 17:58
That looks pretty good too me Dave. Like the two colours together also.
What type paint did you use on the car? If it were lacquer maybe I could help with the touch-up. Hopefully you retained some additional paint from the original application.
What type paint did you use on the car? If it were lacquer maybe I could help with the touch-up. Hopefully you retained some additional paint from the original application.
-
Jon - Frequent Poster
- Posts: 1229
- Joined: 21 Aug 2005 15:12
- Location: Medford Oregon
![]() by dave-r » 03 Mar 2008 19:06
by dave-r » 03 Mar 2008 19:06
Jon wrote: What type paint did you use on the car? If it were lacquer maybe I could help with the touch-up. Hopefully you retained some additional paint from the original application.
I can't remember the paint type. I know nothing about paint which is why this was the only job I will not do myself.
I will have to ask a friend that knows.
The painter was a bit "funny" with me after i picked the car up. He forgot to give me the left over paint. Then because I noticed a lot of "fish eyes" on top of one fender he went ballistic and the spare paint has now been "lost". A friend re-painted the fender for me.
I am not going to worry about it for now. Getting the car running again is the main priority. Pointless getting the paint pefect while i am still working in a tight space surrounded with parts for it. I might go and damage another bit before I am finished.
-
dave-r - Grumpy Old Man
- Posts: 9842
- Joined: 12 Oct 2003 21:45
- Location: North of the Tyne, England
![]() by DAYLEY/CHALLENGER » 04 Mar 2008 3:57
by DAYLEY/CHALLENGER » 04 Mar 2008 3:57
Hey Dave. As I said before , the top looks great. I am glad someone else ended up with a middle seam under the rear window. I had my top put on by the guys that painted it. I too have about a 3/4" foldover in the middle of the rear. Really looks like it belongs now. Year One is where I got my top also. When I received it it was in a box that came from the manuf. http://www.keeautotop.com/ is the manuf. I called them just courious about the pricing and I actually got it cheaper from YO. Guess they buy in bulk...........
-
-
 Viewed 1169 times")
- shows the foldover.
 Viewed 1169 times")
 Viewed 1169 times")
-

DAYLEY/CHALLENGER - Frequent Poster
- Posts: 229
- Joined: 14 Dec 2006 17:32
- Location: Rockingham, Nc ,USA
![]() by dave-r » 04 Mar 2008 9:13
by dave-r » 04 Mar 2008 9:13
Glad it was not just me then. 
I ended up with more than an inch of fold over at the center so I cut and folded it to make it smaller. It should be water tight when I have finished gluing it. I still have some edges to finish gluing. But I am using a brush so I don't have any more paint mishaps.
I ended up with more than an inch of fold over at the center so I cut and folded it to make it smaller. It should be water tight when I have finished gluing it. I still have some edges to finish gluing. But I am using a brush so I don't have any more paint mishaps.
-
dave-r - Grumpy Old Man
- Posts: 9842
- Joined: 12 Oct 2003 21:45
- Location: North of the Tyne, England
![]() by dave-r » 12 Mar 2008 18:09
by dave-r » 12 Mar 2008 18:09
Some of you laughed when I said I was going to restore my dirty old seat belts by putting them in the dishwasher!
Well here it is. Half of them anyway. I can't quite find where I have stored the rest at the moment.
Anyway. They were very grey looking. Full of dirt and dust. Some oily bits on there too. The wife used to complain about dirty marks on her clothes when we had been out in the car.
But after being in the dishwasher they are clean as a whistle. Nice and black in the fabric. Amazing difference.
Not easy to show in the photos. But to the naked eye the difference was huge.
-
 Viewed 1170 times")
- BEFORE.
-
 Viewed 1170 times")
- GOING IN LAST NIGHT BEFORE BED.
-
 Viewed 1170 times")
- NICE AND CLEAN THIS MORNING.
-
 Viewed 1171 times")
- VERY CLEAN.
 Viewed 1170 times")
 Viewed 1170 times")
 Viewed 1170 times")
 Viewed 1171 times")
-
dave-r - Grumpy Old Man
- Posts: 9842
- Joined: 12 Oct 2003 21:45
- Location: North of the Tyne, England
![]() by christer » 12 Mar 2008 19:10
by christer » 12 Mar 2008 19:10
dave-r wrote:Some of you laughed when I said I was going to restore my dirty old seat belts by putting them in the dishwasher!
Professionally redone! $300 of added value.
They look great! They stopped laughing when they saw the result, right?

- christer
- Ghost 48
- Posts: 2133
- Joined: 13 Oct 2006 19:52
- Location: Sweden
-
Eddie - Frequent Poster
- Posts: 6212
- Joined: 16 Oct 2006 21:26
- Location: Terre Haute, Ind.
![]() by dave-r » 12 Mar 2008 21:23
by dave-r » 12 Mar 2008 21:23
airfuelEddie wrote:Looks really nice Dave! Youre wife didnt beat you did she?
She was very pleased indeed to come into the kitchen last night and find I had tidied it up and put the dishwasher on.
When I told her what I had done tonight she gave me "that look" but when i said it was either that or $400 for a new set she came around to my way of thinking pretty quick.
-
dave-r - Grumpy Old Man
- Posts: 9842
- Joined: 12 Oct 2003 21:45
- Location: North of the Tyne, England
![]() by dave-r » 16 Mar 2008 12:25
by dave-r » 16 Mar 2008 12:25
Well I take my hat off to anyone that can put a headliner in without making an arse of it.
I have given up! It has got to the point where I have spent enough time and effort. I have done my best and thats all I can do. It will have to stay as it is.
Unless I have another go from the start again at some point.
I wish I had put some sound deadener in there first as well. The roof sounds like the lid of a biscuit tin.
 Viewed 1171 times")
 Viewed 1177 times")
-
dave-r - Grumpy Old Man
- Posts: 9842
- Joined: 12 Oct 2003 21:45
- Location: North of the Tyne, England
![]() by dave-r » 21 Mar 2008 17:56
by dave-r » 21 Mar 2008 17:56
Took the dash to bits this afternoon.
What a mess. Made worse by being full of fire extinguisher dry powder.
Got to start somewhere so decided to clean up the dash frame first.
I vacuumed it. Then wire brushed the rusty bits. Then sprayed it with rust converter.
Tomorrow It should be ready for paint.
What a mess. Made worse by being full of fire extinguisher dry powder.
Got to start somewhere so decided to clean up the dash frame first.
I vacuumed it. Then wire brushed the rusty bits. Then sprayed it with rust converter.
Tomorrow It should be ready for paint.
-
 Viewed 1170 times")
- Mess.
-
 Viewed 1170 times")
- After a rub down.
-
 Viewed 1169 times")
- Sprayed with rust converter.
 Viewed 1170 times")
 Viewed 1170 times")
 Viewed 1169 times")
-
dave-r - Grumpy Old Man
- Posts: 9842
- Joined: 12 Oct 2003 21:45
- Location: North of the Tyne, England

![]() by dave-r » 22 Mar 2008 10:29
by dave-r » 22 Mar 2008 10:29
Yes. It converts rust completely and seals the metal from oxygen with a tough epoxy clear coat so it cannot rust again.
http://www.frost.co.uk/item_Detail.asp? ... e=Dinitrol Converust RC900 (400ml)&catID=28&frostCat=Rust&frostSubCat=Dinitrol&subCatID=35
http://www.frost.co.uk/item_Detail.asp? ... e=Dinitrol Converust RC900 (400ml)&catID=28&frostCat=Rust&frostSubCat=Dinitrol&subCatID=35
-
dave-r - Grumpy Old Man
- Posts: 9842
- Joined: 12 Oct 2003 21:45
- Location: North of the Tyne, England
![]() by dave-r » 22 Mar 2008 20:36
by dave-r » 22 Mar 2008 20:36
I used a little filler type primer to try and get a slight textured finish when I put the satin black on.
The black bits should be matt black but I just don't like matt anything so everything I paint is satin black on my car.
The end bit went "a bit funny" when I painted it so I did it again.
Dashpad is cleaned up and re-fitted. I have a couple of the nuts that hold the pad to the frame missing. I couldn't find any subtitutes that would fit so did without them. It seems OK without them.
 Viewed 1170 times")
 Viewed 1170 times")
 Viewed 1169 times")
-
dave-r - Grumpy Old Man
- Posts: 9842
- Joined: 12 Oct 2003 21:45
- Location: North of the Tyne, England
-
Eddie - Frequent Poster
- Posts: 6212
- Joined: 16 Oct 2006 21:26
- Location: Terre Haute, Ind.
![]() by dave-r » 31 Mar 2008 8:49
by dave-r » 31 Mar 2008 8:49
The cardboard glovebox liner was in poor condition so I made a new one from very thin ally plate. Once riveted together and covered in vinyl (spare material that came with the headliner) it is stronger than the original.
I think I will fit a light in there as well. Maybe with a switch that comes on when you open the door so passengers can look in without me putting on the interior light while driving in the dark.
I think I will fit a light in there as well. Maybe with a switch that comes on when you open the door so passengers can look in without me putting on the interior light while driving in the dark.
 Viewed 1170 times")
 Viewed 1170 times")
 Viewed 1171 times")
-
dave-r - Grumpy Old Man
- Posts: 9842
- Joined: 12 Oct 2003 21:45
- Location: North of the Tyne, England
![]() by dave-r » 31 Mar 2008 8:51
by dave-r » 31 Mar 2008 8:51
I also covered the rear parcel shelf with a bit of store bought vinyl. It made it look a lot better than it was before.
At the same time I fitted the new speakers for the DAB digital radio/CD player.
At the same time I fitted the new speakers for the DAB digital radio/CD player.
 Viewed 1170 times")
 Viewed 1175 times")
-
dave-r - Grumpy Old Man
- Posts: 9842
- Joined: 12 Oct 2003 21:45
- Location: North of the Tyne, England
-

Hezzel - Frequent Poster
- Posts: 125
- Joined: 22 Oct 2007 13:05
- Location: Sweden, Kiruna
![]() by dave-r » 21 Apr 2008 16:04
by dave-r » 21 Apr 2008 16:04
Inspired by 72challengerorange's use of carbon fibre in his Challenger (plus I have been thinking about it for a while anyway) I decided to obtain a large sheet of carbon to do my car with.
This stuff is a sheet 0.4mm thick, formed in a press under high temp, with a high gloss resin on one side.
Not the cheap option. But I was having trouble getting any carbon sheets big enough.
It is like a wood veneer. Only you have to cut it with a diamond abrasive disc in a Dremel.
Only done the centre console for now. Next will be the plates from the inside of the door. last of all I am going to attempt the dash.
That last one is going to be VERY tricky.
This stuff is a sheet 0.4mm thick, formed in a press under high temp, with a high gloss resin on one side.
Not the cheap option.
It is like a wood veneer. Only you have to cut it with a diamond abrasive disc in a Dremel.
Only done the centre console for now. Next will be the plates from the inside of the door. last of all I am going to attempt the dash.
That last one is going to be VERY tricky.
 Viewed 1172 times")
 Viewed 1173 times")
 Viewed 1172 times")
 Viewed 1172 times")
-
dave-r - Grumpy Old Man
- Posts: 9842
- Joined: 12 Oct 2003 21:45
- Location: North of the Tyne, England
- christer
- Ghost 48
- Posts: 2133
- Joined: 13 Oct 2006 19:52
- Location: Sweden
-
Jimiboy - Frequent Poster
- Posts: 708
- Joined: 22 Dec 2005 10:20
- Location: Sweden
![]() by drewcrane » 21 Apr 2008 21:23
by drewcrane » 21 Apr 2008 21:23
how much do you want for the glove box? looks sweet, i need one im not that good with metal,seriously let me know how much and i might purchase one and a console panel as well!
-
drewcrane - Frequent Poster
- Posts: 2893
- Joined: 01 Sep 2007 12:36
- Location: "follow the laraya belt ,that should get ya there"
-
Eddie - Frequent Poster
- Posts: 6212
- Joined: 16 Oct 2006 21:26
- Location: Terre Haute, Ind.
![]() by dave-r » 22 Apr 2008 10:47
by dave-r » 22 Apr 2008 10:47
drewcrane wrote:how much do you want for the glove box? looks sweet, i need one im not that good with metal,seriously let me know how much and i might purchase one and a console panel as well!
I have enough on my plate trying to finish my own car Drew. I only have a couple of months to get everything done and i keep getting unwell.
-
dave-r - Grumpy Old Man
- Posts: 9842
- Joined: 12 Oct 2003 21:45
- Location: North of the Tyne, England