116 posts
• Page 1 of 4 • 1, 2, 3, 4
Christers ´70
![]() by Dave_R (Roppa440) » 11 Nov 2002 16:27
by Dave_R (Roppa440) » 11 Nov 2002 16:27
Any specifications to go with the picture Christer?
- Dave_R (Roppa440)
Christers ´70
![]() by Christer (Christer) » 23 Nov 2002 15:23
by Christer (Christer) » 23 Nov 2002 15:23
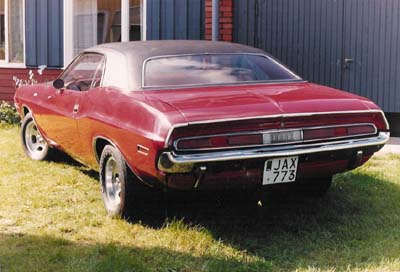
She was born in the beginning of november ´69 with the following VIN stamped on her:
G33 L31 M21 R11 Y05 EN1
V1X A01 B51 C16 C55 G31
FE5 H6E4 000 B08 067043
E44 D31 JH23 G0B 185258
She lived in US until 1976. Then she moved to Sweden.
I bought the car in 1987, until then she had passed through 11 owners here in Sweden!
Not everyone of the owners did treat her the way she should have been treated.
Someone of the previous owners had replaced the 318/904 combo with a 383/727.
The heads are #906 and I have replaced the stock exhaust valves with 1.81" valves.
I have installed 1 3/4 headders (instead of a pair of cracked 2" headders
that was mounted when I bought the car) and they end up in a dual 2,5" exhaust system.
A mallory dual-braker distributor was on the engine when I bought the car and
I have not replaced it yet. The coil is an accel super coil. Right now I use a
stock intake with a 600 vacuum but I plan to replace them with a Holley street dominator
manifold (I already own one) and a 750 vacuum.
The rear end is a 8 3/4. I have a limited-slip 3.91:1 center in my garage, wich I plan to use.
As you can see on the picture, the car runs on slot mags, 7/x14 all around.
I use 60 series tyres, 215 in front and 235 in the rear.
Actually, I have not changed so much on the car since I bought it.
I have added a flip-top gas cap and wheel lip mouldings. Not much more.
Right now, the car is going through a restoration with a main goal to have it as rust-free
as possible. I will keep the colours according to the VIN, that is repaint the car in red,
buy a new red interior and keep the black vinyl roof.
Why has it taken so long time to get the car back on the road:
Some of the causes are lack of money, time, knowledge, inspiration and other projects.
The photo was taken by my brother Robert, in the beginning of nineties.
I like the angle of the photo, and combined with the shadows, it makes a
quite pleasant photo, I think. The car looks better on the photo, than it did in reality.
Lessons learned (a part of them):
*Buying cheap is often not cheap in the long run.
*Do not drive without a working kick-down linkage.
*Try to aviod a "many owned" car.
(Sorry for the delay, Dave.)
- Christer (Christer)
Christers ´70
![]() by Christer (Christer) » 21 May 2003 20:04
by Christer (Christer) » 21 May 2003 20:04
It is soon time to dump in that old mill...
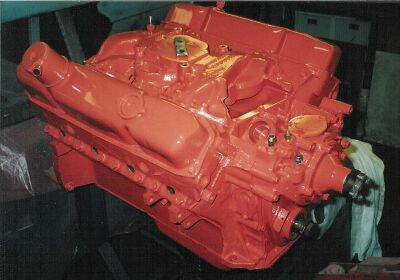
...back to where it belongs.
I won´t feel too sorry when that has happened.
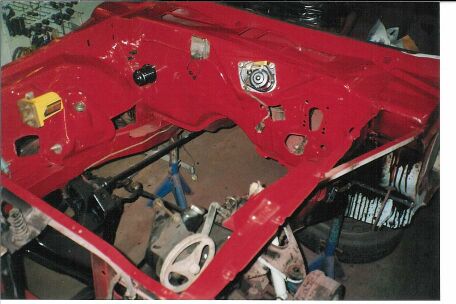
Notice the homebuilt brace (1"x 1") between cowl and front inner fender.
I have also tried to add some stiffeness in the area where the front
subframe meets the floor, thanks to one standing steel plate (2.5 mm thick).
on each side of subframe. You can barely see this mod on the photo.
...back to where it belongs.
I won´t feel too sorry when that has happened.
Notice the homebuilt brace (1"x 1") between cowl and front inner fender.
I have also tried to add some stiffeness in the area where the front
subframe meets the floor, thanks to one standing steel plate (2.5 mm thick).
on each side of subframe. You can barely see this mod on the photo.
- Christer (Christer)
Christers ´70
![]() by Tony Miller (Owner4) » 21 May 2003 22:20
by Tony Miller (Owner4) » 21 May 2003 22:20
Your hard work and dedication is a inspiration to us all. Can't wait to see the finished project!
- Tony Miller (Owner4)
- Christer (Christer)
Christers ´70
![]() by Dave-R (Roppa440) » 22 May 2003 9:28
by Dave-R (Roppa440) » 22 May 2003 9:28
The bracing is a good idea. The chassis connectors I fitted to mine made a big difference to the feel of the car. You can tell it is stiffer when you jack up one corner and the other end comes up too. It used to twist when I did that before.
Are you planning to get the car finished soon?
Are you planning to get the car finished soon?
- Dave-R (Roppa440)
Christers ´70
![]() by Christer (Christer) » 23 May 2003 11:20
by Christer (Christer) » 23 May 2003 11:20
That is a good question, Dave. I keep on asking me the same question.
As soon as possible is an easy answer. I hope to have it in roadworthy
condition this autumn and hopefully finished before the summer after.
About the brace:
There was a brace on my car but it was weak and dented.
I took the decision to replace it. My only concern/worry is if it is too stiff. I am worried that it may cause undesired stress on the inner fender and maybe create cracks or dents.
The future will tell if this is a good mod or not.
About the standing steel plate:
I have taken this tip from a well known and serious book.
I think it can be an alternate route for those who want to keep the underside of their cars fairly original looking (i.e. don´t want to install subframe connectors).
I have nothing against subframe connectors myself.
That mod is on my eventually-in-the-future-list.
- Christer (Christer)
Christers ´70
![]() by Joel Bennett (Joel) » 24 May 2003 8:48
by Joel Bennett (Joel) » 24 May 2003 8:48
Do the original fender braces really do much of anything? I only drove my car for about a month when I had to retire it to the carport, to start work on it, and that was a few years ago, so I can't really remember how the car drove at all.
Does anyone know what that half circle piece of rebarb near the bottom of the cowl, towards the outside of the car, about 12-15 inches below the inner fender brace, is for?
I have to replace the driverside inner fender anyway, so when I weld in a new inner fender, I think I'll go ahead and weld in thicker braces and and a couple of steel plates to the sub frame. 2.5mm is about an 1/8", right?
- Joel Bennett (Joel)
Christers ´70
![]() by Christer (Christer) » 24 May 2003 12:29
by Christer (Christer) » 24 May 2003 12:29
1/8" is a little bit thicker than 2.5 mm (0.5 mm thicker), but that difference does not matter. What´s important is that you don´t choose too thin material.
- Christer (Christer)
Christers ´70
![]() by Joel Bennett (Joel) » 25 May 2003 9:32
by Joel Bennett (Joel) » 25 May 2003 9:32
Why did you choose to have a the end of the steel plate taper to a point, instead of a square blunt end?
The lighting makes the orange on the 383 look a little more like a peach color, than an orange.
The horizontal part of the brace on my car is dented a bit aswell, but it still seems to be fairly sturdy, but I think I'll weld in a square tubular steel piece in its place, anyway. I don't think I want the added extra weight of a solid square piece of steel like you have on your car. I want to make the front end of the car as light weight as possible, which is why I'm going to go with the one piece fiberglass front end from JC Whitney, instead of a pair of reproduction stamped steel fenders and the original steel hood that came with the car.
- Joel Bennett (Joel)
Christers ´70
![]() by David Robson (Admin) » 27 May 2003 20:55
by David Robson (Admin) » 27 May 2003 20:55
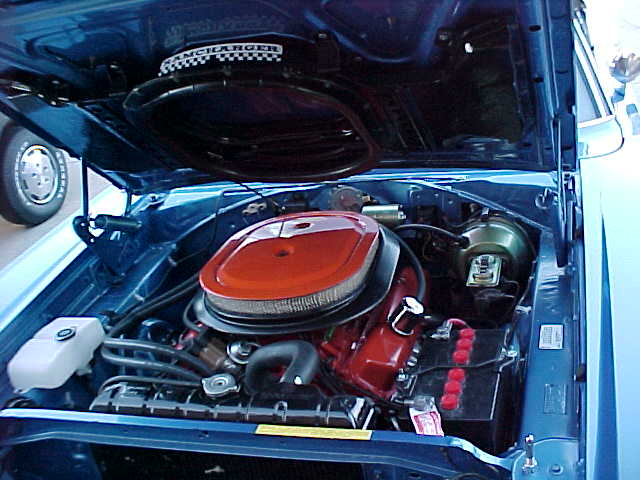
Just for comparison here is what the original brace looks like from under the car.

Notice how it ties in with the shock tower. It looks pretty strong to me.
Notice how it ties in with the shock tower. It looks pretty strong to me.
- David Robson (Admin)
Christers ´70
![]() by Luke (Luke) » 28 May 2003 10:44
by Luke (Luke) » 28 May 2003 10:44
your pretty handy with that camera dave, must get me one of thoses.
- Luke (Luke)
Christers ´70
![]() by Dave-R (Roppa440) » 28 May 2003 11:21
by Dave-R (Roppa440) » 28 May 2003 11:21
Damn handy being able to stick my arm under the car with the camera, fire off a few shots, and then see what I got straight away with the LCD screen on the back.
- Dave-R (Roppa440)
Christers ´70
![]() by Christer (Christer) » 29 May 2003 18:31
by Christer (Christer) » 29 May 2003 18:31
Yes, I do believe that a brace without faults is good enough.
The thing is that one of the car´s previous owners has done some welding in the
firewall/cowl area. To get enough space around the welding place, he probably loosened one
end of the old brace and then simply twisted the brace away.
This caused a dented and cracked brace not worth saving.
I used what I had in the garage to do a new brace.
My new brace is tied to the shock tower in the same way as the original.
The material may be a little oversized, but rather that than use material that is too weak.
Added weight is ok if you thanks to that gets a stiffer chassie.
At least, that is my opinion.
I am also a bit puzzled about the colour of the engine enamel.
I have used a famous brand (Bill Hirsch) and it is said to be chrysler orange.
I don´t understand why it looks like it does.
Does anybody have a clue? Hopefully it has something to do with the light.
Anyway, I am not bothered about that. It is just fun to have something
that differs a bit from the rest.
To use fibre glass to save weight is a good idea. My only concern is that you easily
wind up with fit- and finish problems.
I do not understand what you mean with your first question, Joel.
Maybe you can explain it a little bit more?
- Christer (Christer)
Christers ´70
![]() by Dave-R (Roppa440) » 30 May 2003 7:32
by Dave-R (Roppa440) » 30 May 2003 7:32
I completely agree with how you have done it Christer and a part like that cannot be too strong.
Hemi Orange paint is not what it used to be.
Most of the 'hemi orange' you get these days (including the mopar performance brand would you believe) is the WRONG colour!
Out of three brands I have tried only one was the right red/orange. And guess what? I can't remember which one it was!
Also just to confuse things remember that the original hemi orange from the early '60s was a different colour again. That one was known as 'Race' hemi orange. The one we want is 'Street' hemi orange. Trying to find it in the right shade though is a pain.
- Dave-R (Roppa440)
Christers ´70
![]() by Phil Raynor (Philth) » 30 May 2003 7:39
by Phil Raynor (Philth) » 30 May 2003 7:39
I've heard that some brands of 'Hemi' orange engine enamel look almost pink in certain lights. Then again, there are two types of Hemi orange!!
I've used an acid etch primer followed by some Rover Vermillion (nearest orange to Hemi) on my engine block and so far it hasn't crazed, fallen off, or discoloured. Only time will tell.
Christer - yer engine looks pretty 'Hemi orange' to me! How about some more pics?
I've used an acid etch primer followed by some Rover Vermillion (nearest orange to Hemi) on my engine block and so far it hasn't crazed, fallen off, or discoloured. Only time will tell.
Christer - yer engine looks pretty 'Hemi orange' to me! How about some more pics?
- Phil Raynor (Philth)
Christers ´70
![]() by Tony Miller (Owner4) » 30 May 2003 11:53
by Tony Miller (Owner4) » 30 May 2003 11:53
Finding the correct color is a pain. I have tried the following and here is my opinion of each:
VHT street hemi orange - looks like chivy orange
VHT race hemi orange - very close to the light pale orange
Mopar paint - looks like orange mud
Plasti-kote Chrysler orange #226 - seems to be the closest match. here's a pic of a coronet rt I restored. i also judge at Mopar nat's in Columbus, Ohio, I could run this question past a couple of guru's.
- Tony Miller (Owner4)
Christers ´70
![]() by Dave-R (Roppa440) » 30 May 2003 14:30
by Dave-R (Roppa440) » 30 May 2003 14:30
Thanks for that Tony. I think we should put the results of this in the bodywork section under it's own heading for future reference.
Meanwhile I have taken the afternoon off, I have a couple of hours before I need to drive over to Cumberland to see a band tonight, and the sun is shining, so I think I might squeeze in a little work on my car!
Meanwhile I have taken the afternoon off, I have a couple of hours before I need to drive over to Cumberland to see a band tonight, and the sun is shining, so I think I might squeeze in a little work on my car!
- Dave-R (Roppa440)
Christers ´70
![]() by Christer (Christer) » 09 Jun 2003 13:51
by Christer (Christer) » 09 Jun 2003 13:51
I wonder if there is anyone who has tried Penstar reproducion engine paints?
According to an advertisement in MA (Feb 2001), the paints are said to have the correct texture as well as the correct color. Their paints are the only that are licensed by DaimlerChrysler and cost $8.99 per can.
Contacts: Penstar Reproductions, 112 Fitch Road, Southampton, PA 18966; Phone (215) 396-9172. E-mail: penstar_reproductions@hotmail.com
- Christer (Christer)
Christers ´70
![]() by Joel Bennett (Joel) » 13 Jun 2003 9:39
by Joel Bennett (Joel) » 13 Jun 2003 9:39
Christer, if you look at the subframe near the passenger's side lower section of the firewall in the picture of your car, you will notice the subframe connector that you had welded in. It looks like it runs about 24 inches into the engine bay and comes to a nice point. I was asking why you decided to have it come to a point, unless it was just some scrap steel plating that you found laying around and it just happen to have that particular shape.
- Joel Bennett (Joel)
 Viewed 3324 times")
![]() by Christer » 16 Nov 2003 13:24
by Christer » 16 Nov 2003 13:24
Since the new MB is so roomy, I thought that I would post some old pic´s from the restoration process.
I found them yesterday, among my other pic´s.
I found them yesterday, among my other pic´s.
-
 Viewed 3312 times")
- This is what I started with... Not a California car as you all can understand by the rust.
-
 Viewed 3311 times")
- Here is a pic of the brace that I have talked about.
-
 Viewed 3317 times")
- I have partly cut-out the bottom of the frame and replaced it with 2.5 mm thick steel plates.
I have been keen to keep the original look of the frames.
That is why I have drilled holes exactly in the same locations as they originally were.
 Viewed 3312 times")
 Viewed 3311 times")
 Viewed 3317 times")
- Christer
![]() by Christer » 25 Feb 2004 10:06
by Christer » 25 Feb 2004 10:06
Some of you maybe wonder how I am getting along with my Chally. Quite well, thanks! Some of you maybe think that I only sits in front of the computer all day long!? That is only partly true. Here is a little about my latest progress:
The tuesday that was, I changed the gears from the VERY slow and boring 2.76:1 (non sure-grip), to a healthy 3.91:1 (sure-grip). If that won´t waken up the car, what will? The job with changing gears is now finished. The thoughest part of the job was to swap yokes. Lucky for me, both yokes had the same number of splines (10 splines) so the swap was pretty straight-forward. The biggest problem was to loosen the nuts, but thanks to a wrench-set with 3/4-inch sockets, we finally got the yokes off the pinions. (I have learned that it is NOT adviceable to use 1/2-inch sockets, since they may break.)
During the last couple of months, I have bought more spare parts to my chally, than I have done during the last couple of years. Why? I have come to the conclusion that I got to have what I need, no matter what it costs. Sounds simple and a bit silly, I know, but true. Priority One is to get fewer and fewer problems... As simple as that. I guess that I have been daydreaming about getting my Chally ready WITHOUT having to spend all the $$$ needed. Now, my wallet is quite empty but I have all the necessary parts to get my car completed..
Thanks to Mother "Currency rates", everything has become about 30% cheaper, than it has been during the last couple of years. A great relief for us mopar intrested Swedes, who are buying from america! It makes it much easier to justify all the things that you need to buy.
Thanks to this MB, I have started to use ebay. (I must admit that I haven´t dared using it until now, for different reasons. Among them, I have not been familiar and not felt safe with the payment methods that are beeing used on the net.) I try to follow your recommendations Dave, and only use Paypal, only buy from sellers with a good feedback rating and only bid if it is a picture attached. Until now, it has worked out OK, and I really hope it continues to work well.
to be continued.....
- Christer
![]() by 72 Challenger (Hans) » 25 Feb 2004 10:21
by 72 Challenger (Hans) » 25 Feb 2004 10:21
Hey christer, good to hear it's all going on well. Also with you using ebay, I know you were kind of afraid to use it eh. So you have some spare parts, happen to have a power steering pump incl. brackte left...? You'll need to get new tires a lot sooner Christer with the 3.91 installed. You'll love it to slide trhough corners every now and then.
With my 4.30's behind the 340 I'll only start to have traction in 3th gear when going straight on... But I love peoples faces when they see me sliding trhough traffic lights
  And about the current $$ rates, man I love it! Why do you think I finally got to order the hemi!
Good luck further on and keep us posted!
With my 4.30's behind the 340 I'll only start to have traction in 3th gear when going straight on...
Good luck further on and keep us posted!
- 72 Challenger (Hans)
- Frequent Poster
- Posts: 161
- Joined: 19 Oct 2003 18:09
- Location: Netherlands
![]() by dave-r » 25 Feb 2004 11:11
by dave-r » 25 Feb 2004 11:11
Always the same story. When the Dollar is weak I don't need parts.
When the Dollar is strong I buy overdrive units. cylinder heads etc etc.
Well I don't need anything for quite a while but I thought I would take advantage of the weak Dollar anyway and bought a rear T/A spoiler, new carpet, and vinyl top. It will be about a year before they are on the car but if I had waited until then I whould bet that the Dollar will be strong again.
Good to hear your are getting into work on the Challeger again Christer. Keep posting photos of the work in progress. You know we love those images.
-

dave-r - Grumpy Old Man
- Posts: 9842
- Joined: 12 Oct 2003 21:45
- Location: North of the Tyne, England
![]() by Christer » 25 Feb 2004 13:12
by Christer » 25 Feb 2004 13:12
Hans; No, I am sorry but I haven´t any power steering pump for sale. On the other hand, I know a guy who has one for sale (I do not know him personally). His mailadress is mopar_forever@hotmail.com and his name is Robert (He lives in Sweden). Why don´t you drop him a mail and ask how much he wants for the unit!? If I can help in any way, please let me know.
More pic´s? I really wish I had a digi-cam myself. That would make things so much easier....but since all of my money goes to spare parts at the moment, that will have to wait. I use to borrow a cam every once in a while.
More pic´s? I really wish I had a digi-cam myself. That would make things so much easier....but since all of my money goes to spare parts at the moment, that will have to wait. I use to borrow a cam every once in a while.
- Christer
 Viewed 3307 times")
-
dave-r - Grumpy Old Man
- Posts: 9842
- Joined: 12 Oct 2003 21:45
- Location: North of the Tyne, England
116 posts
• Page 1 of 4 • 1, 2, 3, 4