116 posts
• Page 3 of 4 • 1, 2, 3, 4
-

Eddie - Frequent Poster
- Posts: 6212
- Joined: 16 Oct 2006 21:26
- Location: Terre Haute, Ind.
airfuelEddie wrote:Good Luck Christer! Great price and I'm sure you can smooth it back into shape just fine.
Thanks Eddie! Yeah, I might be needing it, right?
A new repro hood costs about $1000 over here so it is a great relief if you can get away with only 1/10 of that price, isn´t it?
- christer
- Ghost 48
- Posts: 2133
- Joined: 13 Oct 2006 19:52
- Location: Sweden
-

dave-r - Grumpy Old Man
- Posts: 9842
- Joined: 12 Oct 2003 21:45
- Location: North of the Tyne, England
dave-r wrote:Got a bargin there Chris.
Yeah, it feels like that. I could hardly believe my eyes when I saw the ad. The best of all? He lives only 10 km away (10 mintes by car) so it was very handy to get it. Above all he agreed to trade a thing worth $20 so I only had to pay him $80. Yeah, I think I can live with that sum

.gif)
- christer
- Ghost 48
- Posts: 2133
- Joined: 13 Oct 2006 19:52
- Location: Sweden
-

ianandjess - Frequent Poster
- Posts: 687
- Joined: 10 Dec 2005 12:18
- Location: australia
The rear seat looks OK by now. Since all of the interior was quite smelly (from a too wet climate), I decided to replace as much of it as possible. I bought the upholstery from Year One.
Last edited by christer on 30 Oct 2007 22:28, edited 1 time in total.
- christer
- Ghost 48
- Posts: 2133
- Joined: 13 Oct 2006 19:52
- Location: Sweden
-

Eddie - Frequent Poster
- Posts: 6212
- Joined: 16 Oct 2006 21:26
- Location: Terre Haute, Ind.
Recently I realized the the condition of the drivers seat is not exactly mint.  The back has a cracked crossmember and some not so good looking welds and reinforcements (done by one of the previous owners). The upholstery will cover most of it so I will only do what I think is necessary and nothing more. I am not doing a concourse resto by a long way. It is more of a "good enough"-resto.
Btw; Have any of you experianced any similar problems with the seats?
Btw; Have any of you experianced any similar problems with the seats?
- christer
- Ghost 48
- Posts: 2133
- Joined: 13 Oct 2006 19:52
- Location: Sweden
I am also having some problems with the width of passanger side back hinge. The width differs almost 1/2" between the two backs. The welded and repaired back is better than the unrepaired back. A bit surprisingly, isn´t it? As it is right now, I am adding a lot of stress to the passenger seat back when I torque the pivot bolts of. An easy reapir, yes, but I want to mention it anyway.
- christer
- Ghost 48
- Posts: 2133
- Joined: 13 Oct 2006 19:52
- Location: Sweden
- christer
- Ghost 48
- Posts: 2133
- Joined: 13 Oct 2006 19:52
- Location: Sweden
Guess which one is the new and which one is the old? (Sackweave covering the back of the front seat) I wonder how they did this work back in the old days? All I know is that it is quite time consuming. I am quite sure that they used a more effective technique compared to the one I am using.
- christer
- Ghost 48
- Posts: 2133
- Joined: 13 Oct 2006 19:52
- Location: Sweden
Sorry can't help with that extensive job your doing there.
Last year I did do some painting of the tracks and such and notice water had been getting thru the holes that bolt through the floor pan. I applied silicone sealer to the track studs prior to installing the nut and washer. Along with spilled beverages, I believe this contributes to the floor pan rot so common in these cars.
Last year I did do some painting of the tracks and such and notice water had been getting thru the holes that bolt through the floor pan. I applied silicone sealer to the track studs prior to installing the nut and washer. Along with spilled beverages,
 I believe this contributes to the floor pan rot so common in these cars.
-

Jon - Frequent Poster
- Posts: 1229
- Joined: 21 Aug 2005 15:12
- Location: Medford Oregon
Jon wrote:Sorry can't help with that extensive job your doing there.
Thanks anyway!

Jon wrote:Last year I did do some painting of the tracks and such and notice water had been getting thru the holes that bolt through the floor pan. I applied silicone sealer to the track studs prior to installing the nut and washer. Along with spilled beverages,I believe this contributes to the floor pan rot so common in these cars.
It is a very good idea to seal bolt holes to prevent water leakage. I believe that this small detail often is forgotten.
- christer
- Ghost 48
- Posts: 2133
- Joined: 13 Oct 2006 19:52
- Location: Sweden
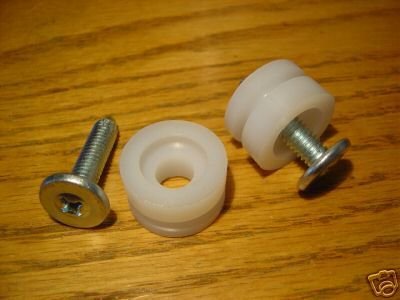
I have been thinking about the front seat bump stops for some time now. I have not known what they look like and I have been searching for information and sale ads. Guess what? Today I found one of them - In the center console box of my own car!  I have not known what it was until now. I was happily surprised when I found out what it is. I need the other one though - Any help is appreciated.
- christer
- Ghost 48
- Posts: 2133
- Joined: 13 Oct 2006 19:52
- Location: Sweden
christer wrote:I have been thinking about the front seat bump stops for some time now. I have not known what they look like and I have been searching for information and sale ads. Guess what? Today I found one of them - In the center console box of my own car!I have not known what it was until now. I was happily surprised when I found out what it is. I need the other one though - Any help is appreciated.
A friend of mine with a 1971 Barracuda has a bump stop looking like this. I am confused (not the first time....
 ).
).- christer
- Ghost 48
- Posts: 2133
- Joined: 13 Oct 2006 19:52
- Location: Sweden
christer wrote:christer wrote:I have been thinking about the front seat bump stops for some time now. I have not known what they look like and I have been searching for information and sale ads. Guess what? Today I found one of them - In the center console box of my own car!I have not known what it was until now. I was happily surprised when I found out what it is. I need the other one though - Any help is appreciated.
A friend of mine with a 1971 Barracuda has a bump stop looking like this. I am confused (not the first time....).
Finally I have managed to track down a set of bump stops. YES! I thought it would be a good thing to mention in case someone is searching for the same part.
From the ad: Fits 70-72 E and B Bodies. The stud attaches the bushing to the bottom of the seat back where it contacts the bottom (see photo). To install, place the stop in between the seat and stud and tighten until the stop snaps into the adjusting stud.
It feels like my buddy in his ´71 `cuda has not got the correct bump stops (that is if the seller is correct).
- christer
- Ghost 48
- Posts: 2133
- Joined: 13 Oct 2006 19:52
- Location: Sweden
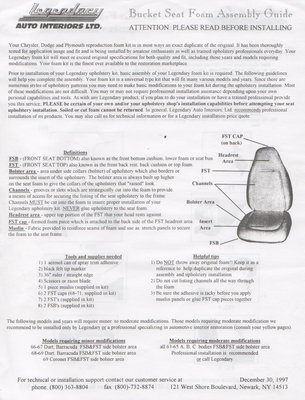
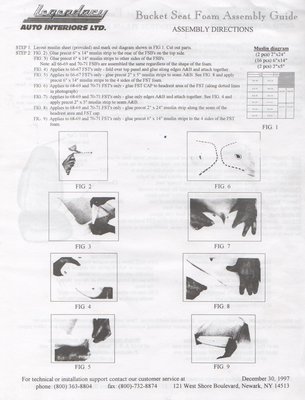
The set of front seat cushions needed some prefabrication before they were ready to be installed. Included with the cushions were a large piece of textile. According to Fig. 1 you supposed to cut the textile into 20 pieces. I used thirteen of them. I intend to throw the rest away. I don´t see any need for them. I used contact adhesive to join the front and the rear part of the headrest together. I used textile adhesive to join the pieces of cloth to the cushion. I added them on the places where the old chushion had cracked.
PS. The instruction was really bad. I gave up and just used the textile pieces where I thought they would make the most benefit. I don´t know if I did it the right way or not, and afterwards I don´t want to know if I did it the wrong way....
PS. The instruction was really bad. I gave up and just used the textile pieces where I thought they would make the most benefit. I don´t know if I did it the right way or not, and afterwards I don´t want to know if I did it the wrong way....
- christer
- Ghost 48
- Posts: 2133
- Joined: 13 Oct 2006 19:52
- Location: Sweden
...and the finished result (except for the seat hinge covers).
I have nothing to compare with but I am quite happy with the result myself. You had to do a little thinking of your own, so it was a bit of a challenge to get it right. A pair of extra hands was very useful. I inted to show how I did it when I do the other seat.
I have nothing to compare with but I am quite happy with the result myself. You had to do a little thinking of your own, so it was a bit of a challenge to get it right. A pair of extra hands was very useful. I inted to show how I did it when I do the other seat.
- christer
- Ghost 48
- Posts: 2133
- Joined: 13 Oct 2006 19:52
- Location: Sweden
-

Hezzel - Frequent Poster
- Posts: 125
- Joined: 22 Oct 2007 13:05
- Location: Sweden, Kiruna
-

Eddie - Frequent Poster
- Posts: 6212
- Joined: 16 Oct 2006 21:26
- Location: Terre Haute, Ind.
Thanks for the comments! 
Recently I removed the gas tank because I had decided to swap the old filler tube grommet for a new one. As you can see from the pic it was a good decision. The old one was quite cracked. I can´t say that it came as a surprise though. Why I didn´t swap it in the first place? The sources over here in Sweden used to be pricey or very pricey charging zillions for every tiny little detail so I thought I could spare me that expense. I have got a small problem: There is an extra seal on the new one. Which way is it supposed to be directed? Against the fuel or against the air/rain-water dripping along the fuel filler pipe? I think I know the answer but I am not sure. Any help?

Recently I removed the gas tank because I had decided to swap the old filler tube grommet for a new one. As you can see from the pic it was a good decision. The old one was quite cracked. I can´t say that it came as a surprise though. Why I didn´t swap it in the first place? The sources over here in Sweden used to be pricey or very pricey charging zillions for every tiny little detail so I thought I could spare me that expense. I have got a small problem: There is an extra seal on the new one. Which way is it supposed to be directed? Against the fuel or against the air/rain-water dripping along the fuel filler pipe? I think I know the answer but I am not sure. Any help?
- christer
- Ghost 48
- Posts: 2133
- Joined: 13 Oct 2006 19:52
- Location: Sweden
The new one (NOS according to the seller) looks identical compared to the old one except for the part to the left who has rounded edges.
An illustration (very sharp eyes are required) in the parts manual gives the impression the seal with rounded edges should seal on the fuel side, that is go in first when you mount the grommet on the tank. I ask this just to be sure.
An illustration (very sharp eyes are required) in the parts manual gives the impression the seal with rounded edges should seal on the fuel side, that is go in first when you mount the grommet on the tank. I ask this just to be sure.
- christer
- Ghost 48
- Posts: 2133
- Joined: 13 Oct 2006 19:52
- Location: Sweden
-

dave-r - Grumpy Old Man
- Posts: 9842
- Joined: 12 Oct 2003 21:45
- Location: North of the Tyne, England
116 posts
• Page 3 of 4 • 1, 2, 3, 4
 I managed to crack one of them before I decided to use the one I had laying on the shelf.