Page 1 of 1

radio and heater control bezel finish

PostPosted: 21 Nov 2011 2:10
by gregvega
I'm trying to find out what type of finish should be on the radio and heater switch bezels. I have a 70 r/t and the bezel seem to have a texture on the front of the black plastic. Its pealed alot and I dont know if it should be bare, flat black paint or some type of texture spray. Any ideas?

Re: radio and heater control bezel finish

PostPosted: 21 Nov 2011 12:48
by fbernard
You can duplicate this somehow with rattle-can, black wrinkle paint and a hairdryer (it helps make the wrinkles tighter)

Re: radio and heater control bezel finish

PostPosted: 21 Nov 2011 13:39
by burdar
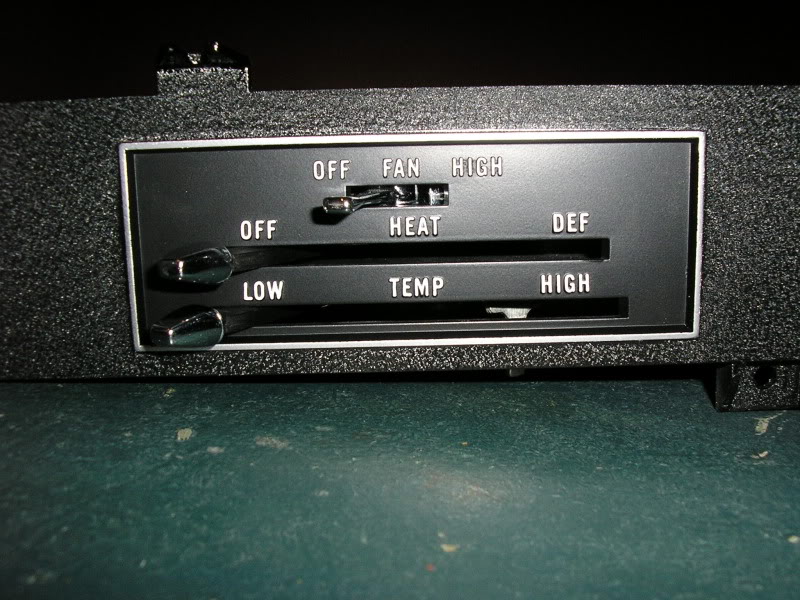
Wrinkle paint is correct. The factory finish veried quite a bit. My bezels were heavily wrinkled. I've seen some that weren't wrinkled much at all. I used SEM Trim Black on the inside(around the lettering)and VHT Wrinkle paint on the outside.

Image

Re: radio and heater control bezel finish

PostPosted: 21 Nov 2011 15:18
by gregvega
Thanks, I thought about going wrinkle finish but mine looked like felt, must have been really worn. I've got a can of the VHT and will givve it a shot.

Re: radio and heater control bezel finish

PostPosted: 21 Nov 2011 23:47
by bill70j
The original in my '70 was a bit less "hammered," plus it also had the texture in the lettering inner box. We restored it with "Premium Rust Oleum Textured," and it came out pretty close to the original.

Re: radio and heater control bezel finish

PostPosted: 22 Nov 2011 4:38
by Jon
Those look great! What 's the trick to get the white lettering so clear?

Re: radio and heater control bezel finish

PostPosted: 22 Nov 2011 9:58
by christer
gregvega wrote:I'm trying to find out what type of finish should be on the radio and heater switch bezels. I have a 70 r/t and the bezel seem to have a texture on the front of the black plastic. Its pealed alot and I dont know if it should be bare, flat black paint or some type of texture spray. Any ideas?


I found a similar discussion on another forum:

http://www.cuda-challenger.com/cc/index ... ic=19720.0

Re: radio and heater control bezel finish

PostPosted: 22 Nov 2011 10:02
by christer
Jon wrote:Those look great! What 's the trick to get the white lettering so clear?


A couple of years ago :s006: I did a similar resto myself.
viewtopic.php?f=15&t=6613&p=27150&hilit=bezel&sid=aa7b4be25cce38eb387eb9447c64aa6b#p27150

Re: radio and heater control bezel finish

PostPosted: 22 Nov 2011 13:55
by burdar
I used a white paint pen with a medium sized tip. I had to go over each letter twice to get them looking crisp.

Re: radio and heater control bezel finish

PostPosted: 22 Nov 2011 15:37
by bill70j
Those look great! What 's the trick to get the white lettering so clear?


Over the years, the edges of the plastic lettering on both my heater bezel and radio bezel had rounded over from use, so the first thing we did was to square the face of the lettering by carefully block sanding with 600 grit wet-or-dry paper.

Then we "stenciled" the white onto the letters with the following procedure: First we contact cemented a piece of smooth brown paper to a perfectly flat (jointed) block of wood, using a veneer roller to ensure the paper was fully glued to the block. Second, we spray bombed the brown paper with a thin coat of white oil-based exterior gloss enamel. And finally, after the gloss paint had become tackey, we pressed the sprayed paper against the squared lettering, thereby transferring the paint.

For the silver highlighting around the heater bezel letter box, we used a silver paint pencil that we got from an art store, and carefully painted it by hand. Hope this helps. I also include a pic of my radio bezel below.

And Jon, by the way, we're in Los Osos, just up the road from you. Will be looking for your ride.
Re: radio and heater control bezel finish

PostPosted: 23 Nov 2011 3:43
by Jon
Thanks for the information! Looks like another rainy day project. :)

Re: radio and heater control bezel finish

PostPosted: 23 Nov 2011 10:06
by dave-r
Another way would be to spray paint the lettering first. Then when completely dry (after a week) spray the black. When that is touch dry just polish off the tops of the lettering to leave the white.

Re: radio and heater control bezel finish

PostPosted: 23 Nov 2011 13:48
by burdar
I tried that....just like Dave Walden did with his Challenger. It didn't work. I used Mineral Spirits to try and get the paint off. Maybe I should have tried a different solvent. That SEM Trim Black is some pretty durable paint.

Re: radio and heater control bezel finish

PostPosted: 23 Nov 2011 14:55
by dave-r
I might have tried 1500 grit paper and then T-cut rather than solvent.

Re: radio and heater control bezel finish

PostPosted: 23 Nov 2011 19:58
by Jon
Any tips restoring R/T badges? I tried hand painting with a brush once, it didn't flow out to well though. Two colors, red and black with chrome trim in between. :s006:

Re: radio and heater control bezel finish

PostPosted: 23 Nov 2011 21:41
by burdar
I've heard of some people using a syringe to inject the paint into the recessed areas. The paint should flow out to the edges. Experimenting with the amount of paint injected AND how much it's thinned would be required for the best result.

Re: radio and heater control bezel finish

PostPosted: 23 Nov 2011 22:58
by bill70j
Any tips restoring R/T badges? I tried hand painting with a brush once, it didn't flow out to well though. Two colors, red and black with chrome trim in between.


Unlike most of you lucky dogs, I don't have the luxury of owning an R/T so never had to hassle with that emblem. But I have had luck re-doing the emblems on the plain-jane JH Challenger hood and on the door inserts -- plus all the scripted exterior "Challenger" emblems.

First, I place the emblem in a position that makes it comfortable to work on while sitting, because it takes a long time. Then I get one of those magnifying glasses that is mounted on the end of a flexible clamping arm -- and focus it on the emblem. Then I apply the paint using the pointed end of a round toothpick. In most places you can glob some paint on and spread it carefully; but in other places you need to apply only the amount that will adhere to the pointed end of the toothpick. I have had luck with Testor's gloss red and gloss black, thinned just enough to flow the "brush" marks. Both adhered well and have not faded with time.

Re: radio and heater control bezel finish

PostPosted: 24 Nov 2011 2:52
by Jon
Makes sense, thinning the paint to flow out and look uniform is the key. Wonder how the factory suppliers did it way back when. Stencils might be an option. Surly not masking as it is way too time consuming.

Re: radio and heater control bezel finish

PostPosted: 24 Nov 2011 10:32
by dave-r
I flowed model paint into my R/T badges but should have removed all the old brushed on paint (from a previous attempt) first because when it dried the brush painted surface showed through so it didn't look any better. :oops:

Never got around to trying it again before selling the car.