62 posts
• Page 1 of 3 • 1, 2, 3
Question on brakes
As discussed previously in another thread my brakes are a bit soft and pulling to one side when applied.
With the help of my dad I ran the length of the street and applied the brakes hard- the drivers side wheel continued to roll and the opposite side locked up- so I guess the driver side one is seized or stuck perhaps?
I took off the front wheels and gave them a spin the driver side drum spun and locked when brakes applied but the opposite side drum was a bit stiff when spun but also locked when the brakes were applied.
Notes - no sign of a leak as no fluild present on either of them.
Notes the spring circling the drum was present on the driver side but missing on the other side- must have lost it on the road maybe- what is the springs purpose by the way?
Any ideas what the problem could be guys?
Could lack of use cause the brake shoe to seize in the drum?
How are the drum covers take off to view the set up inside, I dont want to mess with it I just want to see inside.
-

RedRaven - Frequent Poster
- Posts: 1995
- Joined: 15 Jul 2007 20:09
- Location: THE DOG HOUSE
Re: Question on brakes
The spring is a comfort thingy (anti-vibration I'd say)
You can check the brake shoe lining condition, or you can try to adjust the brake shoe position on your driver side drum (there are two access slots at the bottom of the backing plate, where you can rotate the adjuster with a screwdriver - kind of hard to explain if you don't know what it looks like, pop one drum and look at it, it's a small cogwheel, it can only turn one way).
You may also have to turn the adjuster back (two screwdrivers for this one) if the shoes are too far out and you can't pull the drum.
-

fbernard - Frequent Poster
- Posts: 733
- Joined: 19 Oct 2003 20:41
- Location: Paris, France
Drum brakes need regular adjusting when they get old. It sounds like they probably just need adjusting.
Be careful because if you adjust them up too much the shoes will drag on the inside of the drum and the friction heat will size the brakes up after a few miles.
Yes the spring around the outside is an anti-rattle type thing. You don't need it.
One of the resons I fitted disc brakes on my Challenger was that the car would never stop straight doing an emergancy type stop despite careful adjusting. In fact it always went sideways. It was OK with normal braking though.
-

dave-r - Grumpy Old Man
- Posts: 9842
- Joined: 12 Oct 2003 21:45
- Location: North of the Tyne, England
Ok then my mind is at easy with the spring issue thanks.
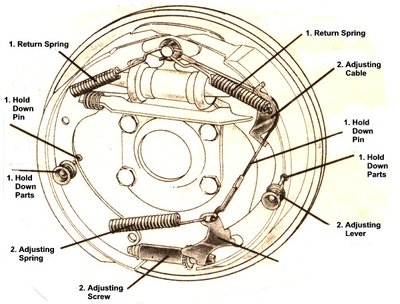
What tools are required for adjustment?
I found this picture on Jim Auto Parts-
Is it just a matter of turning the adjuster screws to alter the shoe position?
What tools are required for adjustment?
I found this picture on Jim Auto Parts-
Is it just a matter of turning the adjuster screws to alter the shoe position?
-

RedRaven - Frequent Poster
- Posts: 1995
- Joined: 15 Jul 2007 20:09
- Location: THE DOG HOUSE
yes you just turn the adjusting cylinder down the bottom -its obvious as you can see the shoes move out when you turn it, they don't like moving back in though unless you give the whole assy a jiggle. Back drums are easier to adjust than front. Keep adjusting the shoes out (about 1/2 turn at a time) and keep putting the hub/drum back on until it is a slight frictional fit and the drum will rotate freely with just a slight swishing noise inside. If you have trouble putting the drum back on then you have made them too wide and will need to screw them back in again.
That diagram looks like a different drum to my 8 3/4 rear drum, mine have an extra spring down the bottom going between the shoes. Quite long it is.
That diagram looks like a different drum to my 8 3/4 rear drum, mine have an extra spring down the bottom going between the shoes. Quite long it is.
-

Goldenblack440 - Frequent Poster
- Posts: 600
- Joined: 08 Jul 2007 18:57
Found this. Comments?? Dave should I take off the remaining spring on the driver side?
-
 Drum Brake Adjustments.pdf
- (336.28 KiB) Downloaded 96 times
-

RedRaven - Frequent Poster
- Posts: 1995
- Joined: 15 Jul 2007 20:09
- Location: THE DOG HOUSE
I believe that diagram is of the rear. I don't think the fronts have the automatic adjusters on them do they?
The spring around the drum is to help stop squeeking too I think.
To get the drum off, you take the dust cover off, remove the cotter pin, remove the nut and take out the outer bearing. You will probably have to loosen up the adjustment on the shoes to get the drum off. A lip forms on the edge of the drum(where the shoes don't hit) making it impossible to remove if you don't back off the shoes.
A trick to getting the inner bearing out(as well as the dust seal) is to put the nut back on the spindle once the outer bearing has been removed. Slide the drum off the spindle while pushing down at the same time. The nut will catch on the bearing and will pull the seal and bearing out of the drum for you. It is a lot easier than using a hammer and a punch.
Inspect everything very well. IF you need new shoes...buy a spring kit while your at the parts store. It's sooo much nicer working with new springs. Also be aware that older brake linings are made of asbestose. Try not to breath it in. Use a lot of brake cleaner to spray everything down. This keeps the dust to a minimum.
Remember to lube the contact points on the backing plates before installing new shoes. It's also a good idea to do that before you put it back together anyway. I use "anti-seeze"
Finally have the drums turned to get rid of the "lip" and to remove any grooves that have developed.
-
burdar - Frequent Poster
- Posts: 429
- Joined: 24 Mar 2009 17:27
- Location: Iowa
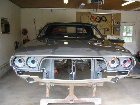
Whoa! Big fella! What are you trying to do?
Don't mess with those nuts on the back. Make sure they are tight, any split pins re-installed, and leave well alone.
To get the front drums off you need to prise off that aluminium dome thing center front on the drum. Under there (and under a lot of grease) is a big nut with a split pin through it.
Remove the split pin.
Remove the castellated cover on the nut. Then undo the nut.
The drum and outer wheel bearing will come right off.
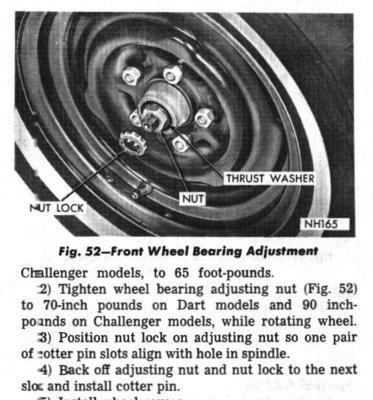
When you come to put that nut back on you need to follow a simple procedure to set the bearing load. I will have to look that up.
Don't mess with those nuts on the back.
 Make sure they are tight, any split pins re-installed, and leave well alone.
To get the front drums off you need to prise off that aluminium dome thing center front on the drum. Under there (and under a lot of grease) is a big nut with a split pin through it.
Remove the split pin.
Remove the castellated cover on the nut. Then undo the nut.
The drum and outer wheel bearing will come right off.
When you come to put that nut back on you need to follow a simple procedure to set the bearing load. I will have to look that up.
-

dave-r - Grumpy Old Man
- Posts: 9842
- Joined: 12 Oct 2003 21:45
- Location: North of the Tyne, England
You will have to look at the wheel cylinders to see if they are leaking. There is NOT always a visable leak on the outside.
Condensation from humidity can be a problem too if there is a lot of dust buildup inside the drums. Taking it appart and cleaning everything up will take care of that if that is the problem.
Condensation from humidity can be a problem too if there is a lot of dust buildup inside the drums. Taking it appart and cleaning everything up will take care of that if that is the problem.
-

burdar - Frequent Poster
- Posts: 429
- Joined: 24 Mar 2009 17:27
- Location: Iowa
-

dave-r - Grumpy Old Man
- Posts: 9842
- Joined: 12 Oct 2003 21:45
- Location: North of the Tyne, England
Make sure you follow Dave's instructions on reinstalling the nut. Getting it too tight will cause the bearings to run hot and fail...not getting it tight enough will cause the wheel to be loose and the bearing will fail.
For those of us who have done many brake jobs...we can reinstall the nut by "feel." It's impossible to explain on-line. You just have to do enough of them. Go with what Dave posted.
Oh...almost forgot...remember to re-pak the wheel bearings.
For those of us who have done many brake jobs...we can reinstall the nut by "feel." It's impossible to explain on-line. You just have to do enough of them. Go with what Dave posted.
Oh...almost forgot...remember to re-pak the wheel bearings.
-

burdar - Frequent Poster
- Posts: 429
- Joined: 24 Mar 2009 17:27
- Location: Iowa
We use a 'Wash Pit' in our shop. Dont spray it down with any high pressure source including spray can cleaners! A Garden hose gently running does the trick. If you breathe the dust you'll never get it out of your lungs Wayne. Muay Thai gone....no joke dude,be careful with that shit,,you gotta assume it ALL contains asbestos fibers! It cant be removed from the lungs once breathed in. Good Luck
-

Eddie - Frequent Poster
- Posts: 6212
- Joined: 16 Oct 2006 21:26
- Location: Terre Haute, Ind.
-

RedRaven - Frequent Poster
- Posts: 1995
- Joined: 15 Jul 2007 20:09
- Location: THE DOG HOUSE
burdar wrote:Make sure you follow Dave's instructions on reinstalling the nut. Getting it too tight will cause the bearings to run hot and fail...not getting it tight enough will cause the wheel to be loose and the bearing will fail.
For those of us who have done many brake jobs...we can reinstall the nut by "feel." It's impossible to explain on-line. You just have to do enough of them. Go with what Dave posted.
Oh...almost forgot...remember to re-pak the wheel bearings.
Now thats the stuff that makes me nervous.

-

RedRaven - Frequent Poster
- Posts: 1995
- Joined: 15 Jul 2007 20:09
- Location: THE DOG HOUSE
burdar wrote: Taking it apart and cleaning everything up will take care of that if that is the problem.
yes, the good thing about cleaning out drum brakes (compared to cleaning greased up old engine parts) is that they clean up really easy. Just use any cheap degreaser, either alkaline or solvent based, and spray on lightly keeping your face away from any dust so it wets everything down. Then give it a good soaking and scrub with a tooth brush and short brush, then hose down with a garden hose. You will see all your brake springs in their true colours, red, green yellow etc.
-

Goldenblack440 - Frequent Poster
- Posts: 600
- Joined: 08 Jul 2007 18:57
You will see all your brake springs in their true colours, red, green yellow etc
Or around here...rust colored. That's why I always buy a spring kit when working on drum brakes. I've seen too many springs rust and fall apart. You don't want to be driving very fast when the shoes come loose inside the drum.
-

burdar - Frequent Poster
- Posts: 429
- Joined: 24 Mar 2009 17:27
- Location: Iowa
burdar wrote:That's why I always buy a spring kit when working on drum brakes. I've seen too many springs rust and fall apart.
hey Burdar, i broke a spring on my 8 3/4 , its the long lower one that holds the shoes together (see pic), i think i might need a spring kit for it. As you have bought them before, where is the best place to go for them? I am in Australia, so i only really know about Mancini, which is general Mopar, but not any brakes- only places. How much should i pay for a spring kit (per side). Thanks.
-

Goldenblack440 - Frequent Poster
- Posts: 600
- Joined: 08 Jul 2007 18:57
WHen I was a mechanic we delt with Car Quest and NAPA. Both of those comanies should have the spring kits. One kit does both sides. I have no idea on the price but I think it's pretty cheap.
I don't know what parts stores you have over there but I'm sure they can get you what you need.
I don't know what parts stores you have over there but I'm sure they can get you what you need.
-

burdar - Frequent Poster
- Posts: 429
- Joined: 24 Mar 2009 17:27
- Location: Iowa
burdar wrote:How do you go about ordering dirrect? I can get you the number of some local parts stores but it would probably be cheaper to find someone on the west coast wouldn't it? I'm smak dab in the middle of the country.
Oh no, its simple, if you let me know the number of anyone in the USA, even your local parts store, i can just ring them straight up, say who i am and that i am in Australia and could they please post me the item. Its the same postage form anywhere in the USA to anywhere in Australia. I pay for the postage of course and their handling fees. All i need to do is find Americans who are willing to post overseas. It only means filling out a simple small customs form that takes about 4 minutes. So you don't have to do anything -except find me a few phone numbers.
The trouble is, the 8 3/4 diff is not very common over this way -if some diff places have not heard of them! As you can imagine, i don't take any work to them !! Thanks.
OR i can just do a Google search for NAPA, that might be easier.
-

Goldenblack440 - Frequent Poster
- Posts: 600
- Joined: 08 Jul 2007 18:57
Problem with brakes pulling to one side when driving
Ok guys,
I got the finger out and got the best bad news Ive had all week
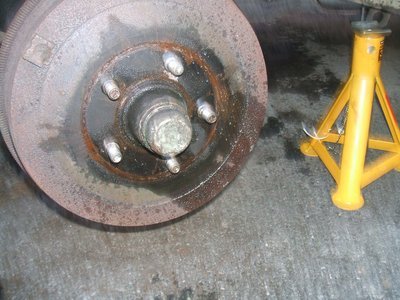
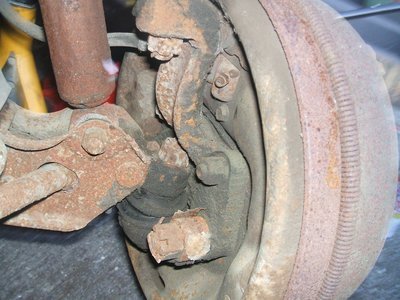
I plucked up the courage to whip of the drums on the challenger and low and behold bye bye pepsi cola hello holy wine I found brake fluid!!
Here are the results.
The left one I adjusted by turning the bar at the base of the drum my dad worked the pedal. I adjusted then so I could just about fit the drums back on.
The right side one I did the same and when I took off the cover it seemed tighter and undisturbed- the nut was lose which may be the reason why I lost the spring.
Anyway I did notice that the whole set up on the right side drum seemed tighter than the left side one -the shoe on the right of the drum on the drivers side seemed to be riding higher than the one on the left side of the drum.
When I got my dad to push the pedal it moved as suspected but they it began to leak fluid!!
So at least I know where the issues are- I must say Im getting a bit more confident working on the car without getting cocky- I will have to get someone to do a proper job on the brakes.
Do the pads look worn to you!!
Last edited by RedRaven on 31 Jul 2009 22:05, edited 1 time in total.
-

RedRaven - Frequent Poster
- Posts: 1995
- Joined: 15 Jul 2007 20:09
- Location: THE DOG HOUSE
By "dust cover" do you mean the drum?
Don't push the brake pedal with the drum off otherwise you will just push the hydraulic pistons out of the brake cylinders and it will leak fluid everywhere.....
Am I too late?
Don't push the brake pedal with the drum off otherwise you will just push the hydraulic pistons out of the brake cylinders and it will leak fluid everywhere.....
Am I too late?

-

dave-r - Grumpy Old Man
- Posts: 9842
- Joined: 12 Oct 2003 21:45
- Location: North of the Tyne, England
The outside of the shoes look to be a decent thickness but how old are they? They probablly have some grooves in them and I have seen the friction material break away from its backing before. I would just go ahead and put all new shoes on it. I don't think you are looking at a whole lot of money here. You arn't going to want to re-use the shoes anyway if you re-surface the drums.
Look at it this way, do you really want to risk your Challenger being damaged by cheaping out on the brakes? That is one area where I would spend the money to make sure everything is working properly.
Look at it this way, do you really want to risk your Challenger being damaged by cheaping out on the brakes? That is one area where I would spend the money to make sure everything is working properly.
-

burdar - Frequent Poster
- Posts: 429
- Joined: 24 Mar 2009 17:27
- Location: Iowa
Measure the diameter of the inside of the drums. They will either be 10 inches or 11 inches diameter. The heavy duty drums fitted to big block R/T models were 11 inches.
Here is something I wrote years ago;
Drum brakes were standard and measured 10 X 2.5 inches front and rear or 11 X 3 front and 11 X 2.5 rear on the R/T.
Optional front brakes were 10.75 inch vented discs with single piston, floating, pin type callipers. These discs were of a two piece design which tended to warp with heat under (very) heavy use but returned to normal after cooling. This problem was not put right until the start of the 1973 model year.
Where front disc brakes were fitted the rear drum size was 10 X 2.5.
-

dave-r - Grumpy Old Man
- Posts: 9842
- Joined: 12 Oct 2003 21:45
- Location: North of the Tyne, England
62 posts
• Page 1 of 3 • 1, 2, 3
